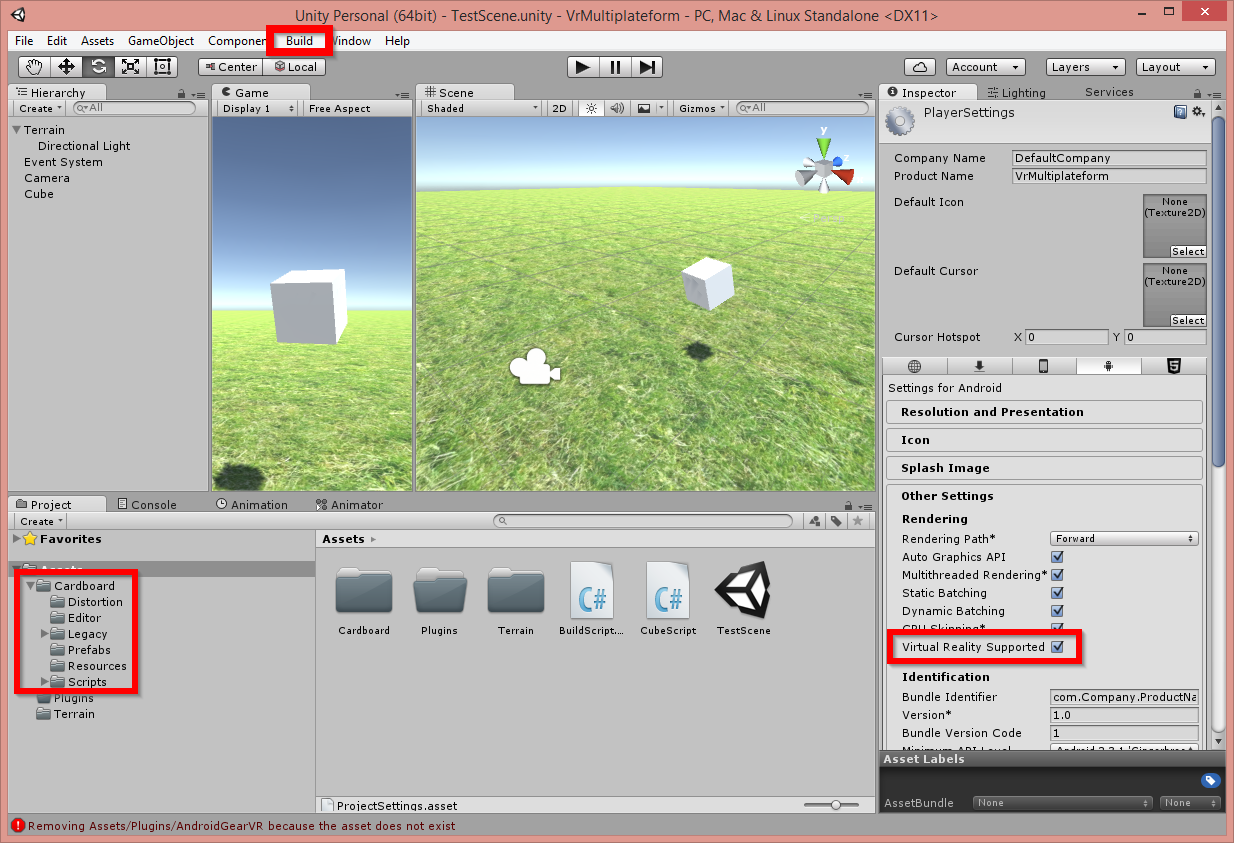
This small project shows how to build an Unity project that support both the Cardboard SDK and Unity Virtual Reality native support.
Only the GearVR is currently supported but all other headset that Unity support can be easily managed too (HTC Vive, Oculus Rift, ...)
Here are the different steps to reproduce this sample project
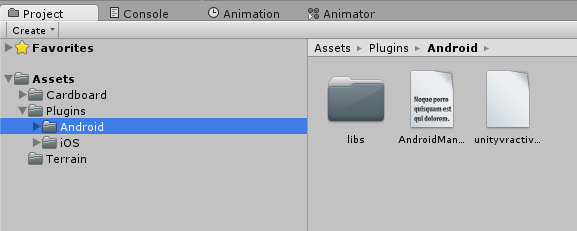
After importing the Cardboard SDK you can see that it creates a folder in Assets/Plugins/Android:
Copy and rename this folder in Assets/Platforms/.AndroidCardboard . We add a dot before the folder name so Unity will ignore it. Unity generate a plugin conflict error when he try to compile this folder.
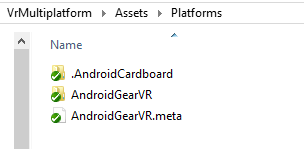
Do the same steps for the GearVR: Get the Oculus Signature File then place it into the folder Assets/Platforms/AndroidGearVR/assets/.
You should have something like this:
The two folders we have just created will automatically replace the default Android Plugins during the compilation (in Assets/Plugins/Android).
We now need to add Preprocessor Directives to ignore SDK functions when the project compilation is set to Virtual Reality Mode in Unity :
#if NATIVE_VR_SUPPORTED
    return;
#endif
This code is added in the followed places:
-
File: Cardboard.cs
- Property accessor:
SDK
- Property accessor:
-
File: StereoController.cs
- Function:
Awake() - Function:
OnPreCull()
- Function:
-
File: GazeInputModule.cs
- Function
ShouldActivateModule() - Function
DeactivateModule() - Function
Process() - Function
CastRayFromGaze()
- Function
For more informations see commit: Added precompilation directive in Cardboard SDK scripts
And Fix GazeInput compatibility without Cardboard
This issue can be usefull too: Fix cardboard issue (googlesamples/cardboard-unity#123)
Firsts lines contains your project name, bundle identifier, output folder and the output filename for all the platforms. Theses informations are going to be used during the compilation:
private static string bundleIdentifier = "com.MyCompany.MyProductName";
private static string productName = "TestScene";
private static string outputFolder = "bin/";
private static string outputFilenameAndroidCardboard = outputFolder + BuildScript.productName + "Cardboard.apk";
private static string outputFilenameAndroidGearVR = outputFolder + BuildScript.productName + "GearVR.apk";
The next three lines contains path to destination folder (android plugins) and folders where we saved the Cardboard SDK Plugins and GearVR Signature Files (see step 1). Before the compilation the default Android Plugins will be replaced by the appropriate one.
 private static string androidFolderDestination = Application.dataPath + "/Plugins/Android/";
 private static string androidFolderCardboard = Application.dataPath + "/Plateforms/.AndroidCardboard/";
 private static string androidFolderGearVR = Application.dataPath + "/Plateforms/AndroidGearVR/";
Uncomment next three line if you want to save your Keystore Path, UserName and Password in this file (not recommended). If you don't you will have to enter your credential in the Player Settings -> Publishing Settings panel the first time you compile your project.
//private static string keystorePath;
//private static string username;
//private static string password;
Next variable is used if you make multiple release the same day. The play store don't allow multiple release with same id. (Note: the version number is generated from the date and this buildNumber with the following format: YYYYMMDDB):
private static int buildNumber = 0;Next two function add a Menu Item on the Unity top menu bar:

 [MenuItem("Build/Cardboard")]
 public static void BuildCardboard()
 {
	 Init ();
	 SwapAndroidPluginFolder (androidFolderCardboard); // Change the Android Plugin
	 PlayerSettings.virtualRealitySupported = false; // Disable the native Unity VR support
	 PlayerSettings.SetScriptingDefineSymbolsForGroup (BuildTargetGroup.Android, ""); // Remove precompilation symbol
	 Build(BuildTarget.Android, outputFilenameAndroidCardboard); // Build the project
 }

 [MenuItem("Build/GearVR")]
 public static void BuildGearVR()
 {
	 Init ();
	 SwapAndroidPluginFolder (androidFolderGearVR); // Change the Android Plugin
	 PlayerSettings.virtualRealitySupported = true; // Enable the native Unity VR support
	 PlayerSettings.SetScriptingDefineSymbolsForGroup (BuildTargetGroup.Android, "NATIVE_VR_SUPPORTED"); // Add a precompilation symbol to disable the cardboard SDK
	 Build(BuildTarget.Android, outputFilenameAndroidGearVR); // Build the project
 }
Next function set some basic Player Settings (Add yours here)
 private static void Init()
 {
	 var now = DateTime.Now;
	 var versionNumber = now.Year.ToString("D4") + now.Month.ToString("D2") + now.Day.ToString("D2") + buildNumber.ToString("D2"); //Version number: YYYYMMDDB

	 PlayerSettings.productName = productName;
	 PlayerSettings.bundleIdentifier = bundleIdentifier;
	 PlayerSettings.bundleVersion = versionNumber;
	 PlayerSettings.Android.bundleVersionCode = int.Parse(versionNumber);

	//PlayerSettings.Android.keystoreName = keystorePath;
	//PlayerSettings.Android.keyaliasName = username;
	//PlayerSettings.Android.keyaliasPass = password;
}
This function restore the SDK's saved folders to Asset -> Android -> Plugins depending on the select SDK
static void SwapAndroidPluginFolder(string folderSource) {

	if (Directory.Exists (androidFolderDestination))
		Directory.Delete (androidFolderDestination);

	if (Directory.Exists (folderSource)) {
		FileUtil.CopyFileOrDirectory (folderSource, androidFolderDestination);
		AssetDatabase.Refresh ();
	} else {
		Debug.LogError("Source folder: " + folderSource + " Doesn't exist");
	}
}
Finally the function build get all the scenes from the Build Settings window and add it to the BuildPipeline with the previous parameters.

private static void Build(BuildTarget target, string output){
var outputDirectory = output.Remove (output.LastIndexOf ("/"));
if (!Directory.Exists(outputDirectory))
Directory.CreateDirectory(outputDirectory);
// Get all the scenes
string[] levelList = EditorBuildSettings.scenes.Where(s => s.enabled).Select(s => s.path).ToArray();
string scenesNames = "(";
foreach( string s in levelList)
scenesNames += s.Remove( s.IndexOf(".unity") ) + ", ";
if (scenesNames.Length <= 1) {
Debug.LogError("No scenes found! Please add scenes (Files -> Build Settings -> Scenes in build");
return;
}
scenesNames = scenesNames.Remove (scenesNames.Length - 2) + ")";
Debug.Log("Building Platform: " + target.ToString() );
Debug.Log("Building Target: " + output);
Debug.Log("Scenes Processed: " + levelList.Length );
Debug.Log("Scenes Names: " + scenesNames);
// Build the project
string results = BuildPipeline.BuildPlayer( levelList, output, target, BuildOptions.None );
if ( results.Length == 0 )
Debug.Log("No Build Errors" );
else
Debug.LogError("Build Error:" + results);
}The script BuildScript.cs has comments in it and is (i guess) easy to understand.
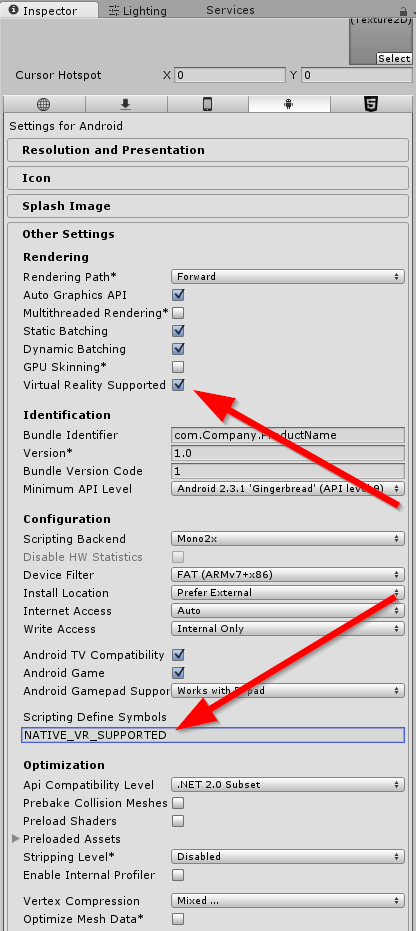
Be carefull when you build for GearVR you will not be able to test your project in Unity. You will have to deactivate the Unity native mode and remove the Scripting define Symbols to get back to the Cardboard system. Here is where theses properties are:
That's all ! Enjoy you Virtual Reality builds on all Platforms ! feel free to make pull request for new platforms! :)
Thanks !


