A lightweight and fast UDP to TCP obfuscator.
- Phantun
- Latest release
- Overview
- Usage
- MTU overhead
- Version compatibility
- Documentations
- Performance
- Future plans
- Compariation to udp2raw
- License
Phantun is a project that obfuscated UDP packets into TCP connections. It aims to achieve maximum performance with minimum processing and encapsulation overhead.
It is commonly used in environments where UDP is blocked/throttled but TCP is allowed through.
Phantun simply converts a stream of UDP packets into obfuscated TCP stream packets. The TCP stack used by Phantun is designed to pass through most L3/L4 stateful/stateless firewalls/NAT devices. It will not be able to pass through L7 proxies. However, the advantage of this approach is that none of the common UDP over TCP performance killer such as retransmissions and flow control will occur. The underlying UDP properties such as out-of-order delivery are fully preserved even if the connection ends up looking like a TCP connection from the perspective of firewalls/NAT devices.
Phantun means Phantom TUN, as it is an obfuscator for UDP traffic that does just enough work to make it pass through stateful firewall/NATs as TCP packets.
Phantun is written in 100% safe Rust. It has been optimized extensively to scale well on multi-core systems and has no issue saturating all available CPU resources on a fast connection. See the Performance section for benchmarking results.
For the example below, it is assumed that Phantun Server listens for incoming Phantun Client connections at
port 4567 (the --local option for server), and it forwards UDP packets to UDP server at 127.0.0.1:1234
(the --remote option for server).
It is also assumed that Phantun Client listens for incoming UDP packets at
127.0.0.1:1234 (the --local option for client) and connects to Phantun Server at 10.0.0.1:4567
(the --remote option for client).
Phantun creates TUN interface for both the Client and Server. For Client, Phantun assigns itself the IP address
192.168.200.2 and fcc8::2 by default.
For Server, it assigns 192.168.201.2 and fcc9::2 by default. Therefore, your Kernel must have
IPv4/IPv6 forwarding enabled and setup appropriate iptables/nftables rules for NAT between your physical
NIC address and Phantun's Tun interface address.
You may customize the name of Tun interface created by Phantun and the assigned addresses. Please
run the executable with -h options to see how to change them.
Another way to help understand this network topology (please see the diagram above for an illustration of this topology):
Phantun Client is like a machine with private IP address (192.168.200.2/fcc8::2) behind a router.
In order for it to reach the Internet, you will need to SNAT the private IP address before it's traffic
leaves the NIC.
Phantun Server is like a server with private IP address (192.168.201.2/fcc9::2) behind a router.
In order to access it from the Internet, you need to DNAT it's listening port on the router
and change the destination IP address to where the server is listening for incoming connections.
In those cases, the machine/iptables running Phantun acts as the "router" that allows Phantun to communicate with outside using it's private IP addresses.
As of Phantun v0.4.1, IPv6 is fully supported for both TCP and UDP sides.
To specify an IPv6 address, use the following format: [::1]:1234 with
the command line options. Resolving AAAA record is also supported. Please run the program
with -h to see detailed options on how to control the IPv6 behavior.
Edit /etc/sysctl.conf, add net.ipv4.ip_forward=1 and run sudo sysctl -p /etc/sysctl.conf.
IPv6 specific config
net.ipv6.conf.all.forwarding=1 will need to be set as well.
Client simply need SNAT enabled on the physical interface to translate Phantun's address into one that can be used on the physical network. This can be done simply with masquerade.
Note: change eth0 to whatever actual physical interface name is
table inet nat {
    chain postrouting {
        type nat hook postrouting priority srcnat; policy accept;
        iifname tun0 oif eth0 masquerade
    }
}
Note: The above rule uses inet as the table family type, so it is compatible with
both IPv4 and IPv6 usage.
iptables -t nat -A POSTROUTING -o eth0 -j MASQUERADE
ip6tables -t nat -A POSTROUTING -o eth0 -j MASQUERADE
Server needs to DNAT the TCP listening port to Phantun's TUN interface address.
Note: change eth0 to whatever actual physical interface name is and 4567 to
actual TCP port number used by Phantun server
table inet nat {
    chain prerouting {
        type nat hook prerouting priority dstnat; policy accept;
        iif eth0 tcp dport 4567 dnat ip to 192.168.201.2
        iif eth0 tcp dport 4567 dnat ip6 to fcc9::2
    }
}
iptables -t nat -A PREROUTING -p tcp -i eth0 --dport 4567 -j DNAT --to-destination 192.168.201.2
ip6tables -t nat -A PREROUTING -p tcp -i eth0 --dport 4567 -j DNAT --to-destination fcc9::2
It is ill-advised to run network facing applications as root user. Phantun can be run fully
as non-root user with the cap_net_admin capability.
sudo setcap cap_net_admin=+pe phantun_server
sudo setcap cap_net_admin=+pe phantun_client
Note: Run Phantun executable with -h option to see full detailed options.
Note: 4567 is the TCP port Phantun should listen on and must corresponds to the DNAT
rule specified above. 127.0.0.1:1234 is the UDP Server to connect to for new connections.
RUST_LOG=info /usr/local/bin/phantun_server --local 4567 --remote 127.0.0.1:1234
Or use host name with --remote:
RUST_LOG=info /usr/local/bin/phantun_server --local 4567 --remote example.com:1234
Note: Server by default assigns both IPv4 and IPv6 private address to the Tun interface. If you do not wish to use IPv6, you can simply skip creating the IPv6 DNAT rule above and the presence of IPv6 address on the Tun interface should have no side effect to the server.
Note: 127.0.0.1:1234 is the UDP address and port Phantun should listen on. 10.0.0.1:4567 is
the Phantun Server to connect.
RUST_LOG=info /usr/local/bin/phantun_client --local 127.0.0.1:1234 --remote 10.0.0.1:4567
Or use host name with --remote:
RUST_LOG=info /usr/local/bin/phantun_client --local 127.0.0.1:1234 --remote example.com:4567
IPv6 specific config
RUST_LOG=info /usr/local/bin/phantun_client --local 127.0.0.1:1234 --remote [fdxx::1234]:4567
Domain name with AAAA record is also supported.
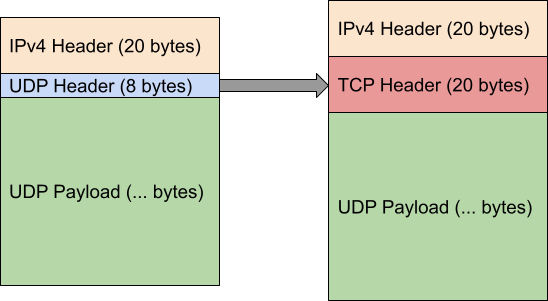
Phantun aims to keep tunneling overhead to the minimum. The overhead compared to a plain UDP packet is the following (using IPv4 below as an example):
Standard UDP packet: 20 byte IP header + 8 byte UDP header = 28 bytes
Obfuscated packet: 20 byte IP header + 20 byte TCP header = 40 bytes
Note that Phantun does not add any additional header other than IP and TCP headers in order to pass through stateful packet inspection!
Phantun's additional overhead: 12 bytes. I other words, when using Phantun, the usable payload for
UDP packet is reduced by 12 bytes. This is the minimum overhead possible when doing such kind
of obfuscation.
For people who use Phantun to tunnel WireGuard® UDP packets, here are some guidelines on figuring out the correct MTU to use for your WireGuard interface.
WireGuard MTU = Interface MTU - IPv4 header (20 bytes) - TCP header (20 bytes) - WireGuard overhead (32 bytes)
or
WireGuard MTU = Interface MTU - IPv6 header (40 bytes) - TCP header (20 bytes) - WireGuard overhead (32 bytes)
For example, for a Ethernet interface with 1500 bytes MTU, the WireGuard interface MTU should be set as:
IPv4: 1500 - 20 - 20 - 32 = 1428 bytes
IPv6: 1500 - 40 - 20 - 32 = 1408 bytes
The resulted Phantun TCP data packet will be 1500 bytes which does not exceed the interface MTU of 1500. Please note it is strongly recommended to use the same interface MTU for both ends of a WireGuard tunnel, or unexpected packet loss may occur and these issues are generally very hard to troubleshoot.
While the TCP stack is fairly stable, the general expectation is that you should run same minor versions of Server/Client of Phantun on both ends to ensure maximum compatibility.
For users who wish to use fake-tcp library inside their own project, refer to the documentations for the library at:
https://docs.rs/fake-tcp.
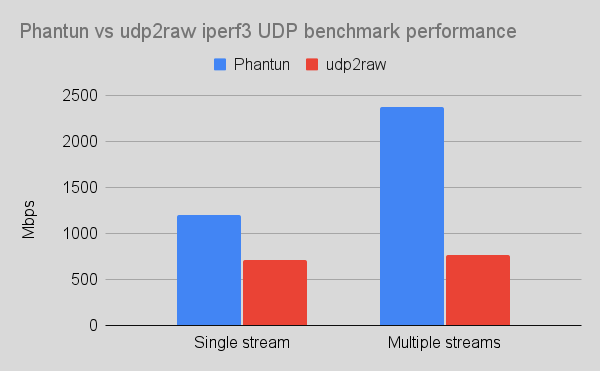
Performance was tested on 2 AWS t4g.xlarge instances with 4 vCPUs and 5 Gb/s NIC over LAN. nftables was used to redirect
UDP stream of iperf3 to go through the Phantun/udp2raw tunnel between two test instances and MTU has been tuned to avoid fragmentation.
Phantun v0.3.2 and udp2raw_arm_asm_aes 20200818.0 was used. These were the latest release of both projects as of Apr 2022.
Test command: iperf3 -c <IP> -p <PORT> -R -u -l 1400 -b 1000m -t 30 -P 5
| Mode | Send Speed | Receive Speed | Overall CPU Usage |
|---|---|---|---|
| Direct (1 stream) | 3.00 Gbits/sec | 2.37 Gbits/sec | 25% (1 core at 100%) |
| Phantun (1 stream) | 1.30 Gbits/sec | 1.20 Gbits/sec | 60% (1 core at 100%, 3 cores at 50%) |
udp2raw (cipher-mode=none auth-mode=none disable-anti-replay) (1 stream) |
1.30 Gbits/sec | 715 Mbits/sec | 40% (1 core at 100%, 1 core at 50%, 2 cores idling) |
| Direct connection (5 streams) | 5.00 Gbits/sec | 3.64 Gbits/sec | 25% (1 core at 100%) |
| Phantun (5 streams) | 5.00 Gbits/sec | 2.38 Gbits/sec | 95% (all cores utilized) |
udp2raw (cipher-mode=none auth-mode=none disable-anti-replay) (5 streams) |
5.00 Gbits/sec | 770 Mbits/sec | 50% (2 cores at 100%) |
Writeup on some of the techniques used in Phantun to achieve this performance result: Writing Highly Efficient UDP Server in Rust.
- Load balancing a single UDP stream into multiple TCP streams
- Integration tests
- Auto insertion/removal of required firewall rules
udp2raw is another popular project by @wangyu- that is very similar to what Phantun can do. In fact I took inspirations of Phantun from udp2raw. The biggest reason for developing Phantun is because of lack of performance when running udp2raw (especially on multi-core systems such as Raspberry Pi). However, the goal is never to be as feature complete as udp2raw and only support the most common use cases. Most notably, UDP over ICMP and UDP over UDP mode are not supported and there is no anti-replay nor encryption support. The benefit of this is much better performance overall and less MTU overhead because lack of additional headers inside the TCP payload.
Here is a quick overview of comparison between those two to help you choose:
| Phantun | udp2raw | |
|---|---|---|
| UDP over FakeTCP obfuscation | ✅ | ✅ |
| UDP over ICMP obfuscation | ❌ | ✅ |
| UDP over UDP obfuscation | ❌ | ✅ |
| Multi-threaded | ✅ | ❌ |
| Throughput | Better | Good |
| Layer 3 mode | TUN interface | Raw sockets + BPF |
| Tunneling MTU overhead | 12 bytes | 44 bytes |
| Seprate TCP connections for each UDP connection | Client/Server | Server only |
| Anti-replay, encryption | ❌ | ✅ |
| IPv6 | ✅ | ✅ |
Copyright 2021-2022 Datong Sun ([email protected])
Licensed under the Apache License, Version 2.0 <LICENSE-APACHE or https://www.apache.org/licenses/LICENSE-2.0> or the MIT license <LICENSE-MIT or https://opensource.org/licenses/MIT>, at your option. Files in the project may not be copied, modified, or distributed except according to those terms.


