Convolutional Neural Network And Multimodal Learning with Graphic User Interface for Digital Pathology
CINNAMON-GUI is an advanced digital pathology tool that leverages the power of convolutional neural networks (CNN) and multimodal learning to provide an intuitive graphical user interface for research professionals. This tool is designed to enhance the analysis and interpretation of pathological samples, making it easier to study various diseases. Cinnamon-GUI has evolved from its initial implementation with ipywidgets for Jupyter Lab and Notebook to a fully-fledged Shiny app in Python. This transition brings several advantages, notably an enhanced user interface and improved interactivity. The Shiny framework allows for dynamic and responsive web applications, making it more straightforward for users to interact with machine learning models and visualize results in real time. This update ensures that Cinnamon-GUI remains at the forefront of digital pathology tools, providing a more robust and user-friendly experience for researchers and clinicians. The user interface, built with Shiny components, provides a responsive and interactive experience. Images and plots are generated dynamically using base64 encoding, ensuring efficient memory usage and performance.
- Advanced CNN Models: Utilize state-of-the-art convolutional neural networks optimized for digital pathology.
- Multimodal Learning Capabilities: Cinnamon-Gui is predispoded for integrating multiple types of data to improve analysis accuracy (only for research purpose).
- User-Friendly Interface with Dynamic UI Components: Simplify the workflow with an intuitive GUI, designed for professionals without technical expertise.
- Image and Plot Display: The application dynamically generates and displays images and plots using base64 encoding, ensuring efficient memory usage and performance.
- Scalable Solutions: Suitable for individual researchers and large organizations.
This schematic illustrates two primary operational pathways within the Cinnamon-GUI platform: 1) Data Processing and Model Training Workflow, where users can load pickle files from datasets to train models and generate reports post-testing, and 2) Biospecimen Annotation and Analysis Workflow, where users can load annotated Pap smear images, with annotations applied using the integrated Labelme software. This workflow supports loading the corresponding JSON annotation files and converting them and the images into a pickle dataset format for subsequent cell type prediction and classification. Additionally, this pathway facilitates the creation and expansion of datasets, enhancing the utility of Cinnamon-GUI for diverse research applications.
- Log Initialization: The application initializes a log file (
log.txt) at startup to record all activities and messages throughout the session. - Notification System: Provides real-time notifications to users about the status and progress of various operations.
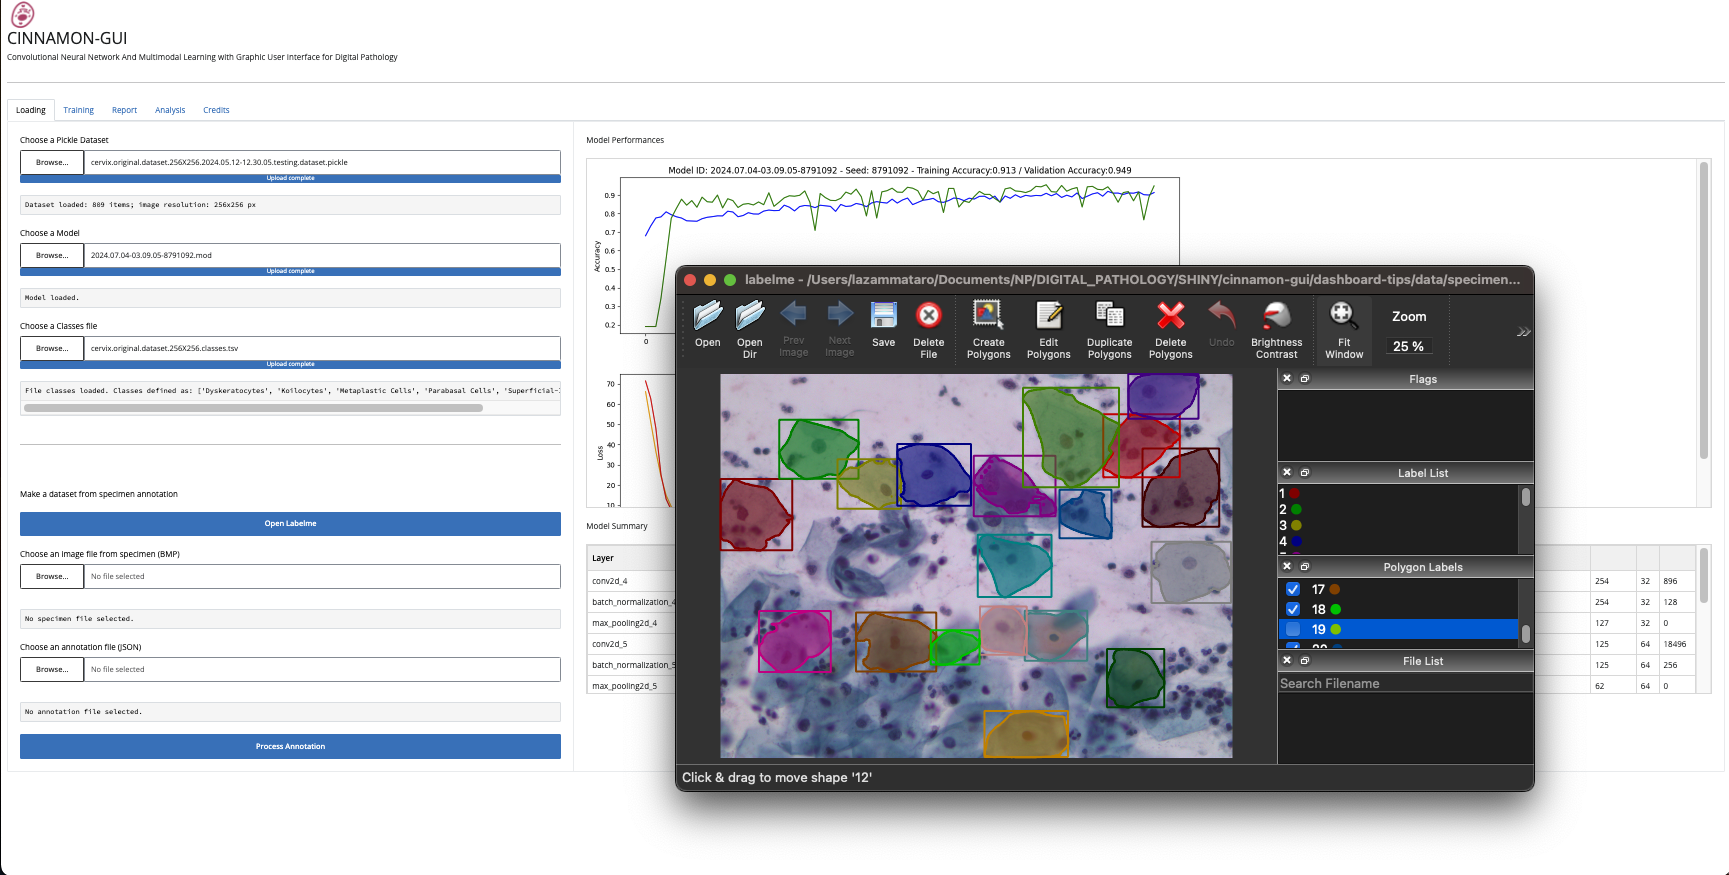
- Dataset Upload: Users can upload a dataset in the form of a pickle file. The dataset is then loaded into memory, normalized, and reshaped for processing.
- Class Definitions: Users can upload a classes file (TSV format) to define the classes used in the dataset. These classes are used for labeling and classification during model training and evaluation.
- Model Upload: Users can upload a pre-trained model file.
- Model Summary: The loaded model's architecture is summarized and displayed in a tabular format, providing detailed information about each layer and its parameters.
- Labelme Integration: The application can open Labelme for defining regions of interest (ROIs) and labeling cells in specimen images.
- Annotation Processing: Users can upload an image file and its corresponding annotation file. The application processes these annotations to extract cells, classify them, and create a new dataset.
- In-Memory Image Handling: All images are handled in memory using
BytesIOand base64 encoding.
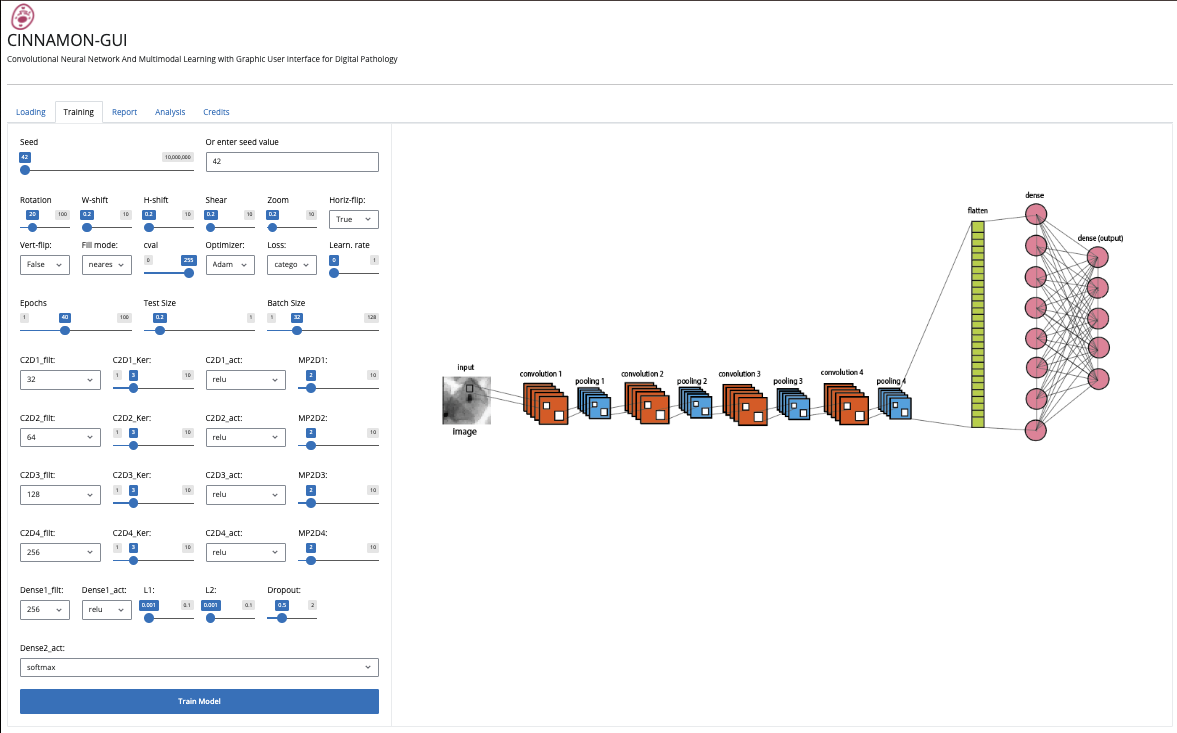
- Training Configuration: Users can configure various parameters for training the model, including the seed, epochs, batch size, learning rate, and data augmentation settings.
- Training Process: The application trains the model using the specified configuration. Progress is displayed in real-time, including a progress bar and status messages.
- Early Stopping and Learning Rate Reduction: The training process includes callbacks for early stopping and reducing the learning rate based on validation loss.
- Model and Log Saving: The trained model and log file are automatically saved to disk upon completion of training.
Through the Training Tab, users can configure and implement various Convolutional Neural Network (CNN) architectures tailored to their specific needs. The interface allows customization of multiple hyperparameters, including the number of convolutional layers, the number of filters, kernel sizes, activation functions, and pooling layers. Additionally, users can add fully connected layers with customizable activation functions, dropout rates, and regularization techniques such as L1 and L2 regularization. This flexibility enables the creation of both simple and complex CNN models, making it suitable for a wide range of applications in digital pathology, from basic image classification to more advanced feature extraction and pattern recognition tasks.
Users can also choose from a variety of optimization algorithms to train their models, including:
- Stochastic Gradient Descent (SGD): A straightforward and widely-used optimizer that updates model parameters iteratively based on each training example.
- Adam: Combines the benefits of two other extensions of stochastic gradient descent, Adaptive Gradient Algorithm (AdaGrad) and Root Mean Square Propagation (RMSProp), making it efficient for large datasets and high-dimensional parameter spaces.
- RMSprop: An adaptive learning rate method designed to perform well in the online and non-stationary settings.
- Adagrad: Adapts the learning rate to the parameters, performing larger updates for infrequent and smaller updates for frequent parameters.
- Adadelta: An extension of Adagrad that seeks to reduce its aggressive, monotonically decreasing learning rate.
- Adamax: A variant of Adam based on the infinity norm.
- Nadam: Combines Adam and Nesterov Accelerated Gradient (NAG) to provide better convergence in some scenarios.
These options allow users to fine-tune the learning process to achieve optimal performance for their specific datasets and tasks.
The Training Tab includes robust Image Augmentation capabilities that enhance the diversity of the training dataset and improve the generalization of the model. Image Augmentation involves applying various transformations to the training images, which helps the model become invariant to these transformations and thus perform better on unseen data. Users can customize the following augmentation parameters:
- Rotation Range: Randomly rotates images within a specified degree range, allowing the model to become invariant to rotational changes.
- Width Shift Range (W-shift): Randomly shifts images horizontally, enabling the model to handle horizontal translations of objects within the images.
- Height Shift Range (H-shift): Randomly shifts images vertically, helping the model cope with vertical translations of objects.
- Shear Range: Applies shearing transformations to the images, effectively tilting them to simulate changes in the camera angle or object orientation.
- Zoom Range: Randomly zooms into images, allowing the model to be robust to variations in object size within the images.
- Horizontal Flip: Randomly flips images horizontally, enhancing the model's ability to recognize objects irrespective of their left-right orientation.
- Vertical Flip: Randomly flips images vertically, useful for datasets where objects can appear upside down.
These augmentation techniques are applied in real-time during training, generating new variations of the images in each epoch. This process helps prevent overfitting and makes the model more resilient to variations in real-world data.
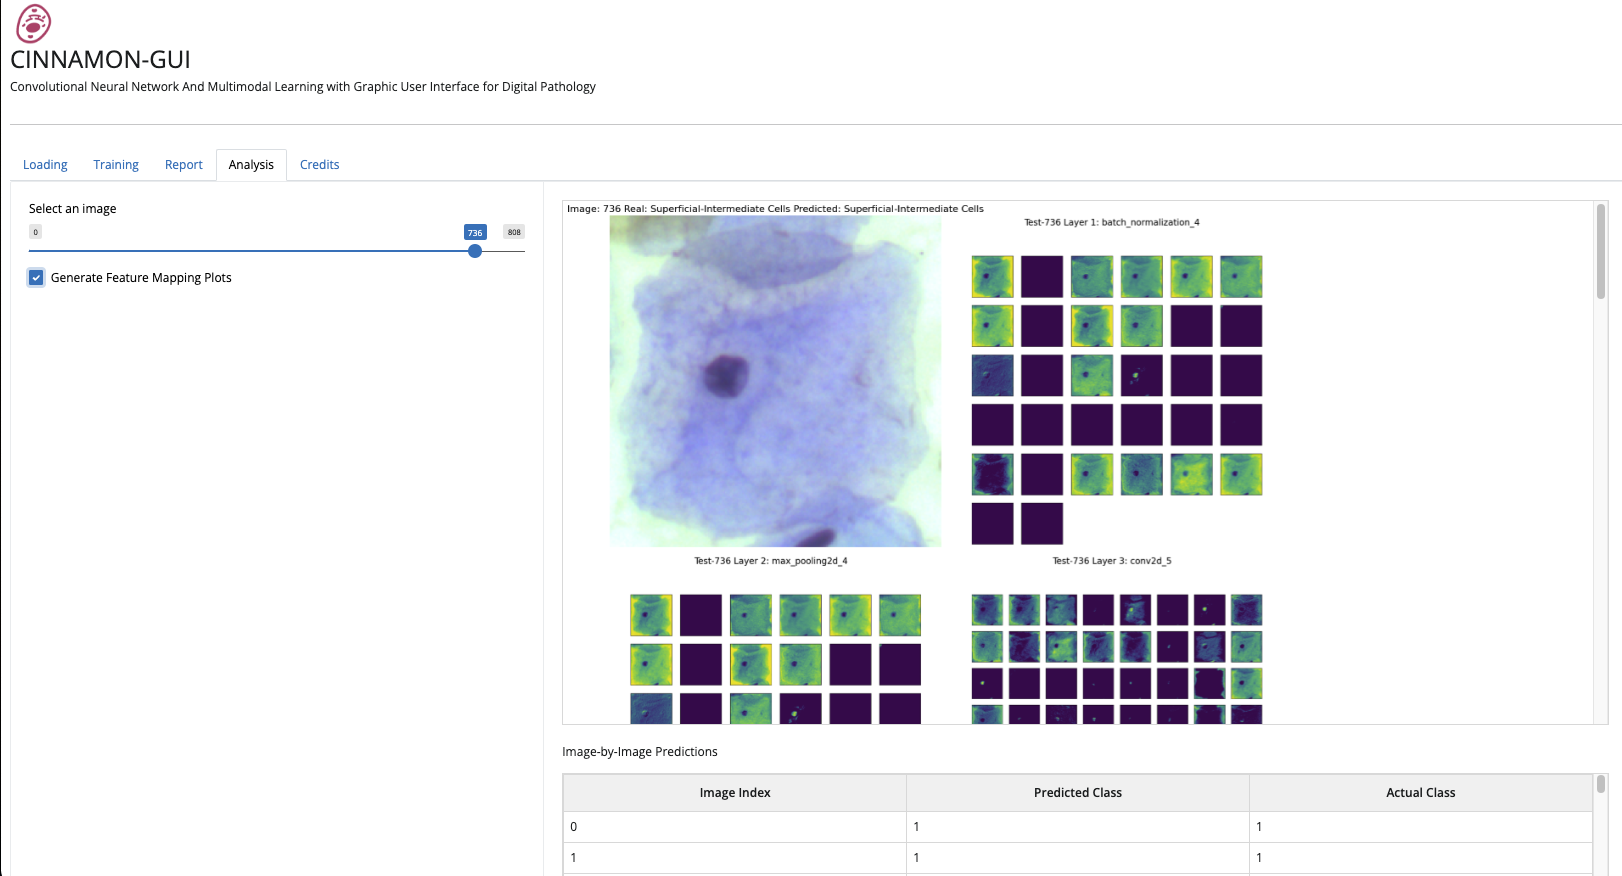
- Image Display and Feature Mapping: Users can select an image index to display the image along with its predicted class. Optionally, feature mapping plots can be generated to visualize the activations of different layers in the model.
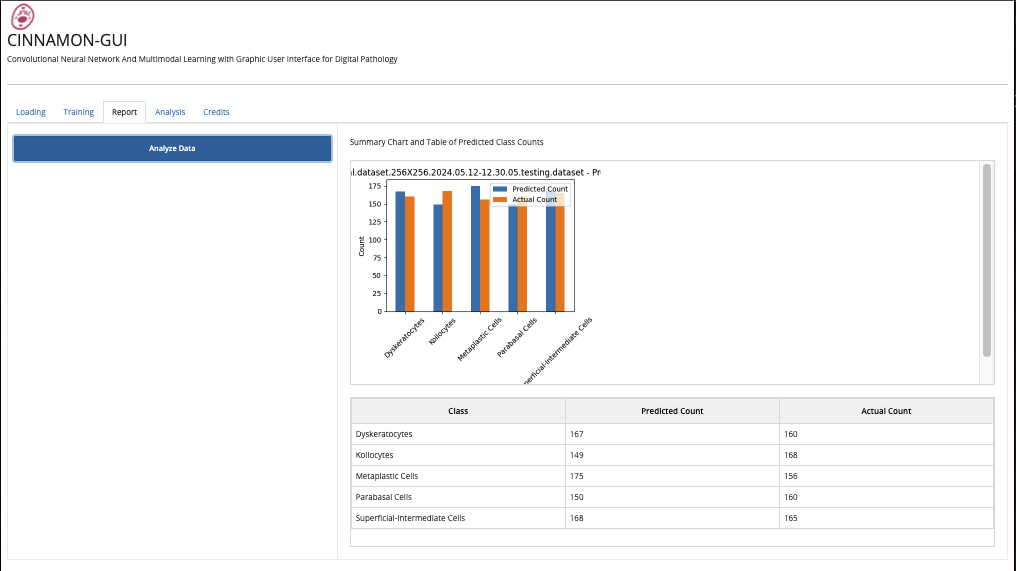
- Performance Testing: The application generates tests on the testing dataset to evaluate the model's performance. It compares the predicted labels against the actual labels to provide counts of predictions versus actual values. The application generates a detailed report of the predicted and actual class counts, along with a summary table and plot. All reports are displayed in the application without saving to disk.
- Interactive Plot: An interactive plot feature enhances user interaction. This plot allows for the immediate identification of images classified by the model through a mouse-over function. This addition aims to improve the usability and functionality of the app, making the analytical process more intuitive and accessible.
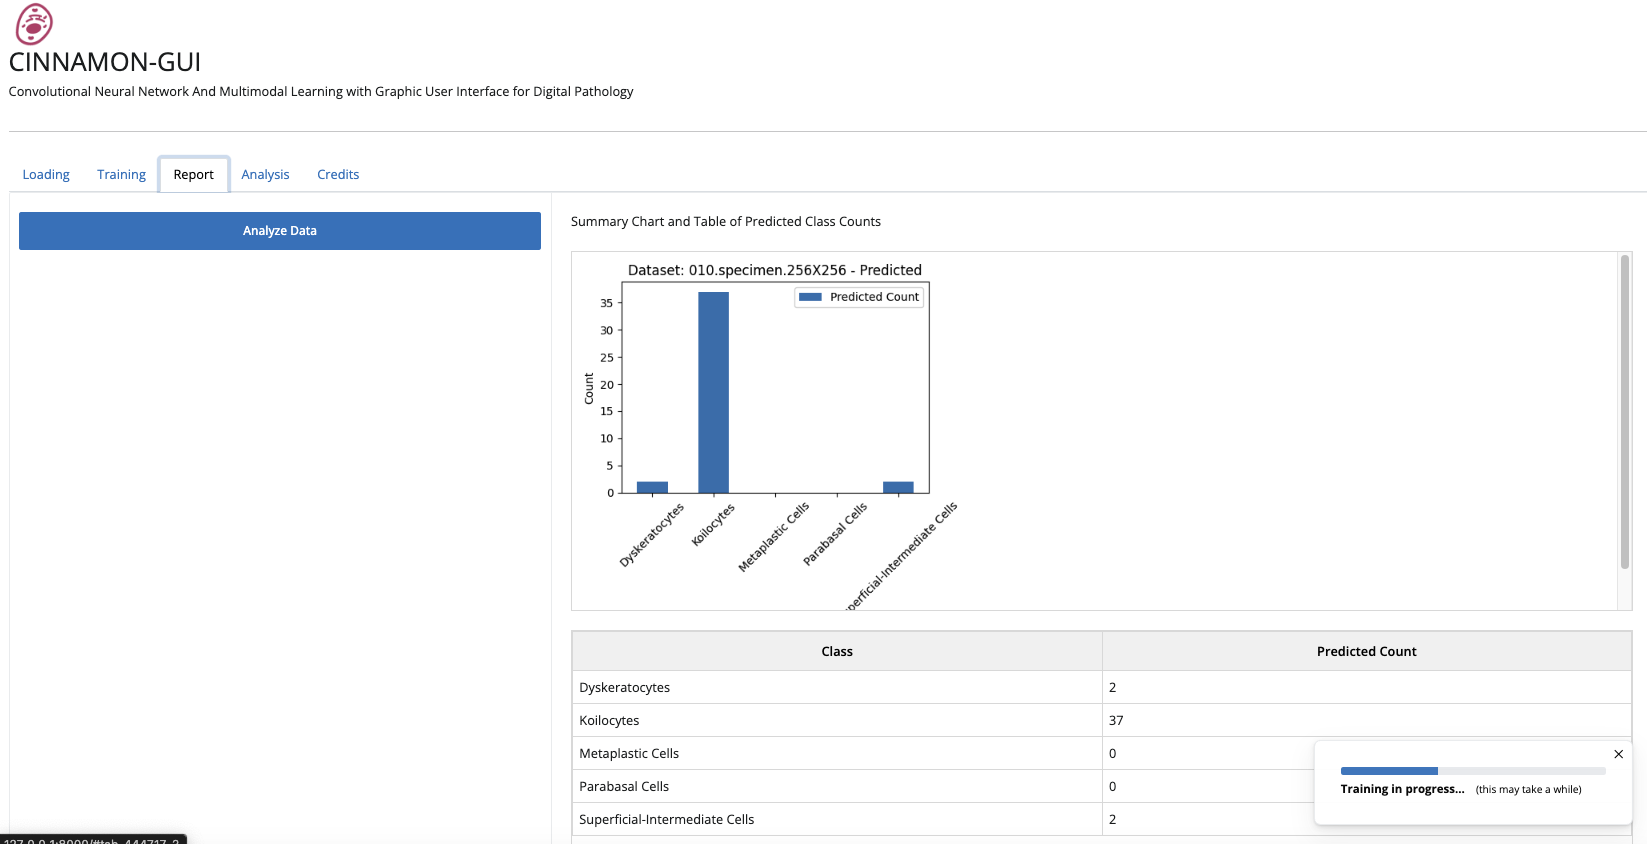
- External Specimen Screening: When used to screen an external specimen with unknown characteristics, the application provides a report to identify specific cells, such as cancerous cells in a Pap smear. This allows for precise identification and classification in real-world diagnostic scenarios.
- Download the latest version of CINNAMON-GUI from our official repository (https://github.com/lunanfoldomics/Cinnamon-GUI/).
- Follow the installation guide provided in this
README.mddocument to set up the software on your system.
Cinnamon-GUI has undergone rigorous testing in MacOS environments for M1 processors.
To run the code, we recommend using a conda virtual environment. You can create a virtual environment named cinnamongui and install the required dependencies by executing the following commands:
# Create a new virtual environment cinnamongui
conda create -n cinnamongui python=3.9
Activate the virtual environment
conda activate cinnamongui  # On Windows
source activate cinnamongui  # On macOS and Linux
To install the necessary packages for Cinnamon-GUI, you can create a requirements.txt file with the following content. This file lists all the dependencies that need to be installed:
faicons
shiny==0.10.2
shinywidgets==0.3.2
plotly==5.22.0
pandas==1.5.3
ridgeplot
matplotlib==3.8.0
numpy==1.23.2
Pillow==10.4.0
scikit_learn==1.3.1
#tensorflow_macos==2.11.0 # only for mac users
tensorflow
labelme
You can install these dependencies by running:
pip install -r requirements.txtDeactivate the virtual environment
conda deactivate  # On Windows
source deactivate # On macOS and Linuxcd dashboard-tips
python cinnamon-gui.pyAs example of implementation we uses the Sipakmed Dataset.
The SIPaKMeD database is publicly available and it can be used for experimental purposes with the request to cite the following paper:
Marina E. Plissiti, Panagiotis Dimitrakopoulos, Giorgos Sfikas, Christophoros Nikou, Olga Krikoni, Antonia Charchanti, SIPAKMED: A new dataset for feature and image based classification of normal and pathological cervical cells in Pap smear images, IEEE International Conference on Image Processing (ICIP) 2018, Athens, Greece, 7-10 October 2018.
The Sipakmed database, which consists of 4049 color images of cells from cervical pap smears, represents a vital example of this tool. Images have been classified into five cellular subclasses: Superficial-Intermediate Cells, Parabasal Cells, Metaplastic Cells, Koilocytes, and Dyskeratocytes. For our work, the database was restructured into a numpy array and subsequently inserted into a Pandas DataFrame, with each row corresponding to a sequence of 65536 pixels, each represented by an RGB triplet for color and associated with an output label. Once loaded into a NumPy vector, the images are reshaped into 256x256 matrices. Once the Sipakmed dataset is downloaded, it needs to be unzipped into a directory, which we might call "sipakmed." The main directory structure of SipakMed is not particularly complex, but it is essential to understand where the images are located within the five cellular categories to correctly construct the pickle file. Therefore, a script must be generated to search for images within the sipakmed directory and generate the pickle file. Here is an example of how this can be done: Upload all the necessary Python libraries
Download Link: https://www.cs.uoi.gr/~marina/sipakmed.html
# routine for converting Bmp to a Pickle Dataset

import numpy as np
from numpy import load
import pandas as pd
import matplotlib.pyplot as plt
from random import randint
from matplotlib.pyplot import imshow
from matplotlib.pyplot import figure
import pickle
import math
import subprocess
import os
import cv2
from PIL import Image
%matplotlib inline
Define a Working Directory using os.getcwd() and concatenate the WD path to the sipakmed directory, where all the images are stored:
WD = os.getcwd()+'/sipakmed/'
Make a list of paths:
'''
The cell categories are assigned to labels

Dyskeratotic 0
Koilocytotic 1
Metaplastic 2
Parabasal 3
Superficial-Intermediate 4
'''

# Creating paths

path = []
path.append(WD+'/im_Dyskeratotic/im_Dyskeratotic/CROPPED/')
path.append(WD+'/im_Koilocytotic/im_Koilocytotic/CROPPED/')
path.append(WD+'/im_Metaplastic/im_Metaplastic/CROPPED/')
path.append(WD+'/im_Parabasal/im_Parabasal/CROPPED/')
path.append(WD+'/im_Superficial-Intermediate/im_Superficial-Intermediate/CROPPED/')
Finally, create the dataset:
# Warning: the OS command for producing the index file list.txt works only with iOS and Linux systems
images_array = []
label = 0
size = 256 # We want a 256 X 256 pixel resolution.

print('I\'m creating the pickle dataset...')

for p in range(len(path)):
    command = str("rm " +path[p]+ str("sunset_resized.bmp"))
    os.system(command)

    print('label: ',label)
    command = str("ls -lth ") + path[p]+ " | " + str("awk '{print $10}' | grep bmp | sed 's/.bmp//' > " + path[p]+ str("list.txt"))
    os.system(command)
    df_list = pd.read_csv(path[p]+"list.txt", sep='\t', header=0)
    df_list.rename(columns={'list.txt': 'filenames'}, inplace=True)


    for i in range(len(df_list)):
        image = Image.open(path[p]+df_list.values[i][0]+'.bmp')
        sunset_resized = image.resize((size, size))
        sunset_resized.save(path[p]+'sunset_resized.bmp')
        images_array.append([cv2.imread(path[p]+'sunset_resized.bmp').flatten(), label])

    label = label+1

df = pd.DataFrame(images_array)
df.rename(columns={0: 'X', 1: 'y'}, inplace=True)
df.to_pickle(WD+str(size)+'X'+str(size)+'.pickle')

print('Dataset created!')
print('bye.')
Congrats! Your 256X256.pickle dataset is ready, and now you can visulize one of the images per time in this way:
Also, you can download a pickle version of Sipakmed from here:
https://www.kaggle.com/datasets/lucazammataro/sipakmed-dataset-for-cinnamon-gui
and pre-trained models from here:
Model-B: https://www.kaggle.com/datasets/lucazammataro/cinnamon-gui-model-b-sipakmed/data
Other models: https://www.kaggle.com/datasets/lucazammataro/cinnamon-gui-for-sipakmed-95-accuracy
# Visualizing dataset

import numpy as np
import matplotlib.pyplot as plt

# Specify here what image you want to see
Image_ID = 1000

with open(WD+str(size)+'X'+str(size)+'.pickle', 'rb') as handle:
    CVX = pickle.load(handle)

X = np.stack(CVX['X'])
Y = np.int64(CVX['y'])

# Reshape the image
image_size = int(np.sqrt(X.shape[1] / 3))  # Dimensione di ciascun lato dell'immagine quadrata
X_reshaped = X.reshape(-1, image_size, image_size, 3)

# One-image visualization
plt.imshow(X_reshaped[Image_ID])
plt.axis('off')
plt.show()
The file "classes.tsv" contains pathological classes associated with the labels. It is pivotal for displaying the results. The classes.tsv file for SIPAKMED is the follow:
| Class | Label |
|---|---|
| Dyskeratocytes | 0 |
| Koilocytes | 1 |
| Metaplastic Cells | 2 |
| Parabasal Cells | 3 |
| Superficial-Intermediate Cells | 4 |
The classes.tsv file associates numerical labels with more intuitive literal characters. There are no predefined rules for generating class names, but using only a short class name is a good practice. Using letters with at most two characters to define a label is better. Remember to start with the label with a zero value when defining the first class, as we are in a Python system, and we know that Python always starts from zero and never from one! The classes have been abbreviated to letters to make the various output more readable. They correspond respectively to the five classes 'Diskeratotic,' 'Koilocytes,' 'Metaplastic,' 'Parabasal,' and 'Superficial-Intermediate,' as reported in the Sipakmed dataset. Generating your dataset.pickle and classes. tsv files is a straightforward process. Always ensure that a classes.tsv file accompanies your dataset and is located in the same directory as the pickle file. Additionally, make sure that both files share the same name. For example, if you decide to name your dataset.pickle 256X256.pickle, ensure that its accompanying classes file is named 256X256.classes.tsv
CINNAMON-GUI includes internal functions for image normalization and a suite of functions for randomly splitting the dataset into training and testing sets for CNN learning. Users can select from a wide range of seeds for random splitting via the scikit-learn package using a dedicated sliding bar in the GUI's Training Tab. The Table illustrates the architecture implemented for classifying the Sipakmed.
| Layer (type) | Output Shape | Param # |
|---|---|---|
| conv2d (Conv2D) | (None, 254, 254, 32) | 896 |
| max_pooling2d (MaxPooling2D) | (None, 127, 127, 32) | 0 |
| conv2d_1 (Conv2D) | (None, 125, 125, 64) | 18496 |
| max_pooling2d_1 (MaxPooling2D) | (None, 62, 62, 64) | 0 |
| conv2d_2 (Conv2D) | (None, 60, 60, 128) | 73856 |
| max_pooling2d_2 (MaxPooling2D) | (None, 30, 30, 128) | 0 |
| conv2d_3 (Conv2D) | (None, 28, 28, 256) | 295168 |
| max_pooling2d_3 (MaxPooling2D) | (None, 14, 14, 256) | 0 |
| flatten (Flatten) | (None, 50176) | 0 |
| dense (Dense) | (None, 256) | 12845312 |
| dense_1 (Dense) | (None, 5) | 1285 |
Other parameters used or this architecture:
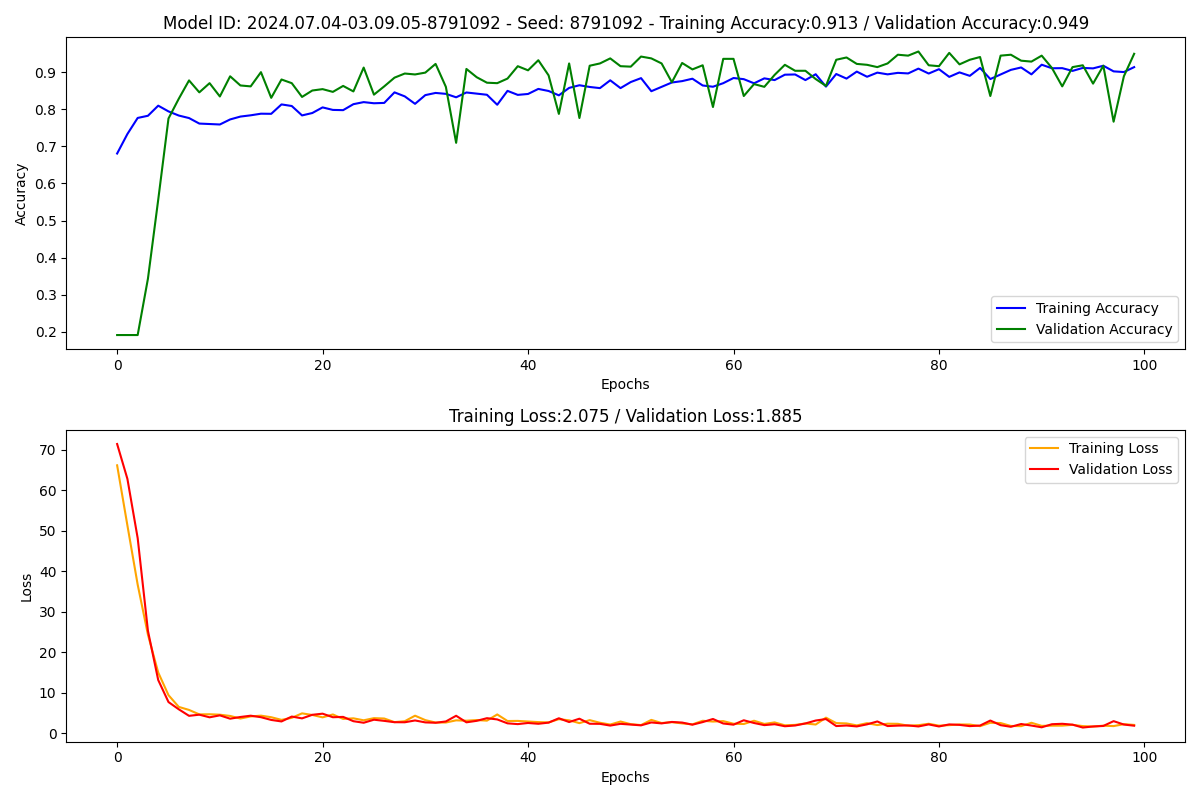
seed: 8791092
total epochs: 100
test size: 0.2
batch size: 32
rotation_range: 20
width_shift_range: 0.2
height_shift_range: 0.2
shear_range: 0.2
zoom_range: 0.2
horizontal_flip: True
vertical_flip: False
regularization params: (0.001, 0.001)
dropout_value: 0.5
optimizer: Adam
loss: categorical_crossentropy
learning_rate: 0.0001
With this architecture, the CNN for the Sipakmed achieved a training accuracy of 95% on the validation test after 100 epochs of learning, with both regularization parameters set to 0.001.
For detailed documentation, including usage examples and configuration, please refer to the docs directory included with the software or visit our documentation page.
We welcome contributions from the community. If you are interested in contributing to CINNAMON-GUI, please read our CONTRIBUTING.md file for guidelines on how to get started.
This project is licensed under the terms of the GNU Affero General Public License version 3. See the LICENSE file in the root directory of the repository for details.
Disclaimer: the software use is intended ONLY for experimental purposes, not for clinical.
For more information, visit our website: Lunan Foldomics LLC
For support or inquiries, please contact us via email at [email protected] or at [email protected] or visit the contact page on our website.
Stay connected with updates and news:
Zammataro L. CINNAMON-GUI: Revolutionizing Pap Smear Analysis with CNN-Based Digital Pathology Image Classification [version 1; peer review: awaiting peer review]. F1000Research 2024, 13:897 (https://doi.org/10.12688/f1000research.154455.1)


