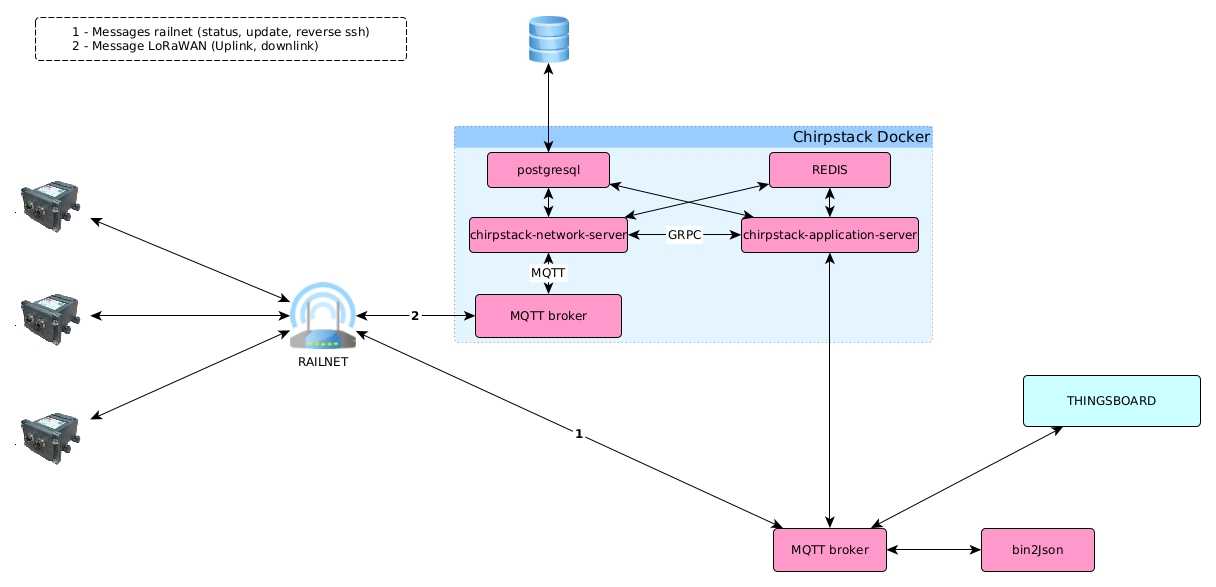
This repository contains a skeleton to setup the ChirpStack open-source LoRaWAN Network Server stack using Docker Compose.
Before using this docker-compose.yml file, make sure you have Docker
installed.
Start docker (Option d is for detach mode):
docker-compose up -dTo see all docker, use the following command. The image names on the right are important, this is what you refer to to perform actions (restart, get logs, etc..)
$ docker ps --all
CONTAINER ID  IMAGE                                            COMMAND                 CREATED            STATUS         PORTS                   NAMES
a3380ca86530  chirpstack/chirpstack-application-server:3.12.2  "/usr/bin/chirpstack…"  About an hour ago  Up 15 minutes  0.0.0.0:8080->8080/tcp  cs-app-server
6cb1befe67d0  eclipse-mosquitto:1.6.12-openssl                 "/docker-entrypoint.…"  About an hour ago  Up 15 minutes  0.0.0.0:1885->1883/tcp  cs-mqtt
75c92fba9849  redis:5-alpine                                   "docker-entrypoint.s…"  About an hour ago  Up 15 minutes  6379/tcp                cs-redis
84028ef9f2c0  postgres:9.6-alpine                              "docker-entrypoint.s…"  About an hour ago  Up 15 minutes  5432/tcp                cs-postgres
fabb725beafe  chirpstack/chirpstack-network-server:3.10.0      "/usr/bin/chirpstack…"  About an hour ago  Up 15 minutes                                cs-nw-server
An example on how to retrieve logs of the mqtt broker
$ docker logs cs-mqtt
1602770820: mosquitto version 1.6.12 starting
1602770820: Config loaded from /mosquitto/config/mosquitto.conf.
1602770820: Opening ipv4 listen socket on port 1885.
1602770820: Opening ipv6 listen socket on port 1885.
1602770820: mosquitto version 1.6.12 running
1602770829: New connection from 172.23.0.4 on port 1885.
1602770829: New client connected from 172.23.0.4 as auto-C858C484-D665-5A15-18D1-A99712693502 (p2, c1, k30, u'chirpstack').
1602772621: Saving in-memory database to /mosquitto/data/mosquitto.db.
1602773459: mosquitto version 1.6.12 terminating
1602773459: Saving in-memory database to /mosquitto/data/mosquitto.db.
1602773493: mosquitto version 1.6.12 starting
1602773493: Config loaded from /mosquitto/config/mosquitto.conf.
1602773493: Opening ipv4 listen socket on port 1885.
1602773493: Opening ipv6 listen socket on port 1885.
1602773493: mosquitto version 1.6.12 running
1602773494: New connection from 172.23.0.4 on port 1885.
1602773494: New client connected from 172.23.0.4 as auto-D41FA84D-7C69-C87A-5832-8A13441B8F5C (p2, c1, k30, u'chirpstack').
1602775294: Saving in-memory database to /mosquitto/data/mosquitto.db.
1602777095: Saving in-memory database to /mosquitto/data/mosquitto.db.
1602778146: mosquitto version 1.6.12 terminating
1602778146: Saving in-memory database to /mosquitto/data/mosquitto.db.
1602833991: mosquitto version 1.6.12 starting
1602833991: Config loaded from /mosquitto/config/mosquitto.conf.
1602833991: Opening ipv4 listen socket on port 1885.
1602833991: Opening ipv6 listen socket on port 1885.
1602833991: mosquitto version 1.6.12 running
1602833991: New connection from 172.23.0.4 on port 1885.
1602833991: New client connected from 172.23.0.4 as auto-2928E72C-46AF-C8A4-0566-0F425C973EA1 (p2, c1, k30, u'chirpstack').
To stop the docker, use:
docker-compose down
Current docker configuration save mqtt data and chirpstack data to a database. This data is persistent even though you start/stop the docker. To clean completely your volume, use the following command:
docker volume prune
When installed, Chirpstack is shipped with a default organization call chirpstack and default credentials admin admin. To prepare the image, we can use to API to initialize what we want using the script initial-api-setup.py.
This script creates a default STIMIO organization STIMIOrg, the network server within the docker, a default service and device profile.
$ python3 initial-api-setup.py -c localhost_chirpstack.conf
Removing default organization
2020-10-16 16:50:04,789 : Organization with id:3 well removed
Adding default STIMIO organization
2020-10-16 16:50:04,793 : Organization STIMIOrg well added with id 4
2020-10-16 16:50:04,802 : network server network_server already exists with id 1
2020-10-16 16:50:04,814 : Service profile service_profile successfully added with id 2009492e-9f4c-48b4-ad26-b2b16c004fb1
2020-10-16 16:50:04,829 : Device profile device_profile successfully added with id 29e29d94-0e53-42de-b9c3-d0a1f105083c

 (Customer) Organization id: 4                                        name: STIMIOrg
       - service profile id: 2009492e-9f4c-48b4-ad26-b2b16c004fb1     name: service_profile
       - device profile  id: 29e29d94-0e53-42de-b9c3-d0a1f105083c     name: device_profile
       - network server  id: 1                                        name: network_server
Then, you can use the Chirpstack API to start registering devices, gateways and application. An example of how to start is provided below:
$ python3 add_gateway.py -c localhost_chirpstack.conf -n RAILNET-118F6D -g aa555a0123118f6d -w 1 -o 4
2020-10-16 17:07:15,070 : Gateway RAILNET-118F6D well added with id aa555a0123118f6d

$ python3 add_application.py -c localhost_chirpstack.conf -n testAPP -s 2009492e-9f4c-48b4-ad26-b2b16c004fb1 -o 4
2020-10-16 17:08:54,791 : Application testAPP successfully added with id 1
Application testAPP (id:1) added within organization id 4

$ python3 add_lorawan_device_fleet.py -c localhost_chirpstack.conf -f ../data_example/devices-test.json -p 29e29d94-0e53-42de-b9c3-d0a1f105083c -i 1
2020-10-16 17:11:18,122 : Device:STA-7c387902 well added
2020-10-16 17:11:18,141 : Device:STA-55387402 well added
