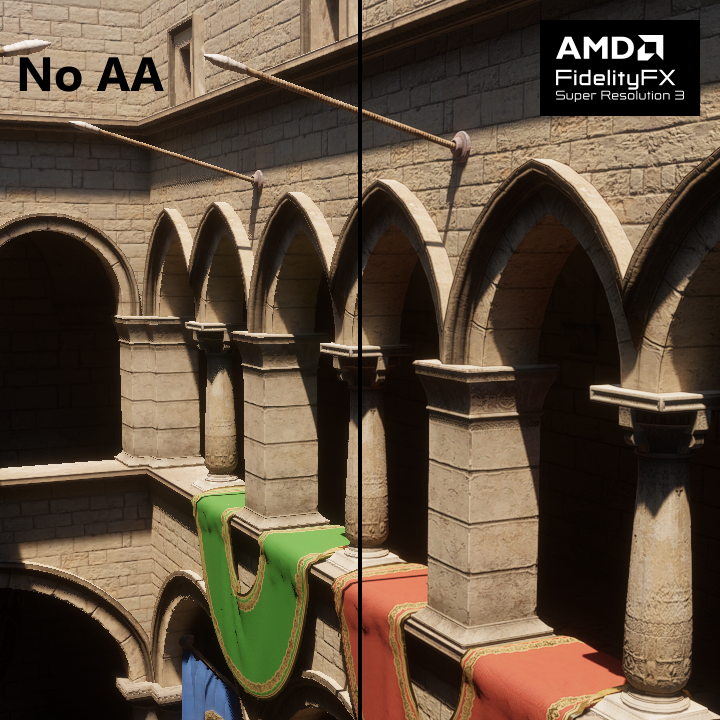
FidelityFX Super Resolution 3 (FSR3) Upscaler is an advanced image upscaling and temporal reconstruction technique developed by AMD and released as open source through the GPUOpen initiative. It provides both high-quality anti-aliasing and the ability for games to output at high resolutions while rendering at a lower internal resolution, improving performance.
This project aims to bring FSR3 upscaling to Unity as an alternative to Unity's existing FXAA, SMAA and TAA anti-aliasing solutions. Compared to Unity's TAA implementation, FSR3 Upscaler offers a sharper and more stable image, with a better sub-pixel detail resolve and better performance due to its reliance on upscaling.
Rather than attempting to integrate AMD's native plugin libraries for FSR3, this project instead reimplements the C++ backend in C# using Unity's scripting APIs while adapting FSR3's HLSL shader code to work within Unity. This allows for maximum compatibility with the platforms and graphics APIs that Unity supports, including ones that normally wouldn't be supported by FSR3.
Focus of this project lies initially on making FSR3 Upscaler work with the traditional Unity built-in render pipeline. However the core FSR3 Upscaler classes and shaders are render pipeline-agnostic, so there is every possibility for URP and HDRP integrations to be built as well.
FSR3 Upscaler for Unity requires Unity 2020.1 or higher. This version of Unity added support for the multi_compile keyword in compute shaders, which the FSR3 Upscaler implementation makes use of.
Other than the above, requirements are no different from the standard FSR3 Upscaler libraries: it requires a GPU with compute shader support, typed UAV load and R16G16B16A16_UNORM support. In practice, almost every GPU made in the past decade will be able to run it.
Platforms tested and confirmed working:
- Windows
- DirectX 11
- DirectX 12
- Vulkan
- OpenGL Core
- Linux
- Vulkan
- OpenGL Core
- MacOS
- Metal
- Android
- Vulkan
- iOS
- Metal
- Xbox One
- Xbox Series X|S
- PlayStation 4
- PlayStation 5
- Standard Graphics API
- NGGC
- Nintendo Switch
The exact hardware requirements for mobile devices (Android and iOS) are still to be determined.
Note that OpenGL on MacOS does not support compute shaders, so it will never be able to run FSR3 Upscaler.
Integration generally follows the same guidelines as the FSR3 Upscaler documentation by GPUOpen, with a few specifics for the Unity implementation.
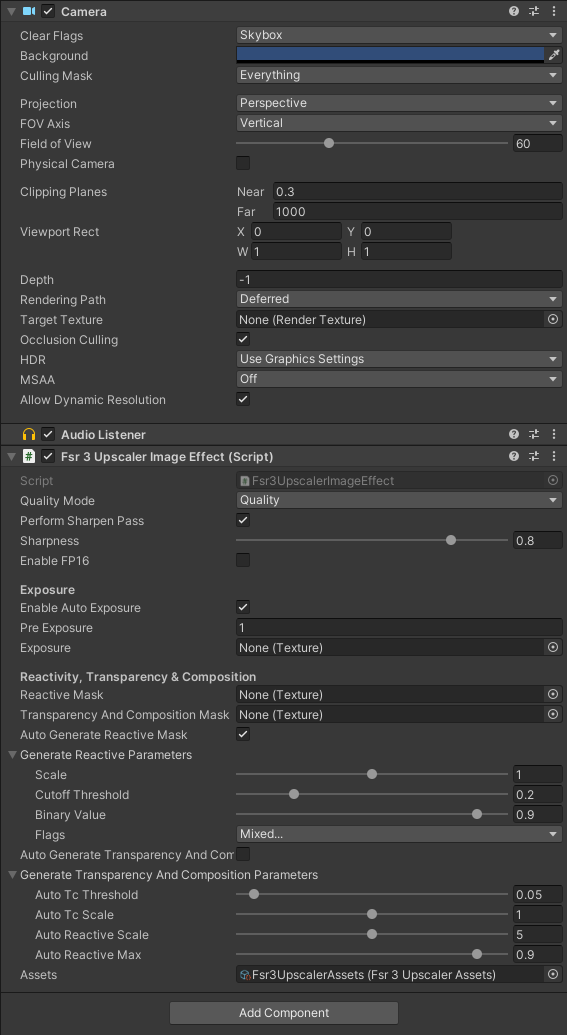
To apply FSR3 Upscaler to a camera, simply add the Fsr3UpscalerImageEffect script to your camera game object. It should be placed at the bottom of the components list, to ensure that it's the last image effect in the chain.
This component contains settings for changing the scaling factor (Quality Mode), enabling or disabling various features, and for providing certain optional inputs that are further explained below. Be sure that the Assets field contains a valid reference to an Fsr3UpscalerAssets object. This should get filled in automatically when creating the component.
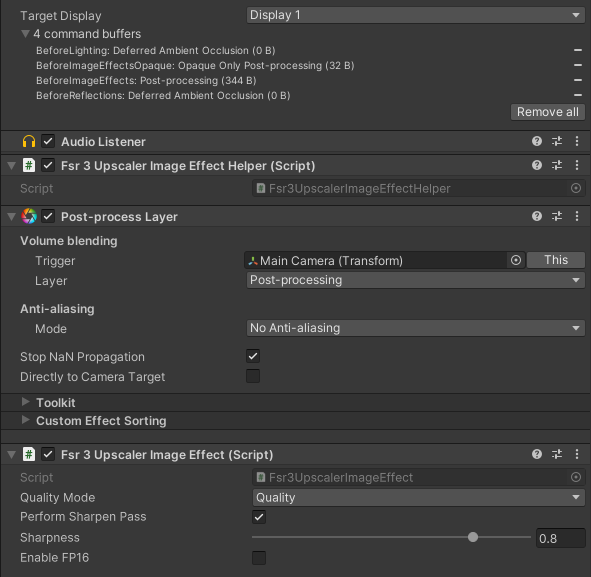
If you have any other post-processing effects on your camera that make use of the OnPreCull method, then also add the Fsr3UpscalerImageEffectHelper script to the camera and move it up, above those other post-processing effects. Specifically: it needs to be above any script that queries the camera's viewport size properties (i.e. rect, pixelRect, pixelWidth/Height) in OnPreCull. Unity's PostProcessLayer script is a particularly good example of this.
Also make sure that any other anti-aliasing methods (MSAA, FXAA, SMAA, TAA) are disabled when enabling FSR3 Upscaler.
FSR3 Upscaler for Unity is also available as a full integration into the Post-Processing Stack V2 (PPV2) from Unity. This integration gets closer to the ideal placement in the render pipeline as recommended by the FSR3 Upscaler documentation. The post-processing effects from PPV2 are split into groups before and after upscaling, meaning that effects that should be applied at full resolution (e.g. film grain, bloom, depth of field, motion blur) are indeed applied on the full resolution upscaled image.
Post-Processing Stack V2 with FSR3 Upscaler is intended to be used as a drop-in replacement package for the official PPV2 package from Unity. It can be downloaded from the Releases page and should be extracted into the Packages directory of your project. From there it will automatically get picked up by Unity when you refresh your project.
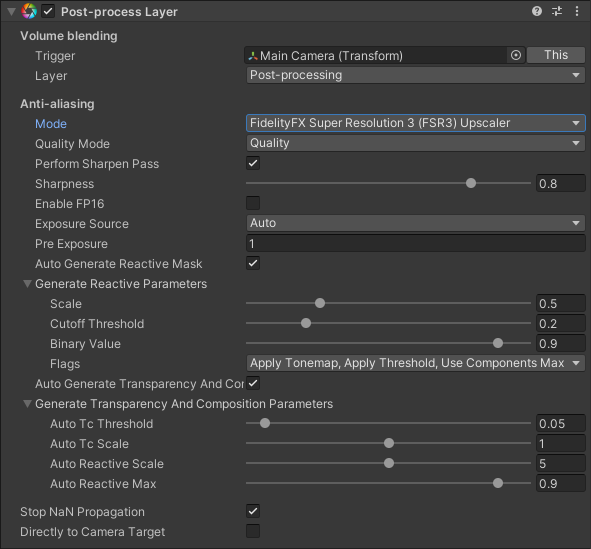
When the package is installed correctly, 'FidelityFX Super Resolution 3 (FSR3) Upscaler' should appear as an Anti-aliasing Mode on the Post-process Layer component:
From here you can configure the usual FSR3 Upscaler settings, including quality mode, sharpness, exposure and reactive mask.
FSR3 Upscaler for Unity requires the application to provide a few services that it can't make any assumptions about itself. For this purpose, it exposes an IFsr3UpscalerCallbacks interface with a default implementation Fsr3UpscalerCallbacksBase. The application can provide these callbacks by either implementing the IFsr3UpscalerCallbacks interface or inheriting the Fsr3UpscalerCallbacksBase class and overriding one or more methods. Assign these callbacks to the Callbacks property on the Fsr3UpscalerImageEffect script component, before the script is enabled.
One key part of FSR3 Upscaler is adjusting the mipmap bias of textures. Normally when lowering the rendering resolution, Unity will also sample textures at lower mipmap levels to prevent texture aliasing. When upscaling is in use, this will result in noticeably blurry textures. To combat this, FSR3 suggests that applications adjust the mipmap bias for texture content in the scene that is to be upscaled. This is further explained in the FSR3 Upscaler documentation.
Unfortunately Unity has no single unified way to identify textures that are part of the 3D scene, nor does it offer a way to set a global mipmap bias at run-time. There are also many different ways in which textures may be applied to a scene, depending on which third-party asset packages the application chooses to use. This makes the implementation of texture mipmap biasing a highly application-specific thing.
The default implementation in Fsr3UpscalerCallbacksBase will very naively look up every Texture2D object in the current scene and apply the mipmap bias offset to it. This generally works fine but it will also include textures that shouldn't have the mipmap bias applied (e.g. UI textures) and potentially misses textures that should have the mipmap bias applied (e.g. texture arrays for terrain rendering). You will want to override this callback to more selectively specify the textures that need to have this mipmap bias applied, and possibly store the current mipmap bias value to retroactively apply it to assets that are loaded on demand.
FSR3 Upscaler relies on depth and motion vector data to track pixels across frames and to detect areas that 'became visible' on the current frame and therefore should not be reconstructed using historical data. For all of this to work properly, it is very important that the application renders correct motion vector data for all moving objects in the scene, in addition to camera motion vectors.
Unfortunately not all community-made Unity asset packages have gotten the message that temporal image techniques are here to stay, and either don't output motion vectors from their shaders or poorly document how this is enabled. This is not helped by Unity itself being rather obscure in how motion vectors are to be rendered and accessed.
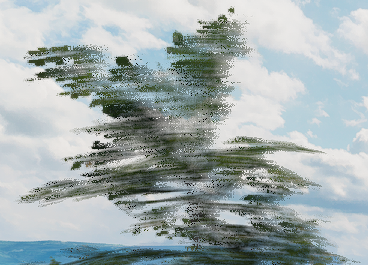
If a moving object does not render motion vectors, you will clearly notice this as pixellated streaks appearing behind it. On small objects like individual particles this isn't a huge problem, but on things like dense foliage it will turn everything into a blurry, smeary soup.
Example of a tree waving in the wind reconstructed without motion vectors, causing visible streaking artifacts:
Again, make sure that all of your moving objects render motion vectors and complain to your third-party asset package providers if they do not.
The reactive mask is a special input texture that tells the FSR3 Upscaler how much of the current frame should be taken into account when reconstructing each pixel. This is important when reconstructing pixels containing transparency effects, such as glass, water or particles. Transparencies are usually not rendered to motion vectors (and even if they did it wouldn't match the opaque content behind the transparent object), so FSR3 Upscaler has no way to track these pixels across frames.
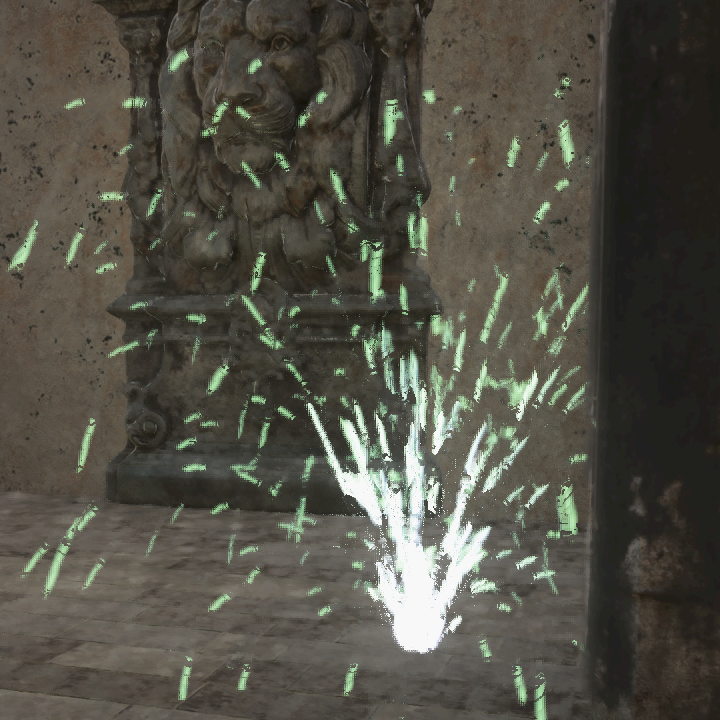
Here is an example of a transparent particle effect upscaled by FSR3 Upscaler without a reactive mask applied:
The particles are poorly defined with lots of streaking and pixellation artifacts.
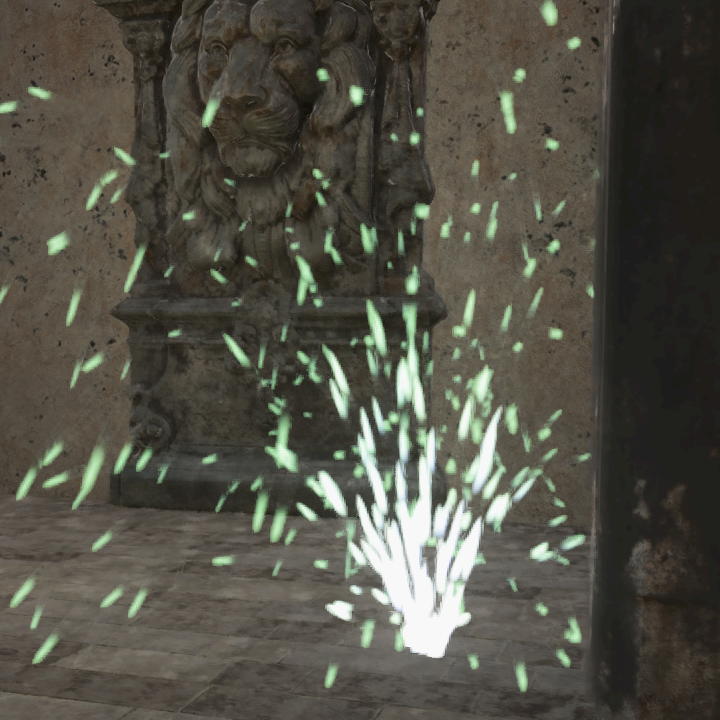
A reactive mask can be provided in two different ways. The easiest way is to make use of the auto-generate reactive mask feature. This captures the render buffer before and after transparencies are applied, and generates a reactive mask based on the difference between the two. This is a 'broad strokes' kind of approach and how well it works depends on the specific transparency effects and how they are applied. Here's what the same particle effect looks like with the auto-generated reactive mask applied:
The artifacting is mostly gone but the particles remain somewhat blurry and streaky.
Enabling the auto-generate reactive mask feature is as simple as ticking the corresponding checkbox on the Fsr3UpscalerImageEffect script. This will automatically capture the opaque-only image on the BeforeForwardAlpha camera event and dispatch the relevant compute shader when it's time to apply the FSR3 Upscaler. There are various parameters available for tweaking the auto-generate process, however what these values do is rather poorly documented. The defaults should give decent results in most cases.
The other way to provide a reactive mask is by generating one yourself. Essentially, you need to have your transparent shaders output directly to a reactive mask texture with a value representing both the pixel's luminance and opacity values. The FSR3 Upscaler sample does this as follows:
output.reactiveMask = max( output.color.r, max( output.color.g, output.color.b ) ) * albedo.a;
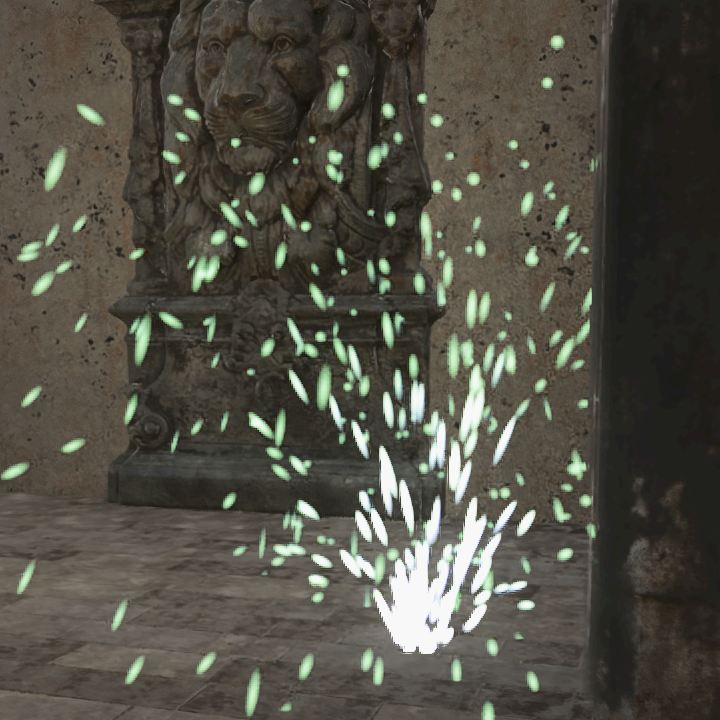
Of course this means that you have to modify your application's shaders to output this value. The upside of this is that it will produce the most accurate and artifact-free results:
The manually generated reactive mask can be supplied to the Fsr3UpscalerImageEffect script through its Reactive Mask texture parameter.
FSR3 Upscaler accepts a 1x1 input texture containing an exposure value for the current frame. Typically this exposure value is output by an eye adaptation shader, as is the case with PPV2's Auto Exposure effect. The need for this exposure value by the FSR3 Upscaler isn't immediately obvious, so I'll try to explain.
Imagine walking from a bright outdoors area into a dark tunnel and standing still while the camera adjusts to the darkness. Without any additional information, the FSR3 Upscaler will see the pixels changing as the picture becomes brighter and will attempt to temporally reconstruct the intended image. This reconstruction is visible as a slight fizzling effect, especially on lower resolutions, lower framerates and lower quality modes. In a situation like this, FSR3 Upscaler needs to be told that it's not the geometry that is changing but rather the light level.
By providing the FSR3 Upscaler with the image's current exposure value, it can derive each pixel's original unadjusted color value and will be able to tell that the pixels are not actually changing. This results in a sharper and more stable image, without any temporal fizzling artifacts.
The exposure value can be supplied to the Fsr3UpscalerImageEffect script through its Exposure texture parameter. PPV2's Auto Exposure effect outputs a compatible texture, however this value is kept internal by PPV2 so it'll require some trickery to plug this into the FSR3 Upscaler. It's also possible to allow FSR3 Upscaler to compute an exposure value by itself by enabling the Auto Exposure feature, however results may vary and this feature has some issues on a couple of platforms.
FSR3 Upscaler for Unity supports dynamic resolution through Unity's ScalableBufferManager class. This is distinct from FSR3 Upscaler's own internal resolution scaling mechanism, which works by manipulating the camera's viewport size (see Built-in Render Pipeline upscaling). The selected quality mode determines the maximum render size that will be used by FSR3's upscaling; the dynamic resolution from ScalableBufferManager can be added on top of that to further reduce the actual render size on a frame-by-frame basis.
The use of ScalableBufferManager is not mandatory in any way, as this form of dynamic resolution is not supported by all graphics APIs in Unity. All that FSR3 Upscaler does with it is: if ScalableBufferManager is supported, and the camera or render target has dynamic scaling enabled, then FSR3 Upscaler will respect the width and height scale factors set by the application to reduce its internal render size. It is up to the application to control the dynamic resolution scale, for example by measuring GPU times using FrameTimingManager and adjusting the resolution according to a target framerate.
Dynamic resolution works really well in combination with FSR3 Upscaler. Any run-time change in resolution is barely noticeable due to FSR3's robust upscaling and image reconstruction, with only a small drop in texture sharpness that can be observed. It is recommended not to scale dynamic resolution below 50%, as the image reconstruction has trouble drawing a stable image below that figure. Typically scaling down to 70% provides the best balance between performance gain and maintaining image quality.
- Texture mipmap bias adjustment is not working on MacOS Metal.
This causes blurry textures as the internal render resolution is lowered. This is a Unity issue of some sort.
Workaround: no known workaround yet. - Using FP16 mode on Xbox with GDK October 2023 or later causes random jittering artifacts.
This seems to be a shader compilation issue introduced by this GDK update.
Workaround: disable FP16 on Xbox consoles. - Using FP16 mode in D3D11 on certain older graphics cards can cause GPU driver crashes.
There appears to be an issue with how Unity compiles the shader code from the FP16 code path.
Workaround: disable FP16 mode.
This section goes more in-depth on how the implementation of FSR3 Upscaler into Unity was accomplished, as well as the rationale behind some of its design decisions. For more information on how the FSR3 Upscaler algorithm itself works, see the official documentation on GPUOpen.
Officially, FSR3 Upscaler only offers support for DX12 and Vulkan, with DX11 and Xbox implementations available at request for licensed developers. So how did we manage to get FSR3 upscaling working on OpenGL, MacOS and PlayStation?
FSR3 Upscaler for Unity relies heavily on Unity's ability to cross-compile HLSL and translate code to other shader languages. As it turns out, FSR3's shader codebase consists largely of very straightforward and portable HLSL code. Only a few shader keywords were necessary to make these shaders compile for DX11 and OpenGL Core in Unity, with a couple of additional patches and hacks required to make them work in Metal and PSSL as well. Additionally by translating FSR3's C++ backend code to C# code using Unity's APIs, we take advantage of Unity's platform abstractions to implement compute shader dispatch and resource management for all the platforms that we want to support.
With Metal, the biggest limitation is the lack of support for atomic texture operations in Unity. FSR3 Upscaler's HLSL code uses three such operations: InterlockedAdd, InterlockedMin and InterlockedMax. These allow values to be accumulated between multiple threads, without the risk of one thread overwriting another thread's write actions. In order to "just make it compile" I redefined these functions as simple, non-atomic code blocks. This was already enough to make FSR3 Upscaler work on Metal and there were no obvious visual issues caused by this hack. It should be possible to properly reimplement these atomic functions by using a compare-and-swap technique, but I've decided to leave well enough alone for now.
For PSSL, the main missing element were type definitions for the various float and vector types that FSR3 uses. These are all defined in a single common header file (ffx_common_types.h) and are primarily aimed at HLSL and GLSL as expected. PSSL uses different type names so in order to make the FSR3 shaders compile for PS4/5, I added the required type definitions to this header file. Additionally, the FSR3 Upscaler shader code uses two type qualifiers (unorm and globallycoherent) that PSSL doesn't understand. I simply defined these keywords as blanks, which was enough to make the shaders work. Again there is probably a proper way to redefine these keywords using PSSL equivalents, but I haven't found the correct ones yet.
These hacks mean that technically speaking, the FSR3 Upscaler shaders are not 'correct' on Metal and PSSL. However during my testing I have not seen any problems or visual artifacts caused by these modifications, and the results look as good as they do on any other platform. It's certainly possible that there are issues that I haven't seen yet, particularly in applications with heavy use of high contrast colors and HDR lighting, but until I see a clear example of this I'm going to leave things as-is.
FSR3 Upscaler for Unity performs upscaling by manipulating the camera's viewport parameters ahead of rendering, then restoring them during the post-processing phase and outputting the upscaled image directly to the camera's backbuffer. This approach has several advantages and drawbacks:
Advantages:
- It's very simple and works well together with most other rendering effects.
- It doesn't add any extra rendering overhead, as you would get with a two-camera setup.
- It works without issue on all tested platforms.
- It does not cause any issues with UI rendering afterward.
Drawbacks:
- The upscaled output cannot be blitted back to the camera's target texture, it can only be blitted directly to the backbuffer.
- Consequently, FSR3 Upscaler has to be the last image effect in the camera's post-processing chain.
- This makes it difficult to apply additional post-processing effects after FSR3 upscaling.
It is possible to have FSR3 Upscaler output to a camera target texture, but this is accomplished by taking over control of the target texture and removing it from the camera. This allows the upscaled output to be used as a render texture on a different camera (e.g. for UI usage), but it does not remove the limitation of FSR3 Upscaler having to be the last image effect on its camera.
Initial prototypes of the upscaler used a two-camera setup with an intermediate render texture created at runtime. This approach worked, but it had several problems:
- It added a lot of complexity of having to create and manage an additional camera.
- It added extra rendering overhead; Unity cameras will always render something even if you tell it not to draw anything (Clear Flags set to Don't Clear, Culling Mask set to Nothing, etc) and that had a visible performance impact in the GPU profiler.
- It doesn't work well on all platforms. Particularly on Xbox One, Unity has some unsolved issues with render texture blitting when ESRAM usage is enabled. This was causing jittering artifacts when FSR3 Upscaler was in use. Disabling ESRAM solved the problem, but at the cost of measurably worse rendering performance.
Unity also offers a dynamic resolution system (through ScalableBufferManager) which would be a good fit for upscaling techniques, but the problem there is that it's not supported on every platform. In particular DirectX 11 on Windows does not support ScalableBufferManager, which is a deal breaker. Additionally ScalableBufferManager has a long-standing issue where UI gets scaled as well, even if the UI camera is set not to allow dynamic resolution scaling.
After looking around for alternative solutions, I came across this discussion: https://answers.unity.com/questions/1322637/best-way-to-downsample-camera-viewport.html. Using camera viewport rect manipulation turned out to be an easy, unassuming and unintrusive solution offering the best balance of platform support, performance and simplicity.
FSR3 Upscaler supports the use of half-precision floating point calculations (or FP16) by enabling the FFX_HALF keyword on its shaders. This allows FSR3 Upscaler to take advantage of double-rate floating point operations on modern graphics cards to improve performance.
FSR3 Upscaler for Unity supports enabling FP16 too, however the feature is rendered practically useless by how Unity compiles shaders. By default on most non-mobile platforms, any half-precision variables and operations are compiled as 32-bit floating point anyway by Unity's shader compiler. This means on those platforms, FSR3's shaders will behave the same regardless of whether the FFX_HALF keyword is enabled or not.
There are some exceptions however. First of all, mobile platforms should see an improvement from enabling FP16. Secondly, because the PlayStation platforms received their own custom floating point type definitions, these are not automatically detected and translated to 32-bit floating point types by Unity. This means that on PS4 Pro and PS5, enabling FP16 may have an effect and indeed, on PS5 a measurable performance improvement was observed.
Thirdly, FSR3 Upscaler for Unity includes experimental support for the DXC shader compiler. Using this alternative shader compiler allows use of certain advanced shader features, such as wave operations and 16-bit floating point operations. The downside of using this compiler is that platform support is very limited; for instance DXC completely breaks DirectX 11 support, which makes it impossible to endorse the use of it. If you're not worried about this and only target platforms covered by the DXC compiler, then it may be worth enabling it in the ffx_fsr3upscaler_unity_common.cginc shader source file, enabling FP16 support in the inspector and measuring what the effect on performance is.
