This solution shows how to provision and configure the infrastructure that you need to deploy Digital Assistant custom components/webviews to Oracle Kubernetes Engine (OKE) using either Oracle Cloud Infrastructure Resource Manager or Terraform. You also can use this infrastructure to deploy different utility services that Digital Assistant can benefit from, like custom channel webhook implementations.
The following list shows all the artifacts that will be provisioned.
| Component | Description | Default Name |
|---|---|---|
| OKE | Oracle Container Engine for Kubernetes | Digital Assistant OKE Cluster |
| API Gateway | Oracle Cloud Infrastructure API Gateway | Digital Assistant API Gateway |
| Vault | Oracle Cloud Infrastructure Vault | Digital Assistant Vault |
| VCN | Oracle Cloud Infrastructure VCN | Digital Assistant VCN |
| Subnets | Oracle Cloud Infrastructure VCN Subnets | Digital Assistant - Public Digital Assistant (OKE Nodes) - Private Digital Assistant (OKE LB) - Private Digital Assistant (OKE API) - Public |
| Object Storage Bucket | Oracle Object Storage Bucket | Digital_AssistantBucket |
| Dynamic Group | Oracle Cloud Infrastructure Dynamic Group | DigitalAssistantDynamicGroup |
| Policies (compartment) | Oracle Cloud Infrastructure Security Policies | DigitalAssistantPolicies |
- You must belong to a user group with tenancy administrator privileges to complete these steps.
- Make sure that the newly provisioned artifacts won't cause your tenancy to exceed its service limits.
The simplest way to provision the infrastructure is to click on the Deploy to Oracle Cloud button.

Or you can manually install the stack by following the below steps:
-
Download
oci-digital-assistant-external-services-v1.0.3.zipfile -
From Oracle Cloud Infrastructure Console/Resource Manager, create a new stack.
-
Make sure you select My Configurations and then upload the zip file downloaded in the previous step.
-
Set a name for the stack and click Next.
-
Set the required variables values and then click Create.
-
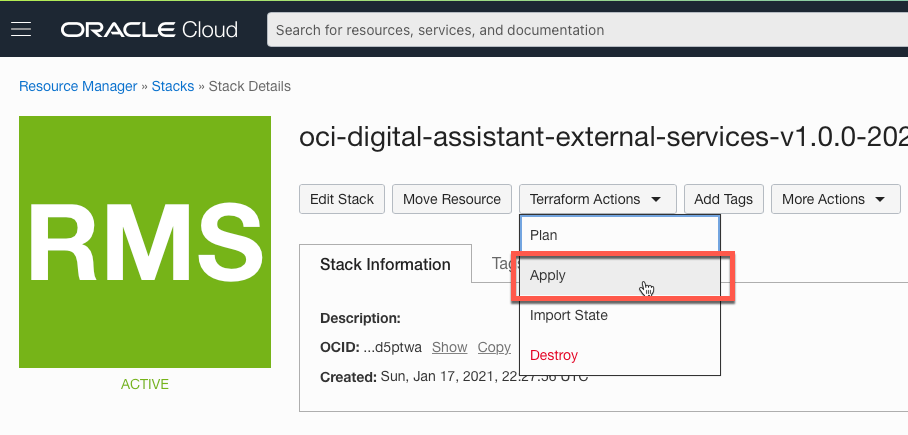
From the stack details page, click Terraform Actions, and then click Plan. Ensure that the action completes successfully.

-
From the stack details page, click Terraform Actions, and then click Apply. Ensure that the action completes successfully.


If you later decide to delete the created artifacts, click Terraform Actions, and then click Destroy. Ensure that the action completes successfully.

-
Clone this repo
git clone git clone git clone [email protected]:oracle-quickstart/oci-digital-assistant-external-services.git cd oci-digital-assistant-external-services/deploy/terraform -
Create a copy of the oci-digital-assistant-external-services/terraform.tfvars.example file in the same directory and name it terraform.tfvars.
-
Open the newly created oci-digital-assistant-external-services/terraform.tfvars file and add your Oracle Cloud Infrastructure user and tenant details to the TF Requirements section.
``` #************************************* # TF Requirements #************************************* // Oracle Cloud Infrastructure Region, user "Region Identifier" as documented here https://docs.cloud.oracle.com/en-us/iaas/Content/General/Concepts/regions.htm region="" // The Compartment OCID to provision artificats within compartment_ocid="" // Oracle Cloud Infrastructure User OCID, more details can be found at https://docs.cloud.oracle.com/en-us/iaas/Content/API/Concepts/apisigningkey.htm#five user_ocid="" // Oracle Cloud Infrastructure tenant OCID, more details can be found at https://docs.cloud.oracle.com/en-us/iaas/Content/API/Concepts/apisigningkey.htm#five tenancy_ocid="" // Path to private key used to create Oracle Cloud Infrastructure "API Key", more details can be found at https://docs.cloud.oracle.com/en-us/iaas/Content/General/Concepts/credentials.htm#two private_key_path="" // "API Key" fingerprint, more details can be found at https://docs.cloud.oracle.com/en-us/iaas/Content/General/Concepts/credentials.htm#two fingerprint="" ``` -
In the same file, revise the below settings:
- Set Application Name prefix
#************************************* # General #************************************* // Prefix name. Will be used as a name prefix to identify resources, such as OKE, VCN, API Gateway, and others app_name = "Digital Assistant" - Set API Gateway URL Path prefix (must start with a leading / )
#************************************* # API Gateway Specific #************************************* // API Gateway Path Prefix // IMPORTANT: Must start with a leading "/" apigateway_path_prefix = "/oda" - Configure Network Settings. By default, the stack will create a new VCN and its corresponding subnets, route tables, security list...etc
if
create_vcn = false, then you must specify the OCID of an existing VCN to use, along with required subnets OCID.#************************************* # Network Specific #************************************* // Create New VCN create_vcn = true // Existing VCN OCID - Only if "create_vcn" is set to "false" existing_vcn_id = "" // Existing Public Subnet (API Gateway) OCID - Only if "create_vcn" is set to "false" existing_public_subnet_id = "" // Existing Public Subnet (OKE API Endpoint) OCID - Only if "create_vcn" is set to "false" existing_public_subnet_id_oke = "" // Existing Private Subnet (OKE Worker Nodes) OCID - Only if "create_vcn" is set to "false" existing_private_subnet_id_oke_nodes = "" // Existing Private Subnet (OKE Load Balancer) OCID - Only if "create_vcn" is set to "false" existing_private_subnet_id_oke_lb = "" - Vault Settings. By default, the stack will create a Vault, if
create_vault = false, then you must specify the OCID of an existing vault.#************************************* # Vault Specific #************************************* // Create new vault create_vault = true // Existing Vault OCID - Only if "create_vault" is set to "false" existing_vault_id = ""
- Set Application Name prefix
-
Run this command to Initialize the Terraform provider:
terraform init
-
To see what components you'll create, and to verify that you can run the terraform scripts successfully, run this command:
terraform plan
-
To execute the Terraform scripts, run this command:
terraform apply -auto-approve
If you later decide to delete the created artifacts, run this command:
terraform destroy -auto-approve