- About
- Before jumping down the rabbit hole
- Setting up the tunnel
- Installing the Operating System
- Setting up the IPv6 tunnel
- Additional stuff
This will let you set up a Raspberry PI 2 to act as an IPv6 tunnel and IPv6 DHCP server on your LAN. All your devices will automatically receive IPv6 addresses when they connect to your LAN.
I used a Raspberry PI 2. A version 3 Pi would work too, but I felt the wifi feature wouldn't be used for the project, so why tie up my Raspberry Pi 3 for this project.
I use fake IP addresses throughout, but I've tried to be consistent, showing the same fake IP addresses where I should. Of course any local ones (192.168.x.y) have to be modified to suit your LAN.
Furthermore, while I expect you to set up your own account on the rpi and use sudo as is common practice, all the commands I provide in this document should be run as root.
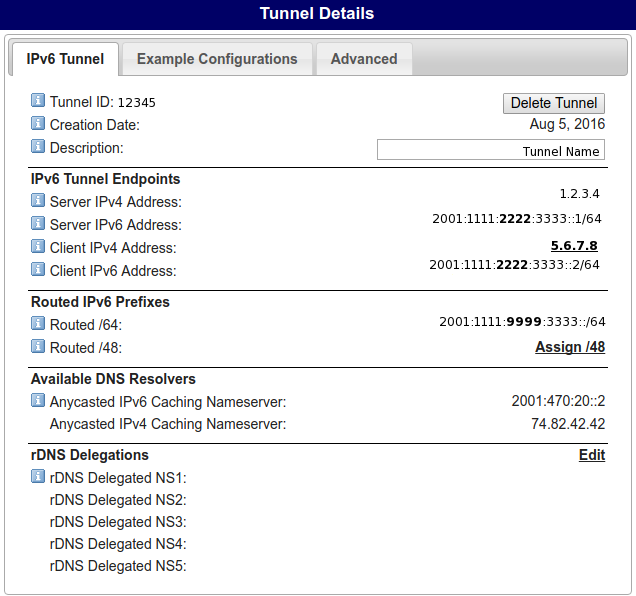
My ISP doesn't provide IPv6 (if they did I wouldn't undertake this project). So I set up a tunnel using Tunnelbroker. First you need to set up a tunnel.
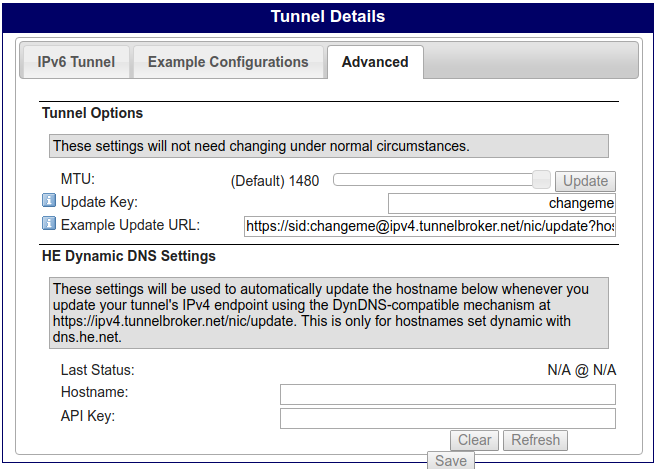
Here are screenshots of my tunnel (with IP addresses modified).
In the Advanced tab, I changed the Update Key. This is optional
I used archlinuxarm, but any linux OS which uses systemd should work, you might just have to search for package names, if they differ.
Download the OS from archlinux arm (rpi1, rpi2, rpi3). Follow the instructions on their Installation tab.
Once the OS is installed, boot into it. If you're wired up the Pi it should automatically get an IP(v4) address. You should configure the machine's hostname, timezone and ensure the clock is correct. Also update the system, we don't know if the installation image was out of date.
pacman -SyuInstall packages we will use later, as well as useful utilities. Then start & enable OpenSSH and cronie:
pacman -S bash-completion bind-tools cronie dfc htop net-tools ntp openssh radvd rsync screen sudo vim wget
systemctl enable --now sshd cronie
After this, you'll most likely want to set up a user account, ssh keys and configure sudo. I'll leave this as an exercise to the reader. Don't forget to change or remove the root user's password and ensure SSH works.
Set up a static IP (v4 and v6) address for the rpi on your LAN. I set this to 192.168.1.23, but you pick yours. Create the file /etc/netctl/eth0-static, copy this into it:
Description='A basic static ethernet connection'
ForceConnect=yes
Interface=eth0
Connection=ethernet
IP=static
Address=('192.168.1.23/24')
Gateway='192.168.1.1'
DNS=('192.168.1.1')

# For IPv6 static address configuration
IP6=static
Address6=('2001:1111:9999:3333::/64')
Double check the values of the file to see they match your LAN. Replace 2001:1111:9999:3333::/64 with your Routed /64 value provided by Tunnelbroker. To enable this on subsequent boots: netctl enable eth0-static.
To allow the machine to act as an IPv6 gateway it needs to be able to forward IPv6 traffic. Create the file /etc/sysctl.d/ipv6.conf, copy this into it:
net.ipv6.conf.default.forwarding=1
net.ipv6.conf.all.forwarding=1
Before continuing you should reboot the rpi. Check the hostname, the clock and importantly the local IP are correct.
Note: A lot of this came from Setting up a Raspberry Pi as an IPv6 gateway using Hurricane Electric. If you become confused by my instructions, that blog post may help you.
Create the file /etc/systemd/system/he-ipv6.service containing:
[Unit]
Description=he.net IPv6 tunnel
After=network.target

[Service]
Type=oneshot
RemainAfterExit=yes
ExecStart=/usr/bin/ip tunnel add he-ipv6 mode sit remote 1.2.3.4 local 192.168.1.23 ttl 255
ExecStart=/usr/bin/ip link set he-ipv6 up mtu 1480
ExecStart=/usr/bin/ip addr add 2001:1111:2222:3333::2/64 dev he-ipv6
ExecStart=/usr/bin/ip -6 route add ::/0 dev he-ipv6
ExecStop=/usr/bin/ip -6 route del ::/0 dev he-ipv6
ExecStop=/usr/bin/ip link set he-ipv6 down
ExecStop=/usr/bin/ip tunnel del he-ipv6

[Install]
WantedBy=multi-user.target
This file contains several values you need to change, be careful;
- Change
1.2.3.4to theServer IPv4 Addressvalue on Tunnelbroker. - Change
192.168.1.23to the local IP of your rpi. - Change
2001:1111:2222:3333::2/64to theClient IPv6 Addressvalue on Tunnelbroker.
Start and enable the service:
systemctl start he-ipv6
systemctl enable he-ipv6systemctl status he-ipv6Ensure the final status command shows a green active. If there's an error it's most likely due to your .service file. If there is no error you should be able to run curl jsonip.com and see an IPv6 address in the output.
Edit /etc/radvd.conf, replacing the entire file with only:
interface eth0
{
    AdvSendAdvert on;
    MinRtrAdvInterval 3;
    MaxRtrAdvInterval 10;
    prefix 2001:1111:9999:3333::/64
    {
        AdvOnLink on;
        AdvAutonomous on;
    };
   route ::/0 {
   };
};
Change the prefix value to your Routed /64 value.
systemctl enable --now radvdsystemctl status radvdAgain, check the status command doesn't show any errors.
Create the file /root/ipv6tables.rules.sh (or wherever you like really), copy the following into it:
# Filename : ipv6tables.rules.sh
# Created by W. Dickson 18.12.12
# First, delete all firewall rules.
ip6tables -F
ip6tables -X
ip6tables -t mangle -F
ip6tables -t mangle -X

# Allow anything on the local link
ip6tables -A INPUT  -i lo -j ACCEPT
ip6tables -A OUTPUT -o lo -j ACCEPT

# Allow anything out onto internet
ip6tables -A OUTPUT -o he-ipv6 -j ACCEPT
# Allow established, related packets back in
ip6tables -A INPUT  -i he-ipv6 -m state --state ESTABLISHED,RELATED -j ACCEPT

# Allow the localnet to access us:
ip6tables -A INPUT    -i eth0   -j ACCEPT
ip6tables -A FORWARD -i eth0 -o eth0 -j ACCEPT
ip6tables -A OUTPUT   -o eth0   -j ACCEPT

# Filter all packets that have RH0 headers:
ip6tables -A INPUT -m rt --rt-type 0 -j DROP
ip6tables -A FORWARD -m rt --rt-type 0 -j DROP
ip6tables -A OUTPUT -m rt --rt-type 0 -j DROP

# Allow Link-Local addresses
ip6tables -A INPUT -s fe80::/10 -j ACCEPT
ip6tables -A OUTPUT -s fe80::/10 -j ACCEPT

# Allow multicast
ip6tables -A INPUT -d ff00::/8 -j ACCEPT
ip6tables -A OUTPUT -d ff00::/8 -j ACCEPT

# Allow ICMPv6 everywhere
ip6tables -I INPUT  -p icmpv6 -j ACCEPT
ip6tables -I FORWARD -p icmpv6 -j ACCEPT
ip6tables -I OUTPUT -p icmpv6 -j ACCEPT

# Allow forwarding
ip6tables -A FORWARD -m state --state NEW -i eth0 -o he-ipv6 -j ACCEPT
ip6tables -A FORWARD -m state --state ESTABLISHED,RELATED -j ACCEPT
ip6tables -A FORWARD -m state --state INVALID -j DROP

# Allow "No Next Header" to be forwarded or proto=59
# See http://www.ietf.org/rfc/rfc1883.txt (not sure if the length
# is needed as all IPv6 headers should be that size anyway).
ip6tables -A FORWARD -p ipv6-nonxt -m length --length 40 -j ACCEPT

# Allow all SSH traffic inbound
ip6tables -A FORWARD -i he-ipv6 -p tcp -d 2001:1111:9999:3333::/64 --dport 22 -j ACCEPT
# Allow all SSH traffic to the gateway
ip6tables -A INPUT -i he-ipv6 -p tcp --dport 22 -j ACCEPT

# Allow HTTP to a specific IP address.
# ip6tables -A FORWARD -i he-ipv6 -p tcp -d [Your IPv6 Webserver Address]/128 --dport 80 -j ACCEPT

## LOGGING

ip6tables -A INPUT -m limit --limit 10/m --limit-burst 7 -j LOG --log-prefix '[FW INPUT]: '
ip6tables -A FORWARD -m limit --limit 10/m --limit-burst 7 -j LOG --log-prefix '[FW FORWARD]: '
ip6tables -A OUTPUT -m limit --limit 10/m --limit-burst 7 -j LOG --log-prefix '[FW OUTPUT]: '

# Set the default policy
ip6tables -P INPUT   DROP
ip6tables -P FORWARD DROP
ip6tables -P OUTPUT  DROP
Note the line ip6tables -A FORWARD -i he-ipv6 -p tcp -d 2001:1111:9999:3333::/64 --dport 22 -j ACCEPT, change the IP to be your Routed /64, or comment out the line if you don't want to forward inbound SSH. Also the lines immediately following allow SSH to the rpi gateway.
cd
chmod +x ipv6tables.rules.sh
./ipv6tables.rules.sh
ip6tables-save > /etc/iptables/ip6tables.rules
systemctl enable --now ip6tablesCheck that ip6tables -L -v -n has a bunch of output.
Connect a new device to your LAN (for example, disconnect your phone from the wifi and reconnect). Check that it can use IPv6. For example browse to https://jsonip.com or try connecting to https://ipv6.google.com. If it can, then you're good to go.
If you have a dynamic IPv4 address provided by your ISP (most people do), then you'll need to update the Client IPv4 address on Tunnelbroker. On the Advanced tab of the tunnel configuration you will see an Example Update URL provided by Tunnelbroker. Copy this value into your crontab:
Open the crontab editor
cron -eSet your tunnel to update every 10 minutes (for instance):
*/10 * * * * curl -s 'https://<username>:<tunnel-token>@ipv4.tunnelbroker.net/nic/update?hostname=<tunnel-id>' &> /dev/null
The cronie service is already running as it was enabled earlier.
Now you're done!
If you want to double check reachability from outside, use an online IPv6 port scanner.
Firefox has an extension called 4or6 and Chrome has one called IPvFoo which can tell you if you're currently using IPv4 or IPv6 to connect to a website.
Your rpi now has a permanent and static IPv6 address. If you own a domain name, you should consider creating an AAAA record for the rpi. Then if you're away (but still on an IPv6 network) you can connect to your rpi at home to initiate downloads or otherwise use your home internet.
Check that netflix doesn't block your streams, they might think you're trying to get around their geo-blockers. Netflix does work for me, but I've heard this isn't always the case.

