CEP (Common Extensibility Platform) lets you build extensions in Adobe Creative Cloud applications like Photoshop, Illustrator, InDesign, After Effects, and many more. Extensions built with CEP let users customize their Creative Cloud experience for their unique workflows.
In this guide, we will help you quickly get started building a CEP extension by covering the basics in 6 easy steps.
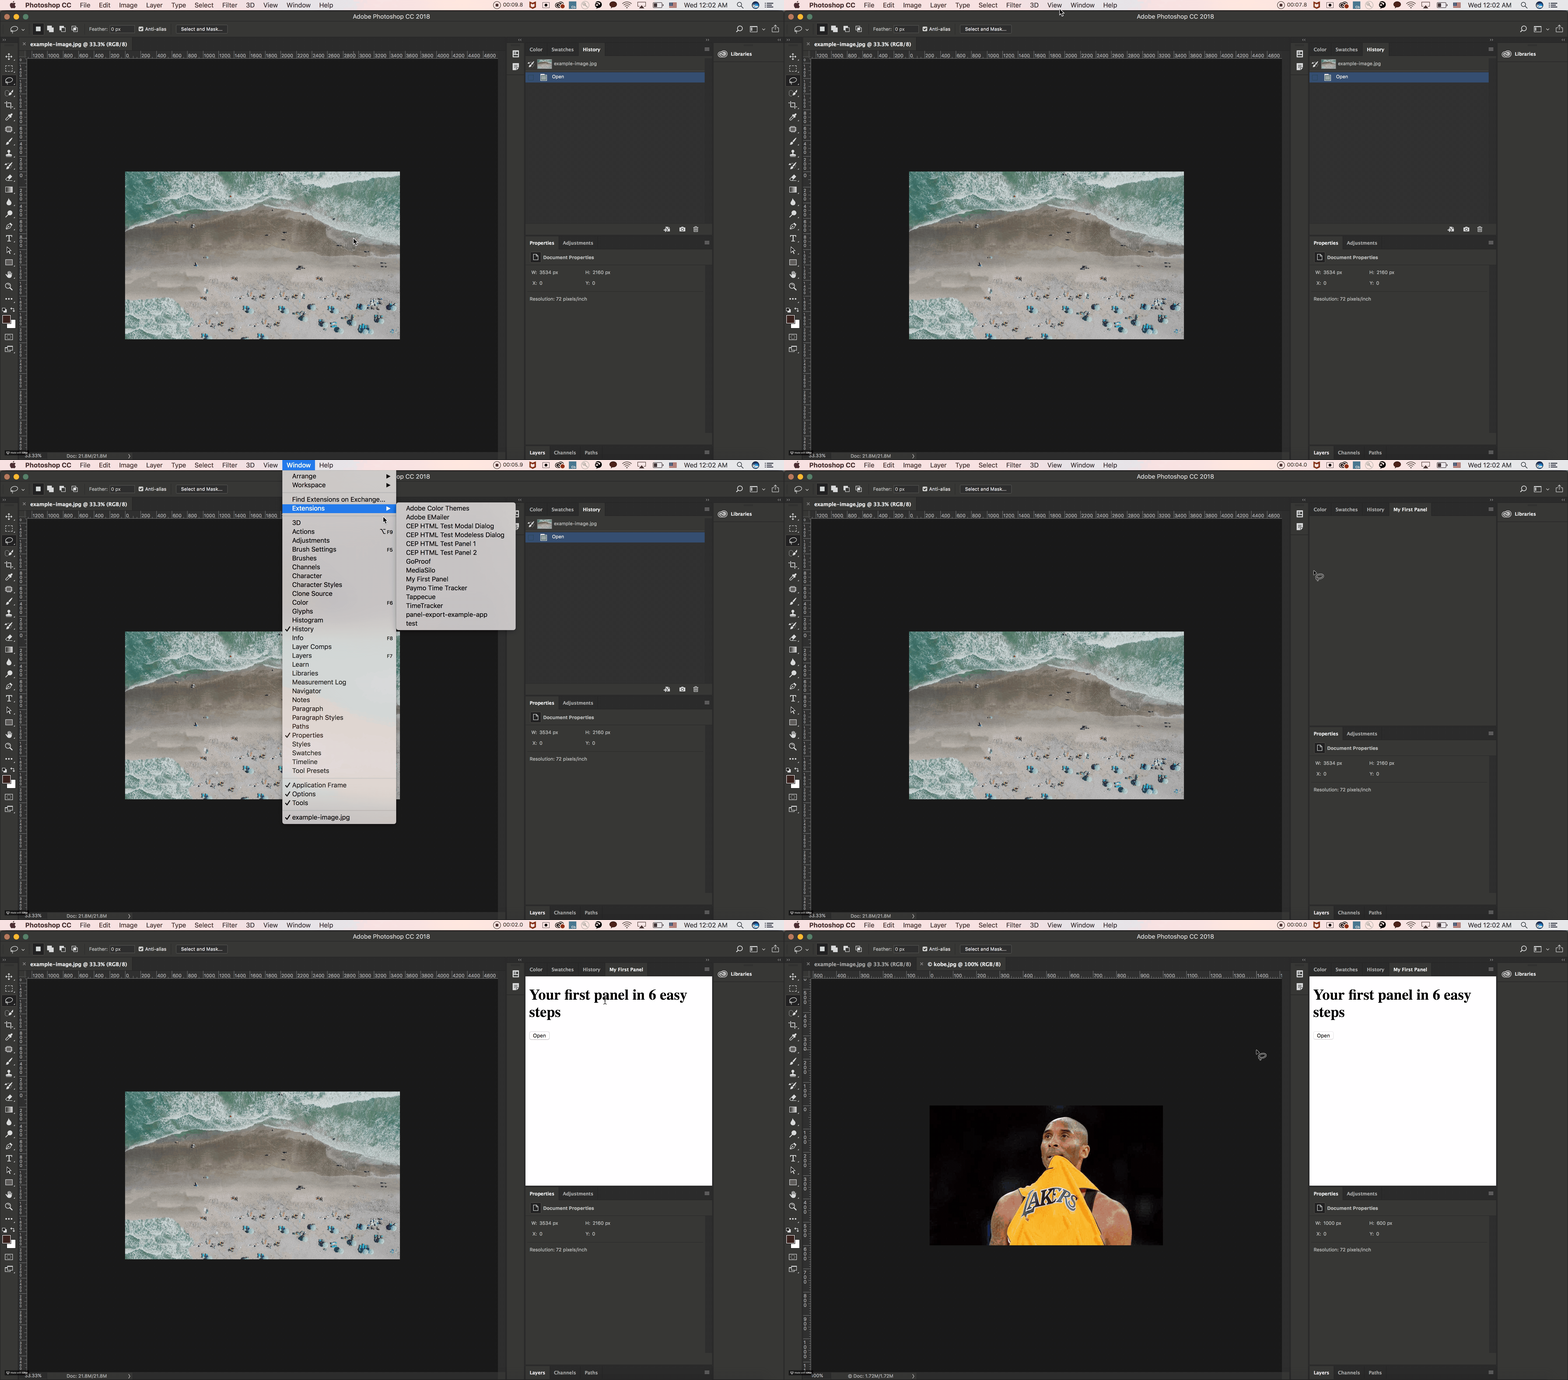
By the end of this guide, we will have a CEP extension that opens a new document from the user's local folder.
When you're finished, be sure to check out the Next Steps section, which has links to guides and samples that will walk you through debugging as well as some common intermediate and advanced topics, like exporting files from the host app, making network requests, and more.
- Supported Host Applications: Photoshop
- Libraries/Frameworks/APIs:
- Adobe-specific: CEP, ExtendScript for Photoshop
Basic knowledge of HTML, CSS, and JavaScript.
You will need to decide where to save your extension code first. Your extension can be saved either at the root level or at the user level, depending on who’s allowed to use the extension (refer to CEP 8 HTML Extension Cookbook for the actual paths).
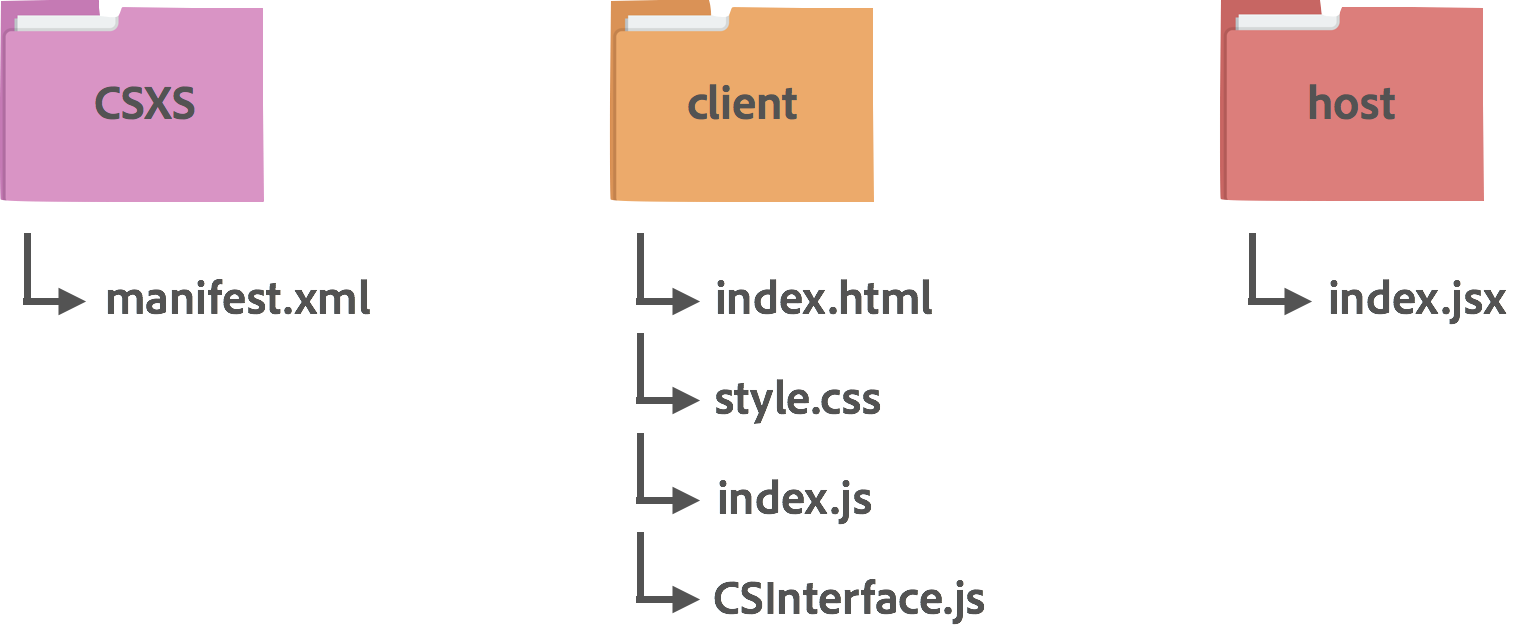
Except for the required CSXS folder, which must contain manifest.xml, the folder structure is flexible. One recommended way to structure the folders would be:
-
/CSXS-- contains themanifest.xmlfile, which stores the extension configuration data. As noted above, this is a requirement for your extension to show up in the host app. -
/client-- contains the front-end HTML, JavaScript, and CSS code, as well as the required AdobeCSInterface.jslibrary, and any third-party libraries you might want to include (for example, jQuery). -
/host-- contains any ExtendScript files (in this case,index.jsx) for your extension. These are used to access and drive most features in the host app
This structure allows you to achieve a clear separation of concerns by devoting one folder to each, client-side and host app.
There are many possible configurations for this file, but to keep things simple, let’s focus on the minimum requirements (for more, see the complete version of the manifest, available in the CEP Resources Github repo).
For a minimal setup, let's look at the following XML elements and attributes in manifest.xml. See the corresponding comments (#1-7) in the code that follows:
- ExtensionBundleId: A unique bundle ID you assign to your extension like
com.my.test - Extension Id: A unique ID you assign to your extension. It usually follows this syntax:
ExtensionBundleID+.panel=com.my.test.panel(note that this ID appears twice in the manifest) - Host Name & Version: List of host application IDs and versions that your extension is built to support. To learn more, take a look at the Adobe CEP HTML Extension Cookbook
- MainPath: Path to your
index.html. Make sure the path to this file is from the top level directory of your code base - ScriptPath: Path to your
index.jsx. Make sure the path to this file is from the top level directory of your code base - Menu: Your extension name that will appear in the dropdown menu of the host app(s)
- Size: Default size of your extension
<?xml version='1.0' encoding='UTF-8'?>
<!-- 1) -->
<ExtensionManifest ExtensionBundleId="com.my.test" ExtensionBundleVersion="1.0.0" Version="7.0" xmlns:xsi="http://www.w3.org/2001/XMLSchema-instance">
  <ExtensionList>
    <!-- 2) -->
    <Extension Id="com.my.test.panel" Version="1.0.0" />
  </ExtensionList>
  <ExecutionEnvironment>
    <HostList>
      <!-- 3) -->
      <Host Name="PHSP" Version="19" />
      <Host Name="PHXS" Version="19" />
    </HostList>
    <LocaleList>
      <Locale Code="All" />
    </LocaleList>
    <RequiredRuntimeList>
      <RequiredRuntime Name="CSXS" Version="7.0" />
    </RequiredRuntimeList>
  </ExecutionEnvironment>
  <DispatchInfoList>
    <!-- 2) -->
    <Extension Id="com.my.test.panel">
      <DispatchInfo>
        <Resources>
          <!-- 4) -->
          <MainPath>./client/index.html</MainPath>
          <!-- 5) -->
          <ScriptPath>./host/index.jsx</ScriptPath>
          <CEFCommandLine />
        </Resources>
        <Lifecycle>
          <AutoVisible>true</AutoVisible>
        </Lifecycle>
        <UI>
          <Type>Panel</Type>
          <!-- 6) -->
          <Menu>My First Panel</Menu>
          <Geometry>
            <Size>
              <!-- 7) -->
              <Height>500</Height>
              <Width>350</Width>
            </Size>
          </Geometry>
          <Icons />
        </UI>
      </DispatchInfo>
    </Extension>
  </DispatchInfoList>
</ExtensionManifest>
This particular configuration gives an panel-type extension called "My First Panel" that supports Photoshop v19 and shows at 500px x 350px.
You need to download the latest version of CEP's CSInterface.js library, which enables you to control the extension and communicate with the application.
You can include this library wherever you like within your codebase, as long as you include it as a <script> dependency in your index.html file.
If you're following along with this example, place the downloaded CSInterface.js directly under /client.
Now, it’s time for you to start using your web development skills to build your extension. You can build this out with HTML, CSS, and JavaScript to suit your goals, but let’s have a look at the basic files.
The user interface for CEP extensions is written in HTML. For this example, locate the HTML document at /client/index.html and write the following code (see comments #1-3):
<!DOCTYPE html>
<html>
<head>
    <meta charset="utf-8">
    <title>Your First Panel</title>
</head>
<body>
    <!-- 1) Simple HTML UI elements to get us started -->
    <h1>Your first panel</h1>

    <!-- 2) A button -->
    <button id="open-button">Open</button>

    <!-- 3) Add your script dependencies here, including CEP's CSInterface.js library -->
    <script type="text/javascript" src="CSInterface.js"></script>
    <script type="text/javascript" src="index.js"></script>
</body>
</html>
As can been seen in the code above, the CSInterface.js library is included as a <script> dependency in this index.html file.
Make sure to create an instance of CSInterface. Your CSInterface instance will give you access to methods and properties useful for buildling your extension.
One of those methods, evalScript(), will let you communicate from your client-side JavaScript to your ExtendScript code (ExtendScript is covered in the next section) and back. See comments #1-3:
/* 1) Create an instance of CSInterface. */
var csInterface = new CSInterface();

/* 2) Make a reference to your HTML button and add a click handler. */
var openButton = document.querySelector("#open-button");
openButton.addEventListener("click", openDoc);

/* 3) Write a helper function to pass instructions to the ExtendScript side. */
function openDoc() {
  csInterface.evalScript("openDocument()");
}
Feel free to refer to the CEP Github repo if you are curious about what else you can do with CSInterface.
ExtendScript code is different from your client-side JavaScript in that, via ExtendScript, you can access the host application’s functionalities, such as opening a document, editing it, exporting it, and almost anything else the host application can do.
In this example, we will create a function that opens one file in the host application. Make sure to change the file name and the path to a file that actually exists in your filesystem.
function openDocument(){
  var fileRef = new File("~/Downloads/myFile.jpg");
  var docRef = app.open(fileRef);
}
This openDocument() helper function will be called when csInterface.evalScript("openDocument()") is invoked from your client-side JavaScript file.
Where the user can find and open your extension will depend on the Creative Cloud host app that your extension supports.
Since the sample extension we made in this guide supports Photoshop, you can find the extension under:
Window > Extensions > My First Panel
When you try to launch your extension, if you get an alert about unsigned extensions, see the "Set the Debug Mode" section of our Client-side debugging guide.
Now that you've seen the basics, check out these guides and samples that walk you through some common intermediate and advanced topics in CEP:

