https://github.com/iteapoy/GANDenoising
目录
Table of Contents
这是SJTU CS386的课程项目。
用GAN对256*256的RGB图像进行去噪。
├─Checkpoints
├─dataset
│  ├─groundtruth
│  ├─metrics
│  ├─test
│  ├─training
│  ├─training_25
│  ├─training_50
│  ├─validation_25
│  ├─validation_50
│  └─validation
├─Graphs
├─Images
├─libs
│  ├─utils.py
│  └─vgg16.py
├─model.py
├─conv_helper.py
├─train.py
├─utils.py
├─test.py
└─README.md
- 噪声程度为15时的去噪效果:
左:原图,中:噪声图,右:去噪图像
-
噪声程度为25时的去噪效果:
左:原图,中:噪声图,右:去噪图像
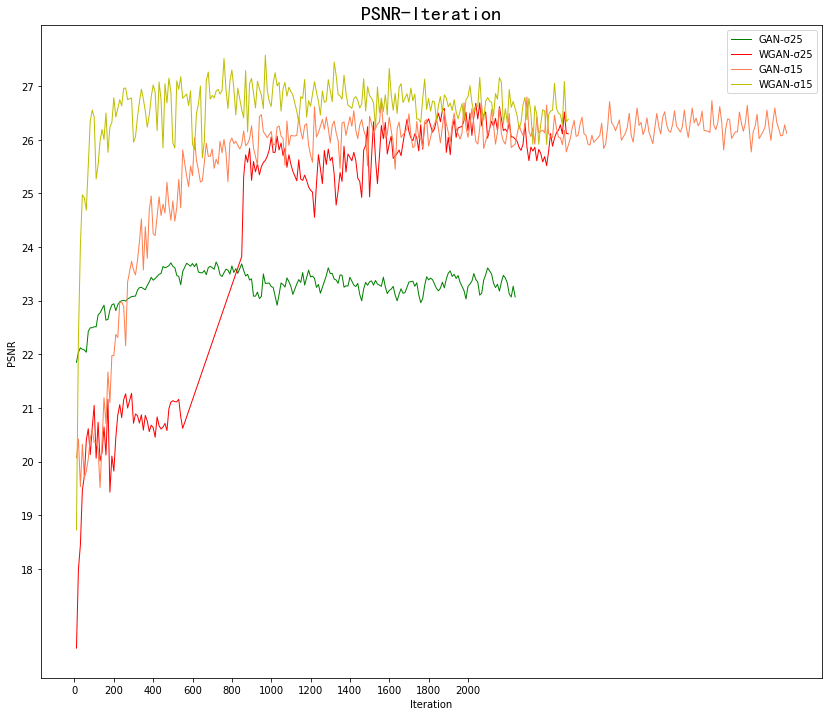
PSNR随迭代次数的变化:
SSIM随迭代次数的变化:
- conv_helper.py,包含:
- 卷积层conv_layer的定义
- model.py,包含:
- 生成器generator的模型结构
- 判别器discriminator的模型结构
- utils.py,包含一些超参数配置,数据载入函数,损失函数的定义。
- 超参数包含:
- LEARNING_RATE:学习率
- BATCH_SIZE:图片批处理数量(默认一次处理5张图片)
- BATCH_SHAPE:图像的格式,默认为256*256的RGB图像
- EPOCHS:迭代次数
- CKPT_DIR:模型保存的目录
- IMG_DIR:验证的图像(validation)保存的目录
- GRAPH_DIR:tensorflow graph的保存目录
- TRAINING_SET_DIR:训练集的目录
- VALIDATION_SET_DIR:验证集的目录
- METRICS_SET_DIR:groundtruth的目录
- 函数包含:
- initialize(sess):初始化会话
- get_training_dir_list():获得训练集列表
- load_next_training_batch():载入下一个训练批次
- load_validation():载入验证集
- training_dataset_init():初始化训练集
- imsave(filename, image):在IMG_DIR目录下保存(去噪后的)图像
- split(arr, size):将整个训练集arr分割成每块size个
- lrelu(x, leak=0.2, name='lrelu'):自定义的Leaky Relu函数
- 超参数包含:
- train.py,用于训练数据集。
- test.py,用于去噪256*256的RGB图像。
- python 3.5
- tensorflow 1.1.0
- pillow (可代替PIL)
- scikit-image
- 其它库可视实际运行情况安装
将Checkpoints目录清空。
运行:python3 train.py
此处默认训练集在噪声$\sigma$=15的情况下。如果想要训练噪声$\sigma$=25,50,请把training和validation改成对应的training_25和validation_25或者training_50和validation_50.
在训练时可能遇到如下问题:
-
默认图模型超过2G
Traceback (most recent call last): File "./train.py", line 90, in train() File "./train.py", line 73, in train saver.save(sess, CKPT_DIR, step+1) File "/lib/python3.5/site-packages/tensorflow/python/training/saver.py", line 1403, in save self.export_meta_graph(meta_graph_filename) File "/lib/python3.5/site-packages/tensorflow/python/training/saver.py", line 1431, in export_meta_graph graph_def=ops.get_default_graph().as_graph_def(add_shapes=True), File "/lib/python3.5/site-packages/tensorflow/python/framework/ops.py", line 2191, in as_graph_def result, _ = self._as_graph_def(from_version, add_shapes) File "/lib/python3.5/site-packages/tensorflow/python/framework/ops.py", line 2154, in _as_graph_def raise ValueError("GraphDef cannot be larger than 2GB.") ValueError: GraphDef cannot be larger than 2GB.
这个不是报错,因为已经在Checkpoint中保存了之前运行的模型,只要再重新运行
python3 train.py(!!!不要删除Checkpoint中的东西),就会恢复上一次成功的模型,并继续运行(相当于连续运行)。
-
运行完发现输出结果是NAN:
Step xx/20000 Gen Loss: nan Disc Loss: nan PSNR: 5.76797350509 SSIM: 0.000175171622197
NAN有一定概率出现,但不是必然。
(1)请将Checkpoints目录清空。重新运行train.py.
(2)如果依然是NAN,再尝试第(1)步。
一般重新运行3-4次后,会出现正确数值。
假设想要去噪的图像为 noisy.png,请先确保它的大小是256*256的RGB图像。
Checkpoints文件夹中应该包含至少4个文件:
- -xxxx.data-00000-of-00001
- -xxxx.index
- -xxxx.meta
- checkpoint
Checkpoints下载地址:https://jbox.sjtu.edu.cn/l/onFbdH
说明:
将可用的模型放到Checkpoints文件夹中(假设训练的模型迭代次数为2490,则模型含三个文件:-2490.data-00000-of-00001,-2490.index,-2490.meta)
必要时修改文件夹中checkpoint文件:
model_checkpoint_path: "-2490"
假设想将模型更换为2500次迭代的模型,则将checkpoint修改成:
model_checkpoint_path: "-2500"
并确保Checkpoints文件夹中含有:
- -2500.data-00000-of-00001
- -2500.index
- -2500.meta
另外,原有的-2490是对噪声程度15的去噪模型,文件夹\Checkpoints\25中是对噪声程度25的去噪模型。更换模型,请删除原有的去噪模型,并把\Checkpoints\25中的文件复制到\Checkpoints中。
运行:
python3 test.py noisy.png
去噪后的图片将保存在output.png中。
原代码来源:https://github.com/manumathewthomas/ImageDenoisingGAN
This is a DIP2018 project for SJTU CS386:Digital Image Process.
The code achieves denoising 256*256 RGB images.
├─Checkpoints
├─dataset
│  ├─groundtruth
│  ├─metrics
│  ├─test
│  ├─training
│  ├─training_25
│  ├─training_50
│  ├─validation_25
│  ├─validation_50
│  └─validation
├─Graphs
├─Images
├─libs
│  ├─utils.py
│  └─vgg16.py
├─model.py
├─conv_helper.py
├─train.py
├─utils.py
├─test.py
└─README.md
-
conv_helper.py,includes:
- definition of convolution layer
-
model.py,includes:
- generator model
- discriminator model
-
utils.py,includes some hyperparameter, function for data loading and loss function
- hyperparameter includes:
- BATCH_SHAPE:image shape,default: 256*256 RGB images
- EPOCHS:iterations
- CKPT_DIR:the directory of checkpoint
- IMG_DIR:the directory of output denoised validation in train.py
- GRAPH_DIR:the directory of tensorflow graph
- TRAINING_SET_DIR:the directory of training dataset
- VALIDATION_SET_DIR:the directory of validation
- METRICS_SET_DIR:the directory of groundtruth
- hyperparameter includes:
-
train.py,for training
-
test.py,for denoising your image(256*256 RGB)
- python 3.5
- tensorflow 1.1.0
- pillow (instead of PIL)
- scikit-image
- other modules if needed
-
train
Clear Checkpoints.
run:
python3 train.pyWhen training, you may meet errors as followed:
-
ValueError: GraphDef cannot be larger than 2GB.
Traceback (most recent call last): File "./train.py", line 90, in train() File "./train.py", line 73, in train saver.save(sess, CKPT_DIR, step+1) File "/lib/python3.5/site-packages/tensorflow/python/training/saver.py", line 1403, in save self.export_meta_graph(meta_graph_filename) File "/lib/python3.5/site-packages/tensorflow/python/training/saver.py", line 1431, in export_meta_graph graph_def=ops.get_default_graph().as_graph_def(add_shapes=True), File "/lib/python3.5/site-packages/tensorflow/python/framework/ops.py", line 2191, in as_graph_def result, _ = self._as_graph_def(from_version, add_shapes) File "/lib/python3.5/site-packages/tensorflow/python/framework/ops.py", line 2154, in _as_graph_def raise ValueError("GraphDef cannot be larger than 2GB.") ValueError: GraphDef cannot be larger than 2GB.
Actually, this is not an error. As the checkpoint of the model you previously trained has been stored in the directory Checkpoints, you may just rerun
python3 train.py(!!!DON'T CLEAR CHECKPOINTS). The code will restore the last checkpoint and continue to run. -
Loss: nan
Step xx/20000 Gen Loss: nan Disc Loss: nan PSNR: 5.76797350509 SSIM: 0.000175171622197
Loss may be NAN, but it is occasional.
You can try:
(1) Clear the directory Checkpoints, and rerun
python3 train.py(2) If the loss is still NAN, please go back to (1)
Generally, the loss may be normal after you retry 3-4 times.
-
test
Assume the noisy image to be denoised is noisy.png, please make sure that it is an RGB image of 256*256.
run:
python3 test.py noisy.pngThe denoised image is output.png.
The code is from:https://github.com/manumathewthomas/ImageDenoisingGAN


