Qgrid is a Jupyter notebook widget which uses SlickGrid to render pandas DataFrames within a Jupyter notebook. This allows you to explore your DataFrames with intuitive scrolling, sorting, and filtering controls, as well as edit your DataFrames by double clicking cells.
Qgrid was developed for use in Quantopian's hosted research environment and is available for use in that environment as of June 2018. Quantopian also offers a fully managed service for professionals that includes Qgrid, Zipline, Alphalens, Pyfolio, FactSet data, and more.
Qgrid author Tim Shawver recently did a live webinar about Qgrid, and the recording of the webinar is now available on YouTube.
This talk will be interesting both for people that are new to Qgrid, as well as longtime fans that are interested in learning more about the project.
Click the badge below to try out the latest beta of qgrid in Quantopian's hosted research environment. If you're already signed into Quantopian you'll be brought directly to the demo notebook. Otherwise you'll be prompted to register (it's free):

Click the badge below to try out qgrid using binder:
Click the following badge to try out qgrid in Jupyterlab, also using binder:
For both binder links, you'll see a brief loading screen while a server is being created for you in the cloud. This shouldn't take more than a minute, and usually completes in under 10 seconds.
The binder demos generally will be using the most recent stable release of qgrid, so features that were added in a recent beta version may not be available in those demos.
For people who would rather not go to another page to try out qgrid for real, here's the tldr; version:
API documentation is hosted on readthedocs.
Installing with pip:
pip install qgrid
jupyter nbextension enable --py --sys-prefix qgrid

# only required if you have not enabled the ipywidgets nbextension yet
jupyter nbextension enable --py --sys-prefix widgetsnbextension
Installing with conda:
# only required if you have not added conda-forge to your channels yet
conda config --add channels conda-forge

conda install qgrid
First, go through the normal installation steps above as you normally would when using qgrid in the notebook. If you haven't already install jupyterlab and enabled ipywidgets, do that first with the following lines:
pip install jupyterlab
jupyter labextension install @jupyter-widgets/jupyterlab-manager
Install the qgrid-jupyterlab extension and enable:
jupyter labextension install qgrid2
At this point if you run jupyter lab normally with the 'jupyter lab' command, you should be able to use qgrid in notebooks as you normally would.
Please Note: Jupyterlab support has been tested with jupyterlab 0.30.5 and jupyterlab-manager 0.31.3, so if you're having trouble, try installing those versions. Feel free to file an issue if you find that qgrid isn't working with a newer version of either dependency.
Column-specific options (as of 1.1.0): Thanks to a significant PR from the community, Qgrid users now have the ability to set a number of options on a per column basis. This allows you to do things like explicitly specify which column should be sortable, editable, etc. For example, if you wanted to prevent editing on all columns except for a column named 'A', you could do the following:
col_opts = { 'editable': False }
col_defs = { 'A': { 'editable': True } }
qgrid.show_grid(df, column_options=col_opts, column_definitions=col_defs)
See the updated show_grid documentation for more information.
Disable editing on a per-row basis (as of 1.1.0): This feature can be thought of as the first row-specific option that qgrid supports. In particular it allows a user to specify, using python code, whether or not a particular row should be editable. For example, to make it so only rows in the grid where the 'status' column is set to 'active' are editable, you might use the following code:
def can_edit_row(row):
    return row['status'] == 'active'

qgrid.show_grid(df, row_edit_callback=can_edit_row)
New API methods for dynamically updating an existing qgrid widget (as of 1.1.0): Adds the following new methods, which can be used to update the state of an existing Qgrid widget without having to call show_grid to completely rebuild the widget:
- edit_cell
- change_selection
- toggle_editable
- change_grid_option (experimental)
Improved MultiIndex Support (as of 1.0.6-beta.6): Qgrid now displays multi-indexed DataFrames with some of the index cells merged for readability, as is normally done when viewing DataFrames as a static html table. The following image shows qgrid displaying a multi-indexed DataFrame that was returned from Quantopian's Pipeline API:
Qgrid runs on Python 2 or 3. You'll also need pip for the installation steps below.
Qgrid depends on the following three Python packages:
- Jupyter notebook
- This is the interactive Python environment in which qgrid runs.
- ipywidgets
- In order for Jupyter notebooks to be able to run widgets, you have to also install this ipywidgets package. It's maintained by the Jupyter organization, the same people who created Jupyter notebook.
- Pandas
- A powerful data analysis / manipulation library for Python. Qgrid requires that the data to be rendered as an interactive grid be provided in the form of a pandas DataFrame.
These are listed in requirements.txt and will be automatically installed (if necessary) when qgrid is installed via pip.
| qgrid | IPython / Jupyter notebook | ipywidgets | Jupyterlab |
|---|---|---|---|
| 0.2.0 | 2.x | N/A | N/A |
| 0.3.x | 3.x | N/A | N/A |
| 0.3.x | 4.0 | 4.0.x | N/A |
| 0.3.x | 4.1 | 4.1.x | N/A |
| 0.3.2 | 4.2 | 5.x | N/A |
| 0.3.3 | 5.x | 6.x | N/A |
| 1.0.x | 5.x | 7.x | 0.30.x |
There are a couple of demo notebooks in the qgrid-notebooks repository which will help you get familiar with the functionality that qgrid provides. Here are the steps to clone the qgrid-notebooks repository and open a demo notebook:
Install qgrid by following the instructions in the Installation section above, if you haven't already
Clone the qgrid-notebooks repository from GitHub:
git clone https://github.com/quantopian/qgrid-notebooks.git
Install the dev requirements for the repository and start the notebook server:
cd qgrid-notebooks
pip install -r requirements_dev.txt
jupyter notebook
Click on one of the two notebooks (index.ipynb or experimental.ipynb) that you see listed in the notebook UI in your browser.
If you'd like to contribute to qgrid, or just want to be able to modify the source code for your own purposes, you'll want to clone this repository and run qgrid from your local copy of the repository. The following steps explain how to do this.
Clone the repository from GitHub and
cdinto the top-level directory:git clone https://github.com/quantopian/qgrid.git cd qgrid
Install the current project in editable mode:
pip install -e .
Install the node packages that qgrid depends on and build qgrid's javascript using webpack:
cd js && npm install .
Install and enable qgrid's javascript in your local jupyter notebook environment:
jupyter nbextension install --py --symlink --sys-prefix qgrid && jupyter nbextension enable --py --sys-prefix qgrid
If desired, install the labextension:
jupyter labextension link js/
Run the notebook as you normally would with the following command:
jupyter notebook
If the code you need to change is in qgrid's python code, then restart the kernel of the notebook you're in and rerun any qgrid cells to see your changes take effect.
If the code you need to change is in qgrid's javascript or css code, repeat step 3 to rebuild qgrid's npm package, then refresh the browser tab where you're viewing your notebook to see your changes take effect.
There is a small python test suite which can be run locally by running the command pytest in the root folder
of the repository.
The read-the-docs page is generated using sphinx. If you change any doc strings or want to add something to the read-the-docs page, you can preview your changes locally before submitting a PR using the following commands:
pip install sphinx sphinx_rtd_theme
cd docs && make html
This will result in the docs/_build/html folder being populated with a new version of the read-the-docs site. If
you open the index.html file in your browser, you should be able to preview your changes.
As of qgrid 1.0.3 there are new on and off methods in qgrid which can be used to attach/detach event handlers. They're available on both the qgrid module (see qgrid.on), and on individual QgridWidget instances (see qgrid.QgridWidget.on). Previously the only way to listen for events was to use undocumented parts of the API.
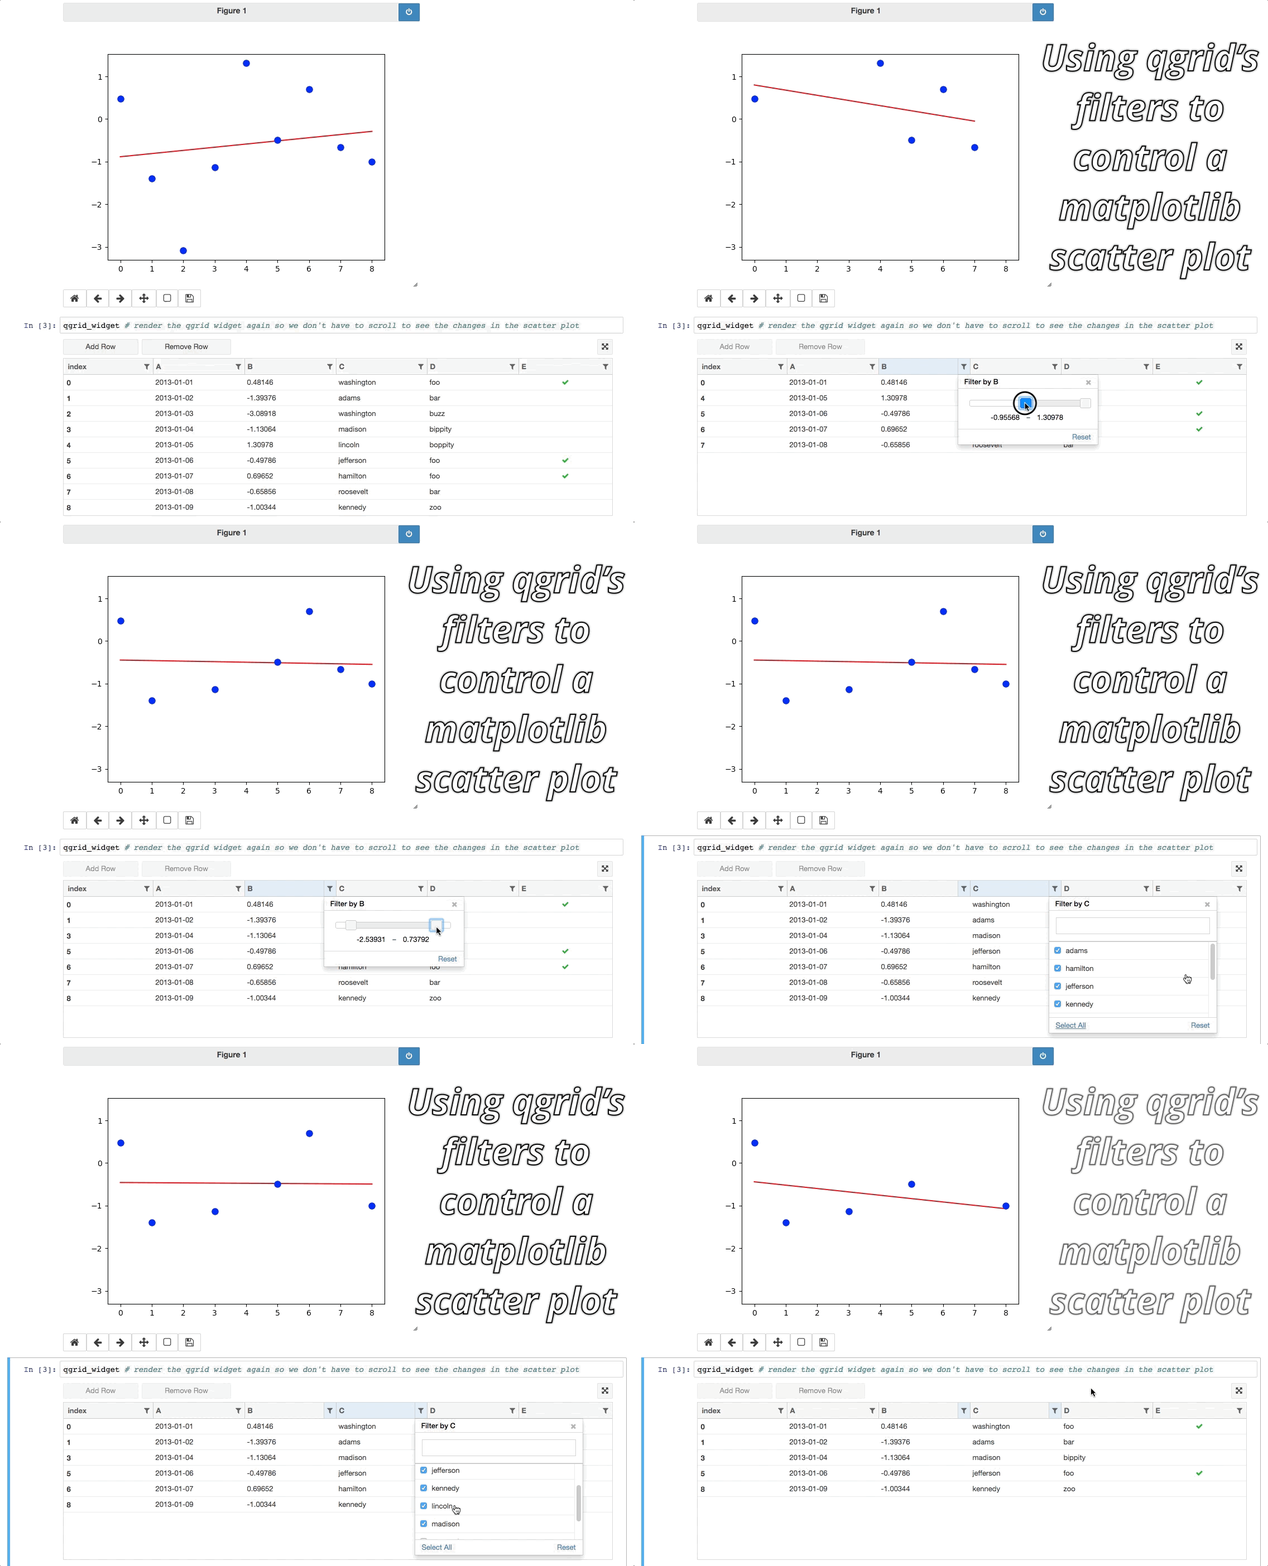
Having the ability to attach event handlers allows us to do some interesting things in terms of using qgrid in conjunction with other widgets/visualizations. One example is using qgrid to filter a DataFrame that's also being displayed by another visualization.
If you previously used the observe method to respond to qgrid events, lets see how your code might be updated to use the new on method:
# Before upgrading to 1.0.3
def handle_df_change(change):
    print(change['new'])

qgrid_widget.observe(handle_df_change, names=['_df'])
When you upgrade to 1.0.3, you have more granular control over which events you do an don't listen to, but you can also replicate the previous behavior of calling print every time the state of the internal DataFrame is changed. Here's what that would look like using the new on method:
# After upgrading to 1.0.3
def handle_json_updated(event, qgrid_widget):
    # exclude 'viewport_changed' events since that doesn't change the DataFrame
    if (event['triggered_by'] != 'viewport_changed'):
        print(qgrid_widget.get_changed_df())

qgrid_widget.on('json_updated', handle_json_updated)
See the events notebook for more examples of using these new API methods.
For people who would rather not go to another page to try out the events notebook, here are a couple of gifs to give you an idea of what you can do with it.
The first gif shows how you can use qgrid to filter the data that's being shown by a matplotlib scatter plot:
The second gif shows how you can move qgrid to a separate view in JupyterLab, which makes it more convenient
to use in conjunction with other visualizations (in this case, a couple of Output widgets):
If you're looking for the installation and usage instructions for qgrid 0.3.3 and the sample notebook that goes along with it, please see the qgrid 0.3.3 tag in this repository. The installation steps will be mostly the same. The only difference is that when you run "pip install" you'll have to explicitly specify that you want to install version 0.3.3, like this:
pip install qgrid==0.3.3
If you're looking for the API docs, you can find them on the readthedocs page for qgrid 0.3.3.
If you're looking for the demo notebook for 0.3.3, it's still availabe in nbviewer.
Qgrid 0.3.3 is not compatible with ipywidgets 7, so if you need support for ipywidgets 7, you'll need to use qgrid 1.0.
All contributions, bug reports, bug fixes, documentation improvements, enhancements, and ideas are welcome. See the Running from source & testing your changes section above for more details on local qgrid development.
If you are looking to start working with the qgrid codebase, navigate to the GitHub issues tab and start looking through interesting issues.
Feel free to ask questions by submitting an issue with your question.


