Traildash is a simple, yet powerful, dashboard for AWS CloudTrail logs.

To quote AWS:
AWS CloudTrail is a web service that records AWS API calls for your account and delivers log files to you. The recorded information includes the identity of the API caller, the time of the API call, the source IP address of the API caller, the request parameters, and the response elements returned by the AWS service. AWS charges a few dollars a month for CloudTrail for a typical organization.
The data in CloudTrail is essential, but it's unfortunately trapped in many tiny JSON files stored in AWS S3. Traildash grabs those files, stores them in ElasticSearch, and presents a Kibana dashboard so you can analyze recent activity in your AWS account.
- Who terminated my EC2 instance?
- When was that Route53 entry changed?
- What idiot added 0.0.0.0/0 to the security group?
- Customizable Kibana dashboards for your CloudTrail logs
- Easy to setup: under 15 minutes
- Self-contained Kibana 3.1.2 release
- HTTPS server with custom SSL cert/key or optional self-signed cert
- Single Linux/OSX binaries
- ElasticSearch proxy ensures your logs are secure and read-only
- No need to open direct access to your ElasticSearch instance
- Helps to achieve PCI and HIPAA compliance in the cloud
Configure the Traildash Docker container with a few environment variables, and you're off to the races.
-
Fill in the "XXX" blanks and run with docker:
docker run -i -d -p 7000:7000 \ -e "AWS_ACCESS_KEY_ID=XXX" \ -e "AWS_SECRET_ACCESS_KEY=XXX" \ -e "AWS_SQS_URL=https://XXX" \ -e "DEBUG=1" \ -v /home/traildash:/var/lib/elasticsearch/ \ appliedtrust/traildash -
Open http://localhost:7000/ in your browser
AWS_ACCESS_KEY_ID		AWS Key ID.
AWS_SECRET_ACCESS_KEY	AWS Secret Key.
AWS_SQS_URL				AWS SQS URL.
AWS_REGION		AWS Region (SQS and S3 regions must match. default: us-east-1).
WEB_LISTEN		Listen IP and port for web interface (default: 0.0.0.0:7000).
ES_URL			ElasticSearch URL (default: http://localhost:9200).
DEBUG			Enable debugging output.
SSL_MODE		"off": disable HTTPS and use HTTP (default)
			"custom": use custom key/cert stored stored in ".tdssl/key.pem" and ".tdssl/cert.pem"
			"selfSigned": use key/cert in ".tdssl", generate an self-signed cert if empty
We recommend using the appliedtrust/traildash docker container for convenience, as it includes a bundled ElasticSearch instance. If you'd like to run your own ElasticSearch instance, or simply don't want to use Docker, it's easy to run from the command-line. The traildash executable is configured with environment variables rather than CLI flags - here's an example:
export AWS_ACCESS_KEY_ID=AKIXXX
export AWS_SECRET_ACCESS_KEY=XXX
export AWS_SQS_URL=XXX
export AWS_REGION=us-east-1
export WEB_LISTEN=0.0.0.0:7000
export ES_URL=http://localhost:9200
export DEBUG=1
traildash
traildash --version
- AWS CloudTrail creates a new log file, stores it in S3, and notifies an SNS topic.
- The SNS topic notifes a dedicated SQS queue about the new log file in S3.
- Traildash polls the SQS queue and downloads new log files from S3.
- Traildash loads the new log files into a local ElasticSearch instace.
- Kibana provides beautiful dashboards to view the logs stored in ElasticSearch.
- Traildash protects access to ElasticSearch, ensuring logs are read-only.
- In your primary region, turn on CloudTrail:

- Tell CloudTrail to create a new S3 bucket and SNS topic:

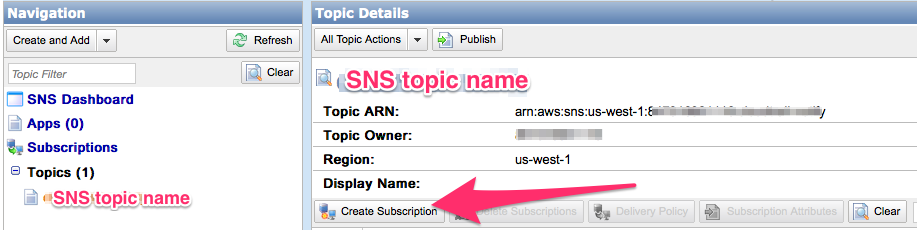
- Switch to SNS in your AWS console to view your SNS topic and copy its ARN to your clipboard:

- Switch to SQS in your AWS console and create a new SQS queue - okay to stick with default options:


- Select your SQS queue, click the "permissions" tab, then click "Add a Permission":

- Click "Everybody", and click the "SendMessage" action:

- Change the Key to "aws:SourceArn", paste in your SNS topic ARN from your clipboard, then click "Add Condition":
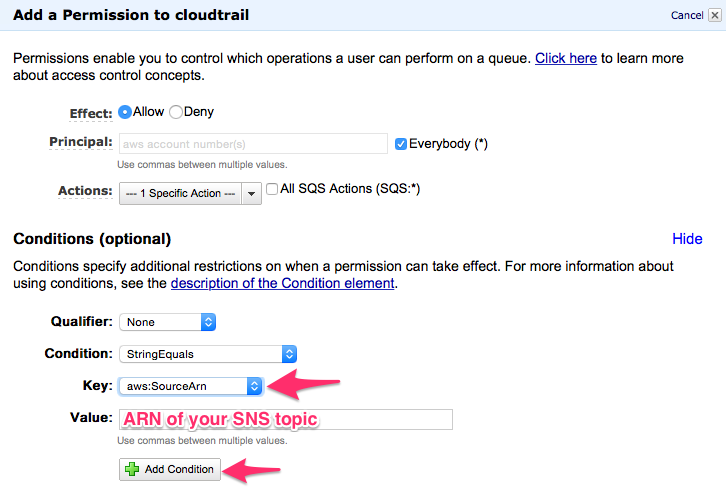
- Click "Add Permission":

- Copy your SQS queue's ARN to your clipboard:

- Switch back to your SNS topic, and click "Add Subscription":
- Paste in your SQS queue's URL from your clipboard:

- To add other regions:
- Configure all regions to use the same S3 bucket.
- Configure your SQS queue to permit each region's SNS topic.
- Subscribe your central SQS queue to each region's SNS topic.
- Disable the CloudTrail "global events" option for all but your primary region.
- Finally, create a dedicated IAM user with the following inline policy, filing in information from the S3 bucket name and SQS queue ARN from above. Create an API access key and download to a safe place.


{
  "Version": "2012-10-17",
  "Statement": [
    {
      "Sid": "Stmt1424707635000",
      "Effect": "Allow",
      "Action": [
        "s3:GetObject"
      ],
      "Resource": [
        "arn:aws:s3:::[YOUR CLOUDTRAIL S3 BUCKET NAME]/*"
      ]
    },
    {
      "Sid": "Stmt1424707727000",
      "Effect": "Allow",
      "Action": [
        "sqs:DeleteMessage",
        "sqs:ReceiveMessage"
      ],
      "Resource": [
        "[YOUR SQS ARN]"
      ]
    }
  ]
}
- Fork the project
- Add your feature
- If you are adding new functionality, document it in README.md
- Add some tests if able.
- Push the branch up to GitHub.
- Send a pull request to the appliedtrust/traildash project.
This project uses glock for managing 3rd party dependencies. You'll need to install glock into your workspace before hacking on traildash.
$ git clone <your fork>
$ glock sync github.com/appliedtrust/traildash
$ make
To cross-compile, you'll need to follow these steps first: http://dave.cheney.net/2012/09/08/an-introduction-to-cross-compilation-with-go
MIT