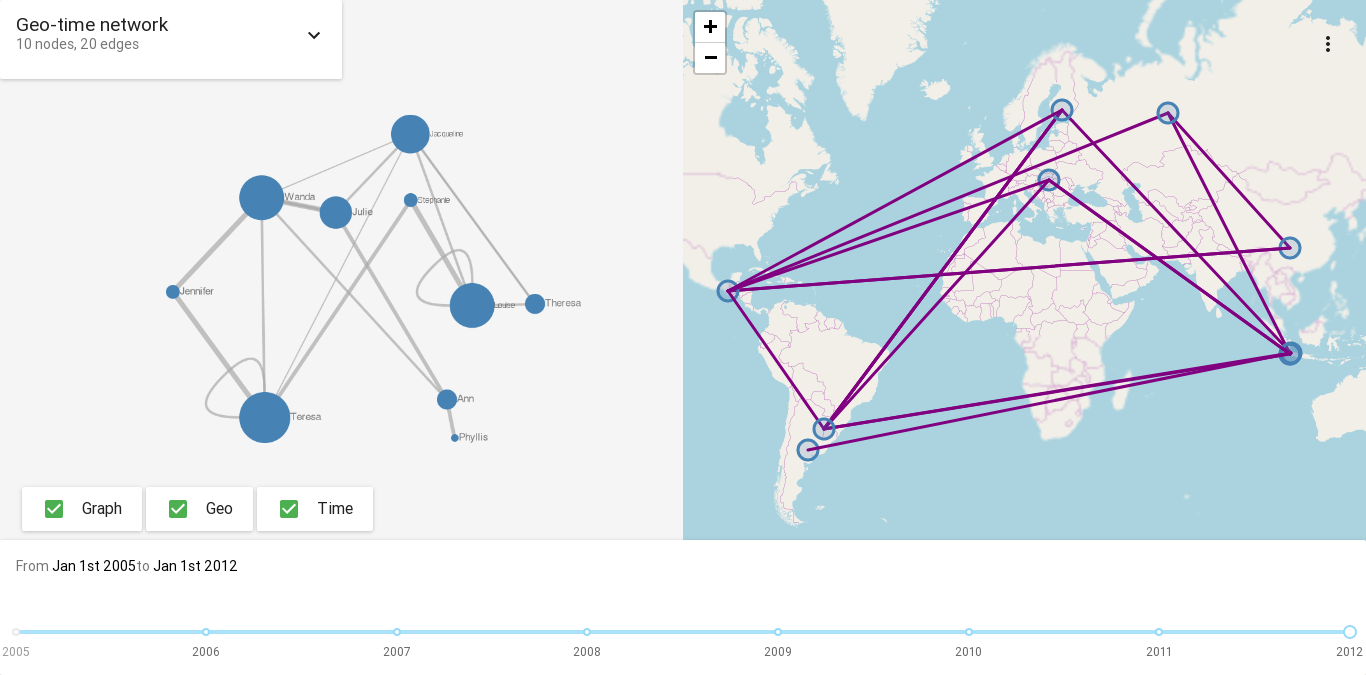
Topogram is a web-based app to visualize the evolution of networks over time and space.
Try it online at app.topogram.io or install your own.
- Time-based navigation in graph
- Network layouts + geographic data
- Online/real-time data update via API
Currently, the simplest way is to input data is to use the Python API client to push data directly into the database.
from topogram-python-client import TopogramAPIClient

topogram = TopogramAPIClient("http://localhost:3000")

# create a new network
topogram.create_topogram("Awesome viz of geo-time network")

# add data
r = topogram.create_nodes(topogram_ID, [...nodes])
r = topogram.create_edges(topogram_ID, [...edges])You can add geographic and time information to the nodes.
| Name | Type | Description | Example | |
|---|---|---|---|---|
| id | String | required | Id of the node. Should match node Id provided to the edges | 'My node 1' |
| name | String | optional | The name of the node | 'Michael' |
| lat | Float | optional | Latitude (in degrees) | -6.7589 |
| lng | Float | optional | Longitude (in degrees) | 105.8671 |
| start | Date | optional | When the node started existing (Json ISO format) | 2010-08-03T10:00:00.000000 |
| end | Date | optional | When the node stopped existing (Json ISO format) | 2010-09-02T10:00:00.000000 |
| color | String | optional | Color of the node | '#555000' |
| weight | Float | optional | Weight of the node | 4 |
| group | String | optional | Some category to classify the node | 'male' |
| notes | String | optional | (Markdown) Additional info about the nodes | '# Title' |
See the model in /imports/api/nodes/Nodes.js
Example of mapping using the Python API Client :
  node = {
    "id" : str,
    "name" : str,
    "lat" : float,
    "lng" : float,
    "weight" : float,
    "start" : datetime,
    "end" : datetime,
    "notes" : str
    }
Edges require a source and target. When source node or target node are absent from the data, the edge will be ignored.
| Name | Type | | Description | Example | |--- |--- |--- |--- | | source | String | required | Id of the source node (required) | 'My node 1' | | target | String | required | Id of the target node (required) | 'My node 2' | | id | String | optional | Id of the edge | 'My edge 1' | | name | String | optional | The name/label of the edge | 'Loves' | | start | Date | optional | Date when the edge started existing | 2015 | | end | Date | optional | Date when the edge stopped existing | 2012 | | color | String | optional | Color of the edge | '#555000'| | weight| Float | optional | Weight of the edge | 4 | | group | String | optional | Some category to classify the edge | 'male'| | notes | String | optional | (Markdown) Additional info about the edge | '# Title' |
See the model in /imports/api/edges/Edges.js
Example of mapping using the Python API Client :
  edge = {
    "source" : str,
    "target" : str,
    "weight" : float,
    "notes" : str
}Once you have created your topogram, it will be available at the list at the address /topograms of your server. You can click on the title to access
The main visualization is divided between 3 panels :
- network graph
- geographical map
- timeline
You can toggle each of these panels by using the panel selector. When no geo or time element are detected, the checkboxes are disabled automatically.
By clicking on the title, you can access the main menu to manipulate and edit your topogram.
Change the tiles of the map according to your needs.
Different layouts are available to display your graph. Try different options to see what fits you best.
Different options are available to display the nodes. It can used the degree of the node in the graph or a user-defined weight (if you assigned it in the data).
When the selection mode is activated, you can click to highlight specific elements of the graphs.
You need Meteor JS to install Topogram.
git clone https://github.com/topogram/topogram-client.git
cd topogram-client
meteor npm install
meteor

