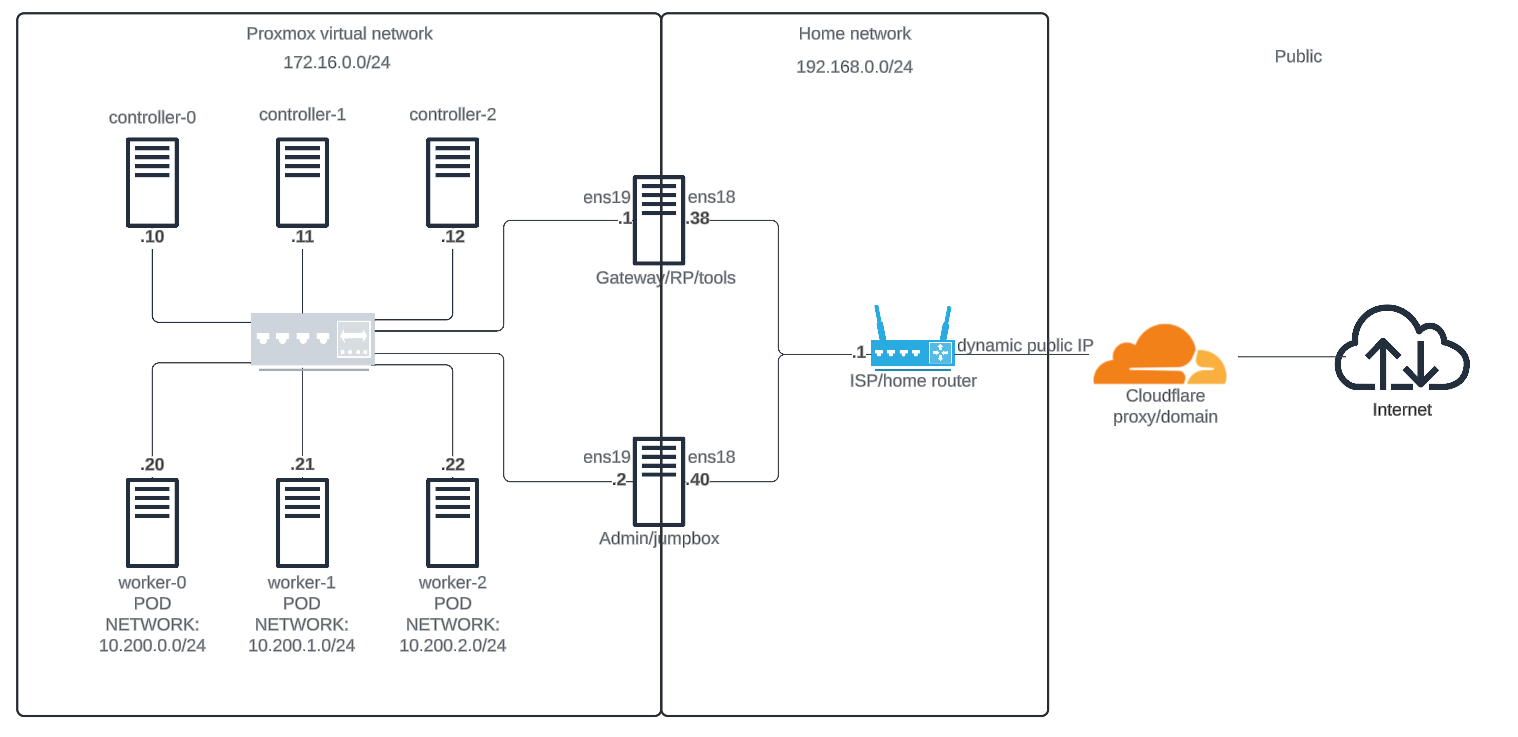
This tutorial walks you through setting up Kubernetes the hard way. This guide is not for someone looking for a fully automated tool to bring up a Kubernetes cluster. Kubernetes The Hard Way is optimized for learning, which means taking the long route to ensure you understand each task required to bootstrap a Kubernetes cluster.
The results of this tutorial should not be viewed as production ready, and may receive limited support from the community, but don't let that stop you from learning!
Shout out to Kelsey Hightower who created the original guide, and DushanthaS who created the Proxmox-specific guide that requires a dedicated/static public IP address. However, not everyone has access to a dedicated public IP address, especially in home environments where IP addresses are dynamically assigned by Internet Service Providers (ISPs).
To address this, I have modified the setup to work with a dynamic home router IP address using Cloudflare DNS and DDNS (Dynamic DNS) services. This approach allows for a more accessible and cost-effective Kubernetes setup without the need for a static IP.
Here’s a brief overview of the steps I used to get my Kubernetes setup working with a dynamic home router IP address:
- Cloudflare DNS:
- Create an account on Cloudflare and add your domain.
- Configure DNS settings to use Cloudflare's nameservers.
- DDNS Configuration:
- Set up a DDNS service (I used DDclient) to update Cloudflare DNS records with your current public IP address, and each time a new IP is assigned.
- Ensure the DDNS service runs as a daemon on the admin server to handle IP changes.
- Kubernetes Configuration:
- Modify Kubernetes setup scripts to use the domain managed by Cloudflare.
By following these steps, you can achieve a functional Kubernetes setup using a dynamic IP address, making it easier to follow this guide without a dedicated/static public IP address.
This work is licensed under a Creative Commons Attribution-NonCommercial-ShareAlike 4.0 International License.
The target audience for this tutorial is someone planning to support a production Kubernetes cluster and wants to understand how everything fits together, in particular if you want to use a Proxmox hypervisor and do not have a dedicated/static public IP address.
Kubernetes The Hard Way guides you through bootstrapping a highly available Kubernetes cluster with end-to-end encryption between components and RBAC authentication.
- kubernetes v1.29.1
- containerd v1.7.13
- coredns v1.11.1
- cni-plugins v1.4.0
- etcd v3.5.12
This tutorial assumes you have access to a Proxmox hypervisor with at least 25GB free RAM and 140GB free HDD/SSD. While a Proxmox server is used for basic infrastructure requirements the lessons learned in this tutorial can be applied to other platforms (ESXi, KVM, VirtualBox, ...).
- Prerequisites
- Installing the Client Tools
- Provisioning Compute Resources
- Provisioning the CA and Generating TLS Certificates
- Generating Kubernetes Configuration Files for Authentication
- Generating the Data Encryption Config and Key
- Bootstrapping the etcd Cluster
- Bootstrapping the Kubernetes Control Plane
- Bootstrapping the Kubernetes Worker Nodes
- Configuring kubectl for Remote Access
- Provisioning Pod Network Routes
- Deploying the DNS Cluster Add-on
- Smoke Test
- Cleaning Up

