OpenShift LightSpeed (OLS) is an AI powered assistant that runs on OpenShift and provides answers to product questions using backend LLM services.
- Python 3.11
- Git, pip and PDM
- An LLM api key, currently BAM (IBM's research environment), OpenAI, Azure OpenAI, and Watsonx are supported as backends.
-
Clone the repo
git clone https://github.com/openshift/lightspeed-service.git cd lightspeed-service -
Install python packages
make install-deps
-
Get API keys
a. BAM provided LLM
- Get a BAM API Key at https://bam.res.ibm.com
- BAM API URL: https://bam-api.res.ibm.com
b. OpenAI provided LLM (OpenAI api key)
-
Store local copies of API keys securely
Here is a proposed scheme for storing API keys on your development workstation. It is similar to how private keys are stored for OpenSSH. It keeps copies of files containing API keys from getting scattered around and forgotten:
$ cd <lightspeed-service local git repo root> $ find ~/.openai -ls 72906922 0 drwx------ 1 username username 6 Feb 6 16:45 /home/username/.openai 72906953 4 -rw------- 1 username username 52 Feb 6 16:45 /home/username/.openai/key $ ls -l openai_api_key.txt lrwxrwxrwx. 1 username username 26 Feb 6 17:41 openai_api_key.txt -> /home/username/.openai/key $ grep openai_api_key.txt olsconfig.yaml credentials_path: openai_api_key.txt -
Configure OpenShift LightSpeed (OLS)
OLS configuration is in YAML format. It is loaded from a file referred to by the
OLS_CONFIG_FILEenvironment variable and defaults toolsconfig.yamlin the current directory. You can find a example configuration in the examples/olsconfig.yaml file in this repository.API credentials are in turn loaded from files specified in the config YAML by the
credentials_pathattributes. If these paths are relative, they are relative to the current working directory. To use the example olsconfig.yaml as is, place your BAM API Key into a file namedbam_api_key.txtin your working directory.The example configuration file defines providers for four LLM providers: BAM, OpenAI, Azure OpenAI, and Watsonx, but defines BAM as the default provider. If you prefer to use different LLM provider than BAM, such as OpenAI, ensure that the provider definition points to file containing a valid OpenAI, Watsonx etc. API key, and change the
default_modelanddefault_providervalues to reference the selected provider and model. -
Configure OLS Authentication
This section provides guidance on how to configure authentication within OLS. It includes instructions on enabling or disabling authentication, configuring authentication through OCP RBAC, overriding authentication configurations, and specifying a static authentication token in development environments.
-
Enabling and Disabling Authentication
Authentication is enabled by default in OLS. To disable authentication, modify the
dev_configin your configuration file as shown below:dev_config: disable_auth: true
-
Configuring Authentication with OCP RBAC
OLS utilizes OCP RBAC for authentication, necessitating connectivity to an OCP cluster. It automatically selects the configuration from the first available source, either an in-cluster configuration or a KubeConfig file.
-
Overriding Authentication Configuration
You can customize the authentication configuration by overriding the default settings. The configurable options include:
- Kubernetes Cluster API URL (
k8s_cluster_api): The URL of the K8S/OCP API server where tokens are validated. - CA Certificate Path (
k8s_ca_cert_path): Path to a CA certificate for clusters with self-signed certificates. - Skip TLS Verification (
skip_tls_verification): If true, the Kubernetes client skips TLS certificate validation for the OCP cluster.
To apply any of these overrides, update your configuration file as follows:
   ols_config:
      authentication_config:
         k8s_cluster_api: "https://api.example.com:6443"
         k8s_ca_cert_path: "/Users/home/ca.crt"
         skip_tls_verification: false
- Kubernetes Cluster API URL (
-
Providing a Static Authentication Token in Development Environments
For development environments, you may wish to use a static token for authentication purposes. This can be configured in the
dev_configsection of your configuration file:dev_config: k8s_auth_token: your-user-token
Note: using static token will require you to set the
k8s_cluster_apimentioned in section 6.4, as this will disable the loading of OCP config from in-cluster/kubeconfig.
-
-
Configure OLS TLS communication
This section provides instructions on configuring TLS (Transport Layer Security) for the OLS Application, enabling secure connections via HTTPS. TLS is enabled by default; however, if necessary, it can be disabled through the
dev_configsettings.-
Enabling and Disabling TLS
By default, TLS is enabled in OLS. To disable TLS, adjust the
dev_configin your configuration file as shown below:dev_config: disable_tls: false
-
Configuring TLS in local Environments:
- Generate Self-Signed Certificates: To generate self-signed certificates, run the following command from the project's root directory:
./scripts/generate-certs.sh
- Update OLS Configuration: Modify your config.yaml to include paths to your certificate and its private key:
   ols_config:
      tls_config:
         tls_certificate_path: /full/path/to/certs/cert.pem
         tls_key_path: /full/path/to/certs/key.pem
- Launch OLS with HTTPS: After applying the above configurations, OLS will run over HTTPS.
- Generate Self-Signed Certificates: To generate self-signed certificates, run the following command from the project's root directory:
-
Configuring OLS in OpenShift:
For deploying in OpenShift, Service-Served Certificates can be utilized. Update your ols-config.yaml as shown below, based on the example provided in the examples directory:
   ols_config:
      tls_config:
         tls_certificate_path: /app-root/certs/cert.pem
         tls_key_path: /app-root/certs/key.pem
-
Using a Private Key with a Password If your private key is encrypted with a password, specify a path to a file that contains the key password as follows:
   ols_config:
      tls_config:
         tls_key_password_path: /app-root/certs/password.txt
-
-
(Optional) Configure the local document store
make get-rag
-
(Optional) Configure conversation cache Conversation cache can be stored in memory (it's content will be lost after shutdown) or in PostgreSQL database. It is possible to specify storage type in
olsconfig.yamlconfiguration file. -
Cache stored in memory:
ols_config:
  conversation_cache:
    type: memory
    memory:
      max_entries: 1000
-
Cache stored in PostgreSQL:
conversation_cache:
  type: postgres
  postgres:
    host: "foobar.com"
    port: "1234"
    dbname: "test"
    user: "user"
    password_path: postgres_password.txt
    ca_cert_path: postgres_cert.crt
    ssl_mode: "require"
In this case, file
postgres_password.txtcontains password required to connect to PostgreSQL. Also CA certificate can be specified usingpostgres_ca_cert.crtto verify trusted TLS connection with the server. All these files needs to be accessible.
in order to run the API service
make runThere is an all-in-one image that has the document store included already.
-
Follow steps above to create your config yaml and your API key file(s).
-
Place your config yaml and your API key file(s) in a known location (eg:
/path/to/config) -
Make sure your config yaml references the config folder for the path to your key file(s) (eg:
credentials_path: config/openai_api_key.txt) -
Run the all-in-one-container. Example invocation:
 podman run -it --rm -v `/path/to/config:/app-root/config:Z \
 -e OLS_CONFIG_FILE=/app-root/config/olsconfig.yaml -p 8080:8080 \
 quay.io/openshift-lightspeed/lightspeed-service-api:latest
In the examples folder is a set of YAML manifests,
openshift-lightspeed.yaml. This includes all the resources necessary to get
OpenShift Lightspeed running in a cluster. It is configured expecting to only
use OpenAI as the inference endpoint, but you can easily modify these manifests,
looking at the olsconfig.yaml to see how to alter it to work with BAM as the
provider.
There is a commented-out OpenShift Route with TLS Edge termination available if you wish to use it.
To deploy, assuming you already have an OpenShift environment to target and that you are logged in with sufficient permissions:
- Make the change to your API keys and/or provider configuration in the manifest file
- Create a namespace/project to hold OLS
oc apply -f examples/openshift-lightspeed-tls.yaml -n created-namespace
Once deployed, it is probably easiest to oc port-forward into the pod where
OLS is running so that you can access it from your local machine.
To send a request to the server you can use the following curl command:
curl -X 'POST' 'http://127.0.0.1:8080/v1/query' -H 'accept: application/json' -H 'Content-Type: application/json' -d '{"query": "write a deployment yaml for the mongodb image"}'Web page with Swagger UI has the standard /docs endpoint. If the service is running on localhost on port 8080, Swagger UI can be accessed on address http://localhost:8080/docs.
OpenAPI schema is available docs/openapi.json. It is possible to re-generate the document with schema by using:
make schema
When the OLS service is started OpenAPI schema is available on /openapi.json endpoint. For example, for service running on localhost on port 8080, it can be accessed and pretty printed by using following command:
curl 'http://127.0.0.1:8080/openapi.json' | jq .Service exposes metrics in Prometheus format on /metrics endpoint. Scraping them is straightforward:
curl 'http://127.0.0.1:8080/metrics'There is a minimal Gradio UI you can use when running the OLS server locally. To use it, it is needed to enable UI in olsconfig.yaml file:
dev_config:
  enable_dev_ui: true
Then start the OLS server per Run the server and then browse to the built in Gradio interface at http://localhost:8080/ui
By default this interface will ask the OLS server to retain and use your conversation history for subsequent interactions. To disable this behavior, expand the Additional Inputs configuration at the bottom of the page and uncheck the Use history checkbox. When not using history each message you submit to OLS will be treated independently with no context of previous interactions.
OLS API documentation is available at http://localhost:8080/docs
A Helm chart is available for installing the service in OpenShift.
Before installing the chart, you must configure the auth.key parameter in the Values file
To install the chart with the release name ols-release in the namespace openshift-lightspeed:
helm upgrade --install ols-release helm/ --create-namespace --namespace openshift-lightspeedThe command deploys the service in the default configuration.
The default configuration contains OLS fronting with a kube-rbac-proxy.
To uninstall/delete the chart with the release name ols-release:
helm delete ols-release --namespace openshift-lightspeedChart customization is available using the Values file.
- REST API handlers
- Configuration loader
- LLM loader
- Doc retriever from vector storage
- Question validator
- Docs summarizer
- Conversation cache
- (Local) Web-based user interface
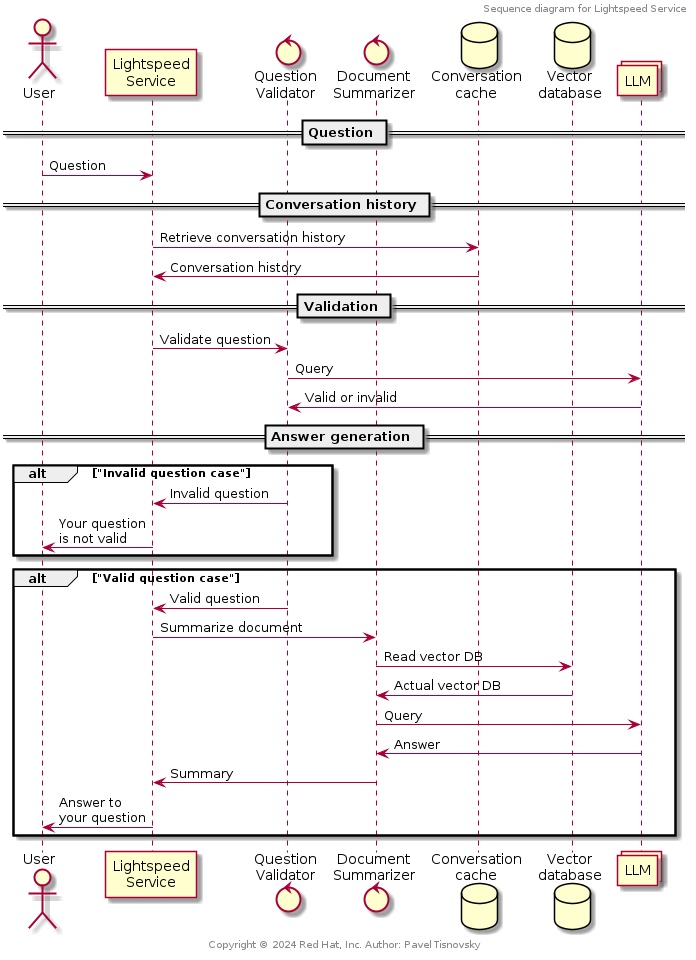
Sequence of operations performed when user asks a question:
-
See contributors guide.
-
See the open issues for a full list of proposed features (and known issues).
Published under the Apache 2.0 License

