- chain-style proxy: the program itself can be a primary proxy, and if a parent proxy is set, it can be used as a second level proxy or even a N level proxy.
- Encrypted communication: if the program is not a primary proxy, and the parent proxy is also the program, then it can communicate with the parent proxy by encryption. The TLS encryption is high-intensity encryption, and it is safe and featureless.
- Intelligent HTTP, SOCKS5 proxy: the program will automatically determine whether the site which it access is blocked, if the site is blocked, the program will use parent proxy (the premise is you set up a parent proxy) to access the site. If the site isn't blocked, in order to speed up the access, the program will directly access the site and don't use parent proxy.
- The black-and-white list of domain: It is very flexible to control the way which you visite site.
- Cross platform: no mater what the os (such as Linux, windows, and even Raspberry Pi) you use, you always can use proxy well.
- Multi protocol support: the program support HTTP (S), TCP, UDP, Websocket, SOCKS5 proxy.
- The TCP/UDP port forwarding is supported.
- Nat forwarding in different network is supported: the program support TCP protocol and UDP protocol.
- SSH forwarding: HTTP (S), SOCKS5 proxy support SSH transfer, parent Linux server does not need any server, a local proxy can be happy to access the Internet.
- KCP protocol is supported: HTTP (S), SOCKS5 proxy supports the KCP protocol which can transmit data, reduce latency, and improve the browsing experience.
- The integrated external API, HTTP (S): SOCKS5 proxy authentication can be integrated with the external HTTP API, which can easily control the user's access through the external system.
- Reverse proxy: goproxy supports directly parsing the domain to proxy monitor IP, and then proxy will help you to access the HTTP (S) site that you need to access.
- Transparent proxy: with the iptables, goproxy can directly forward the 80 and 443 port's traffic to proxy in the gateway, and can realize the unaware intelligent router proxy.
- Protocol conversion: The existing HTTP (S) or SOCKS5 proxy can be converted to a proxy which support both HTTP (S) and SOCKS5 by one port, but the converted SOCKS5 proxy does not support the UDP function.Also support powerful cascading authentication.
- Custom underlying encrypted transmission, HTTP(s)\sps\socks proxy can encrypt TCP data through TLS standard encryption and KCP protocol encryption. In addition, it also supports custom encryption after TLS and KCP. That is to say, custom encryption and tls|kcp can be used together. The internal uses AES256 encryption, and it only needs to define one password by yourself when is used.
- Low level compression and efficient transmission,The HTTP(s)\sps\socks proxy can encrypt TCP data through a custom encryption and TLS standard encryption and KCP protocol encryption, and can also compress the data after encryption. That is to say, the compression and custom encryption and tls|kcp can be used together.
- Because for some reason, we cannot access our services elsewhere. We can build a secure tunnel to access our services through multiple connected proxy nodes.
- WeChat interface is developed locally, which is convenient to debug.
- Remote access to intranet machines.
- Play with partners in a LAN game.
- something used to be played only in the LAN, now it can be played anywhere.
- Instead of 剑内网通,显IP内网通,花生壳,frp and so on.
- ...
This page is the v4.7 manual, and the other version of the manual can be checked by the following link.
- v4.6 manual
- v4.5 manual
- v4.4 manual
- v4.3 manual
- v4.2 manual
- v4.0-4.1 manual
- v3.9 manual
- v3.8 manual
- v3.6-v3.7 manual
- v3.5 manual
- v3.4 manual
- v3.3 manual
- v3.2 manual
- v3.1 manual
- v3.0 manual
- v2.x manual
Click to join the proxy group of gitter Click to join the proxy group of telegram
- Environmental Science
- Use configuration file
- Debug output
- Using log files
- Daemon mode
- Monitor mode
- Generating a communication certificate file
- Safety advice
- 1.HTTP proxy
- 1.1 Common HTTP proxy
- 1.2 Common HTTP second level proxy
- 1.3 HTTP second level proxy(encrypted)
- 1.4 HTTP third level proxy(encrypted)
- 1.5 Basic Authentication
- 1.6 HTTP proxy traffic force to go to parent http proxy
- 1.7 Transfer through SSH
- 1.8 KCP protocol transmission
- 1.9 HTTP(S) reverse proxy
- 1.10 HTTP(S) transparent proxy
- 1.11 Custom DNS
- 1.12 Custom encryption
- 1.13 Compressed transmission
- 1.14 View help
- 2.TCP proxy
- 3.UDP proxy
- 4.Nat forward
- 5.SOCKS5 proxy
- 5.1 Common SOCKS5 proxy
- 5.2 Common SOCKS5 second level proxy
- 5.3 SOCKS5 second level proxy(encrypted)
- 5.4 SOCKS third level proxy(encrypted)
- 5.5 SOCKS proxy traffic force to go to parent socks proxy
- 5.6 Transfer through SSH
- 5.7 Authentication
- 5.8 KCP protocol transmission
- 5.9 Custom DNS
- 5.10 Custom encryption
- 5.11 Compressed transmission
- 5.12 View help
- 6.Proxy protocol conversion
- 7.KCP Configuration
tips:all operations require root permissions.
0. If your VPS is linux64, you can complete the automatic installation and configuration by the following sentence.
curl -L https://raw.githubusercontent.com/snail007/goproxy/master/install_auto.sh | bash The installation is completed, the configuration directory is /etc/proxy, more detailed use of the method referred to the following manual for further understanding.
If the installation fails or your VPS is not a linux64 system, please follow the semi-automatic step below:
Download address: https://github.com/snail007/goproxy/releases
cd /root/proxy/
wget https://github.com/snail007/goproxy/releases/download/v4.7/proxy-linux-amd64.tar.gz cd /root/proxy/
wget https://raw.githubusercontent.com/snail007/goproxy/master/install.sh
chmod +x install.sh
./install.sh The following tutorial defaults system is Linux, the program is proxy and all operations require root permissions.
If the system are windows, please use proxy.exe.
The following tutorial is to introduce the useage by the command line parameters, or by reading the configuration file to get the parameters.
The specific format is to specify a configuration file by the @ symbol, for example, ./proxy @configfile.txt.
configfile.txt's format: The first line is the subcommand name, and the second line begins a new line: the long format of the parameter = the parameter value, there is no space and double quotes before and after.
The long format of the parameter's beginning is --, the short format of the parameter's beginning is -. If you don't know which short form corresponds to the long format, please look at the help command.
For example, the contents of configfile.txt are as follows:
http
--local-type=tcp
--local=:33080By default, the log output information does not contain the number of file lines. In some cases, in order to eliminate and positione the program problem, You can use the --debug parameter to output the number of lines of code and the wrong time.
By default, the log is displayed directly on the console, and if you want to save it to the file, you can use the --log parameter.
for example, --log proxy.log, The log will be exported to proxy.log file which is easy to troubleshoot.
HTTP, TCP, UDP proxy process will communicate with parent proxy. In order to secure, we use encrypted communication. Of course, we can choose not to encrypted communication. All communication with parent proxy in this tutorial is encrypted, requiring certificate files.
The OpenSSL command is installed on the Linux and encrypted certificate can be generated directly through the following command.
./proxy keygen
By default, the certificate file proxy.crt and the key file proxy.key are generated under the current program directory.
After the default execution of proxy, if you want to keep proxy running, you can't close the command line.
If you want to run proxy in the daemon mode, the command line can be shut down, just add the --daemon parameter at the end of the command.
for example: ./proxy http -t tcp -p "0.0.0.0:38080" --daemon
Monitor mode parameter --forever, for example: proxy http --forever,
Proxy will fork subprocess, then monitor the child process, if the subprocess exits, restarts the subprocess after 5 seconds.
This parameter, with the parameter --daemon and the log parameter --log, can guarantee that the proxy has been ran in the background and not exited accidentally.
And you can see the output log of proxy through the log file.
for example: proxy http -p ":9090" --forever --log proxy.log --daemon
When vps is behind the NAT, the network card IP on VPS is an internal network IP, and then you can add the VPS's external network IP to prevent the dead cycle by -g parameter.
Assuming that your VPS outer external network IP is 23.23.23.23, the following command sets the 23.23.23.23 through the -g parameter.
./proxy http -g "23.23.23.23"
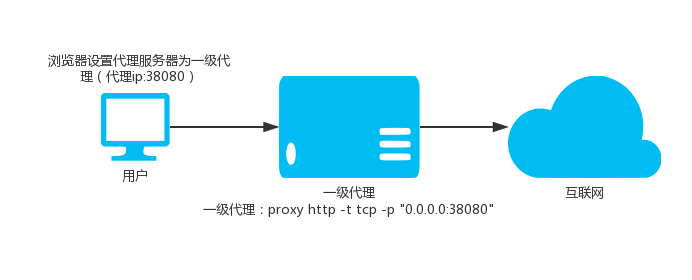
./proxy http -t tcp -p "0.0.0.0:38080"
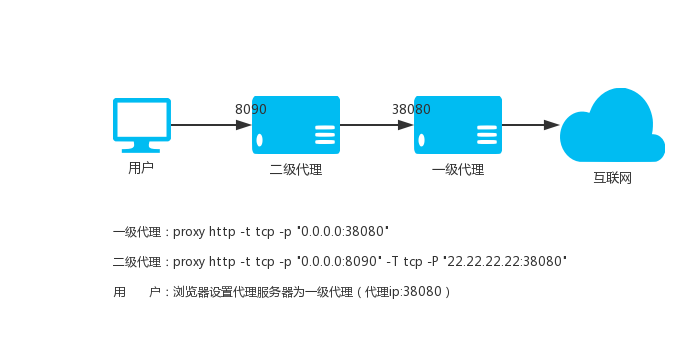
Using local port 8090, assume the parent HTTP proxy is: 22.22.22.22:8080
./proxy http -t tcp -p "0.0.0.0:8090" -T tcp -P "22.22.22.22:8080"
The connection pool is closed by default. If you want to speed up access speed, -L can open the connection pool, the 10 is the size of the connection pool, and the 0 is closed.
It is not good to stability of connection pool when the network is not good.
./proxy http -t tcp -p "0.0.0.0:8090" -T tcp -P "22.22.22.22:8080" -L 10
We can also specify the black and white list files of the domain name, one line for one domain name. The matching rule is the most right-hand matching, for example, baidu.com, which matches ..baidu.com. The domain name of the blacklist is directly headed by the parent proxy, and the domain name of the white list does not go to the parent proxy.
./proxy http -p "0.0.0.0:8090" -T tcp -P "22.22.22.22:8080" -b blocked.txt -d direct.txt
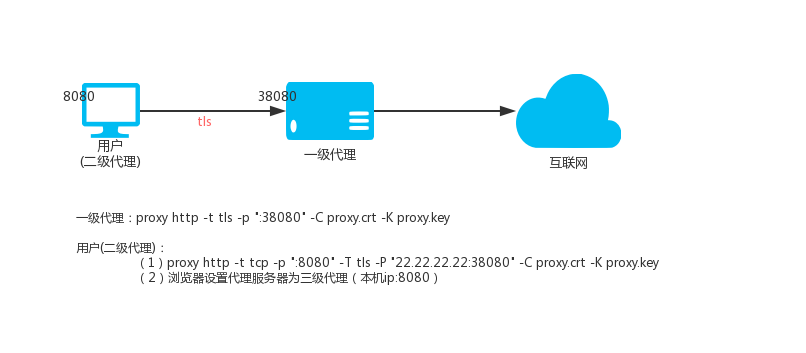
HTTP first level proxy(VPS,IP:22.22.22.22)
./proxy http -t tls -p ":38080" -C proxy.crt -K proxy.key
HTTP second level proxy(local Linux)
./proxy http -t tcp -p ":8080" -T tls -P "22.22.22.22:38080" -C proxy.crt -K proxy.key
accessing the local 8080 port is accessing the proxy port 38080 above VPS.
HTTP second level proxy(local windows)
./proxy.exe http -t tcp -p ":8080" -T tls -P "22.22.22.22:38080" -C proxy.crt -K proxy.key
In your windos system, the mode of the program that needs to surf the Internet by proxy is setted up as HTTP mode, the address is 127.0.0.1, the port is: 8080, the program can go through the encrypted channel through VPS to surf on the internet.
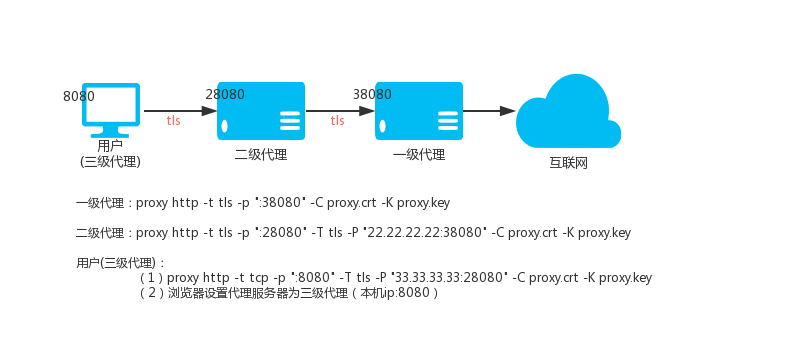
HTTP first level proxy VPS_01,IP:22.22.22.22
./proxy http -t tls -p ":38080" -C proxy.crt -K proxy.key
HTTP second level proxy VPS_02,IP:33.33.33.33
./proxy http -t tls -p ":28080" -T tls -P "22.22.22.22:38080" -C proxy.crt -K proxy.key
HTTP third level proxy(local)
./proxy http -t tcp -p ":8080" -T tls -P "33.33.33.33:28080" -C proxy.crt -K proxy.key
Then access to the local 8080 port is access to the HTTP first level proxy which port is 38080.
We can do Basic authentication for the HTTP proxy, The authenticated username and password can be specified at the command line.
./proxy http -t tcp -p ":33080" -a "user1:pass1" -a "user2:pass2"
If you need multiple users, repeat the -a parameters.
You can also be placed in a file, which is a line, a ‘username: password’, and then specified in -F.
./proxy http -t tcp -p ":33080" -F auth-file.txt
In addition, the HTTP (s) proxy also integrates external HTTP API authentication, and we can specify a HTTP URL interface address by the --auth-url parameter.
When somebody connect the proxy, which will request this URL by GET way, with the following four parameters, and if the HTTP state code 204 is returned, the authentication is successful.
In other cases, authentication failed.
for example:
./proxy http -t tcp -p ":33080" --auth-url "http://test.com/auth.php"
When the user connecte the proxy, which will request this URL by GET way("http://test.com/auth.php"),
with user, pass, IP, and target four parameters:
http://test.com/auth.php?user={USER}&pass={PASS}&ip={IP}&target={TARGET}
user:username
pass:password
ip:user's IP,for example: 192.168.1.200
target:URL user connect to, for example: http://demo.com:80/1.html or https://www.baidu.com:80
If there is no -a or -F or --auth-url parameters, Basic authentication is closed.
By default, proxy will intelligently judge whether a domain name can be accessed. If it cannot be accessed, it will access to parent HTTP proxy.
Through --always, all HTTP proxy traffic can be coercion to the parent HTTP proxy.
./proxy http --always -t tls -p ":28080" -T tls -P "22.22.22.22:38080" -C proxy.crt -K proxy.key
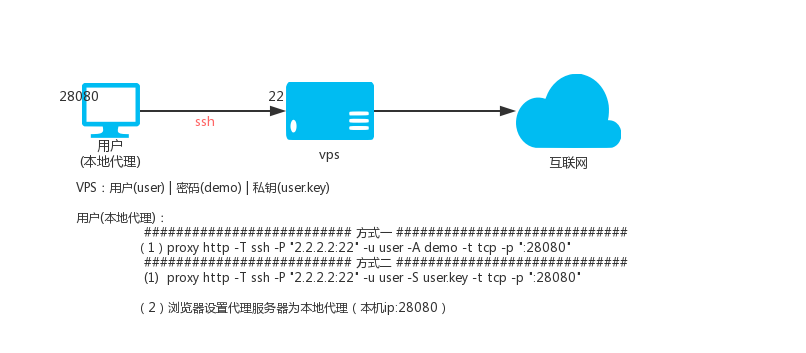
Explanation: the principle of SSH transfer is to take advantage of SSH's forwarding function, which is, after you connect to SSH, you can access to the target address through the SSH proxy.
Suppose there is a vps
- IP is 2.2.2.2, ssh port is 22, ssh username is user, ssh password is demo
- The SSH private key of the user is user.key
Local HTTP (S) proxy use 28080 port,excute:
./proxy http -T ssh -P "2.2.2.2:22" -u user -A demo -t tcp -p ":28080"
Local HTTP (S) proxy use 28080 port,excute:
./proxy http -T ssh -P "2.2.2.2:22" -u user -S user.key -t tcp -p ":28080"
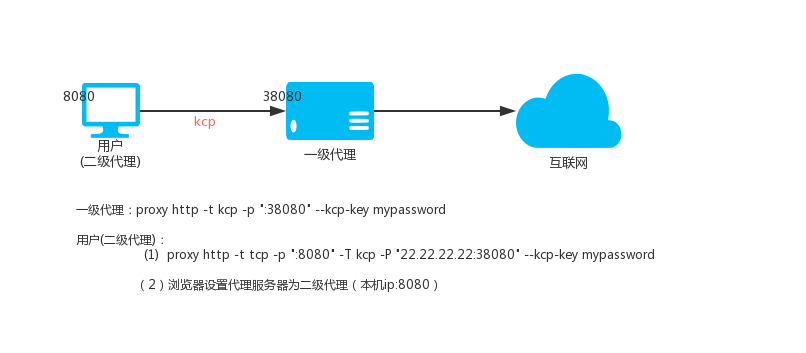
The KCP protocol requires a --kcp-key parameter to set a password which can encrypt and decrypt data.
Http first level proxy(VPS,IP:22.22.22.22)
./proxy http -t kcp -p ":38080" --kcp-key mypassword
Http second level proxy(os is Linux)
./proxy http -t tcp -p ":8080" -T kcp -P "22.22.22.22:38080" --kcp-key mypassword
Then access to the local 8080 port is access to the proxy's port 38080 on the VPS, and the data is transmitted through the KCP protocol.
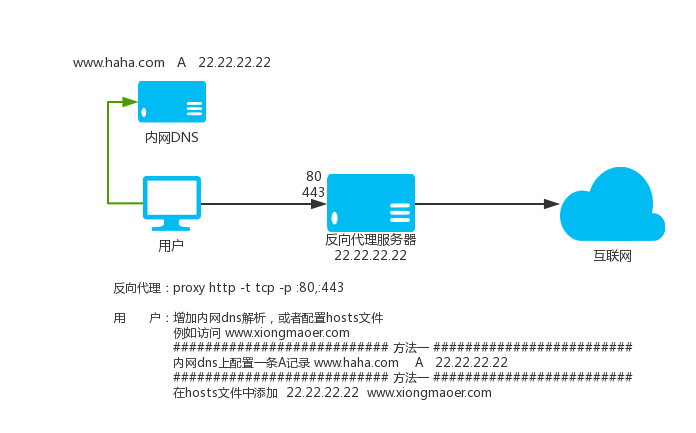
Proxy supports not only set up a proxy through in other software, to provide services for other software, but support the request directly to the website domain to proxy monitor IP when proxy monitors 80 and 443 ports, then proxy will automatically access to the HTTP proxy access website for you.
How to use:
On the last level proxy computer, because proxy is disguised as all websites and the default port of HTTP is 80, HTTPS is 443, the proxy listens to 80 and 443 port. Parameters -p multiple addresses are separated by commas.
./proxy http -t tcp -p :80,:443
This command starts a proxy on the computer, and listens to 80 and 443 ports. It can be used as a common proxy and it can directly resolve the domain that needs proxy to the IP of the computer.
If a parent proxy exist, you can refer to the above tutorial to set up a parent. The way of use is exactly the same.
./proxy http -t tcp -p :80,:443 -T tls -P "2.2.2.2:33080" -C proxy.crt -K proxy.key
Notice:
The result of the DNS parsing of the server in which proxy is located can not affected by a custom parsing, if not, it is dead cycle.
The mode needs a certain network knowledge, if the related concepts don't understand, you must search it by yourself.
Assuming that proxy is now running on the router, the boot command is as follows:
./proxy http -t tcp -p :33080 -T tls -P "2.2.2.2:33090" -C proxy.crt -K proxy.key
Then the iptables rule is added, and the following rule is a reference rule:
#IP of parent proxy:
proxy_server_ip=2.2.2.2

#Proxy that the router runs monitor the port:
proxy_local_port=33080

#The following don't need to be modified
#create a new chain named PROXY
iptables -t nat -N PROXY

# Ignore your PROXY server's addresses
# It's very IMPORTANT, just be careful.

iptables -t nat -A PROXY -d $proxy_server_ip -j RETURN

# Ignore LANs IP address
iptables -t nat -A PROXY -d 0.0.0.0/8 -j RETURN
iptables -t nat -A PROXY -d 10.0.0.0/8 -j RETURN
iptables -t nat -A PROXY -d 127.0.0.0/8 -j RETURN
iptables -t nat -A PROXY -d 169.254.0.0/16 -j RETURN
iptables -t nat -A PROXY -d 172.16.0.0/12 -j RETURN
iptables -t nat -A PROXY -d 192.168.0.0/16 -j RETURN
iptables -t nat -A PROXY -d 224.0.0.0/4 -j RETURN
iptables -t nat -A PROXY -d 240.0.0.0/4 -j RETURN

# Anything to port 80 443 should be redirected to PROXY's local port
iptables -t nat -A PROXY -p tcp --dport 80 -j REDIRECT --to-ports $proxy_local_port
iptables -t nat -A PROXY -p tcp --dport 443 -j REDIRECT --to-ports $proxy_local_port

# Apply the rules to nat client
iptables -t nat -A PREROUTING -p tcp -j PROXY
# Apply the rules to localhost
iptables -t nat -A OUTPUT -p tcp -j PROXY- Clearing the whole chain command is iptables -F chain name, such as iptables -t NAT -F PROXY
- Deleting the specified chain that user defined command is iptables -X chain name, such as iptables -t NAT -X PROXY
- Deleting the rules of the chain command is iptables -D chain name from the selected chain, such as iptables -t nat -D PROXY -d 223.223.192.0/255.255.240.0 -j RETURN
--dns-address and --dns-ttl parameters can be used to specify DNS(--dns-address) when you use proxy to access to a domain.
they also can specify dns result cache time (--dns-ttl) which unit is second. they can avoid the interference of system DNS to proxy. cache can reduce DNS resolution time and increase access speed.
for example:
./proxy http -p ":33080" --dns-address "8.8.8.8:53" --dns-ttl 300
HTTP(s) proxy can encrypt TCP data by TLS standard encryption and KCP protocol encryption, in addition to supporting custom encryption after TLS and KCP, That is to say, custom encryption and tls|kcp can be combined to use. The internal AES256 encryption is used, and it only needs to define one password by yourself. Encryption is divided into two parts, the one is whether the local (-z) is encrypted and decrypted, the other is whether the parents (-Z) is encrypted and decrypted.
Custom encryption requires both ends are proxy. Next, we use two level example and three level example as examples:
two level example
First level VPS (ip:2.2.2.2) execution:
proxy http -t tcp -z demo_password -p :7777
Local second level execution:
proxy http -T tcp -P 2.2.2.2:777 -Z demo_password -t tcp -p :8080
through this way, When you visits the website by local proxy 8080, it visits the target website by encryption transmission with the parents proxy.
three level example
First level VPS (ip:2.2.2.2) execution:
proxy http -t tcp -z demo_password -p :7777
Second level VPS (ip:2.2.2.2) execution:
proxy http -T tcp -P 2.2.2.2:7777 -Z demo_password -t tcp -z other_password -p :8888
Local third level execution:
proxy http -T tcp -P 3.3.3.3:8888 -Z other_password -t tcp -p :8080
through this way, When you visits the website by local proxy 8080, it visits the target website by encryption transmission with the parents proxy.
HTTP(s) proxy can encrypt TCP data through TCP standard encryption and KCP protocol encryption, and can also compress data before custom encryption.
That is to say, compression and custom encryption and tls|kcp can be used together, compression is divided into two parts, the one is whether the local (-z) is compressed transmission, the other is whether the parents (-Z) is compressed transmission.
The compression requires both ends are proxy. Compression also protects the (encryption) data in certain extent. we use two level example and three level example as examples:
two level example
First level VPS (ip:2.2.2.2) execution:
proxy http -t tcp -m -p :7777
Local second level execution:
proxy http -T tcp -P 2.2.2.2:777 -M -t tcp -p :8080
through this way, When you visits the website by local proxy 8080, it visits the target website by compressed transmission with the parents proxy.
three level example
First level VPS (ip:2.2.2.2) execution:
proxy http -t tcp -m -p :7777
Second level VPS (ip:3.3.3.3) execution:
proxy http -T tcp -P 2.2.2.2:7777 -M -t tcp -m -p :8888
Local third level execution:
proxy http -T tcp -P 3.3.3.3:8888 -M -t tcp -p :8080
through this way, When you visits the website by local proxy 8080, it visits the target website by compressed transmission with the parents proxy.
./proxy help http
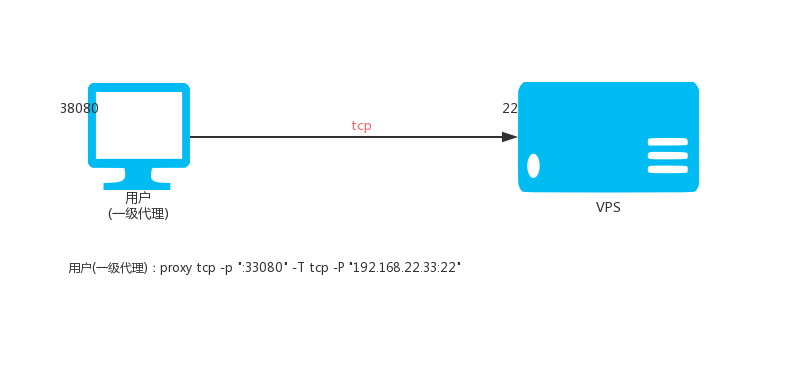
Local execution:
./proxy tcp -p ":33080" -T tcp -P "192.168.22.33:22" -L 0
Then access to the local 33080 port is the 22 port of access to 192.168.22.33.
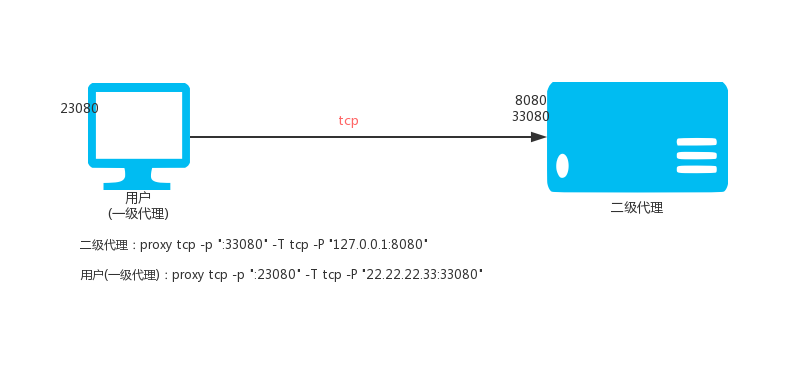
VPS(IP:22.22.22.33) execute:
./proxy tcp -p ":33080" -T tcp -P "127.0.0.1:8080" -L 0
local execution:
./proxy tcp -p ":23080" -T tcp -P "22.22.22.33:33080"
Then access to the local 23080 port is the 8080 port of access to 22.22.22.33.
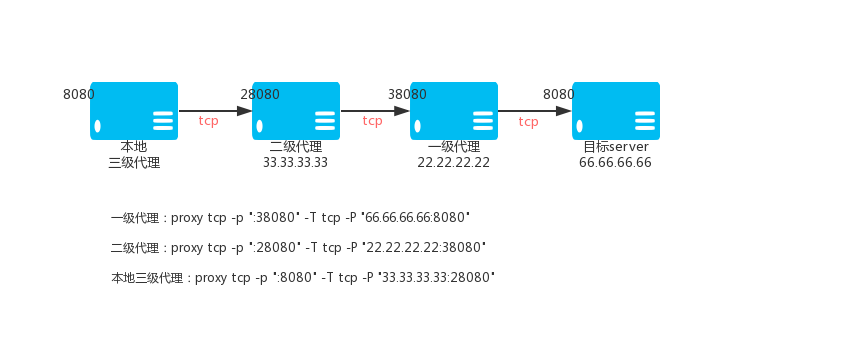
TCP first level proxy VPS_01,IP:22.22.22.22
./proxy tcp -p ":38080" -T tcp -P "66.66.66.66:8080" -L 0
TCP second level proxy VPS_02,IP:33.33.33.33
./proxy tcp -p ":28080" -T tcp -P "22.22.22.22:38080"
TCP third level proxy (local)
./proxy tcp -p ":8080" -T tcp -P "33.33.33.33:28080"
Then access to the local 8080 port is to access the 8080 port of the 66.66.66.66 by encrypting the TCP tunnel.
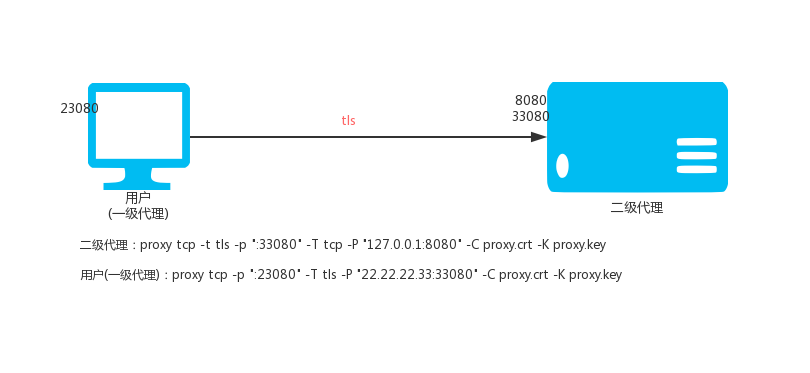
VPS(IP:22.22.22.33) execute:
./proxy tcp --tls -p ":33080" -T tcp -P "127.0.0.1:8080" -L 0 -C proxy.crt -K proxy.key
local execution:
./proxy tcp -p ":23080" -T tls -P "22.22.22.33:33080" -C proxy.crt -K proxy.key
Then access to the local 23080 port is to access the 8080 port of the 22.22.22.33 by encrypting the TCP tunnel.
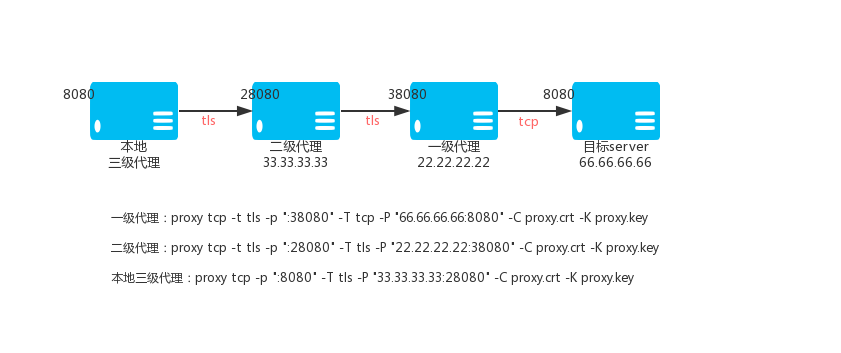
TCP first level proxy VPS_01,IP:22.22.22.22
./proxy tcp --tls -p ":38080" -T tcp -P "66.66.66.66:8080" -C proxy.crt -K proxy.key
TCP second level proxy VPS_02,IP:33.33.33.33
./proxy tcp --tls -p ":28080" -T tls -P "22.22.22.22:38080" -C proxy.crt -K proxy.key
TCP third level proxy (local)
./proxy tcp -p ":8080" -T tls -P "33.33.33.33:28080" -C proxy.crt -K proxy.key
Then access to the local 8080 port is to access the 8080 port of the 66.66.66.66 by encrypting the TCP tunnel.
./proxy help tcp
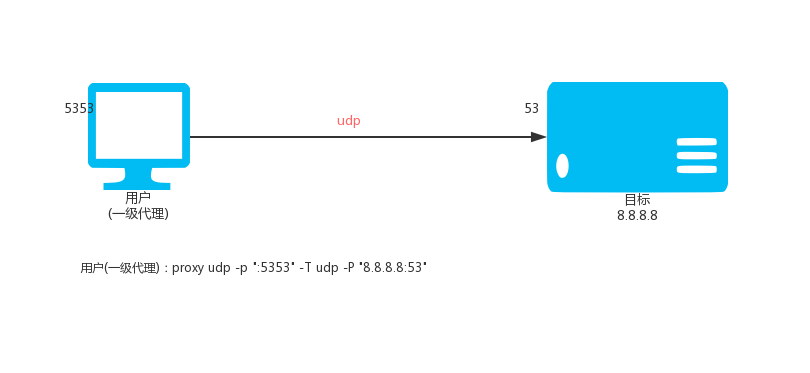
local execution:
./proxy udp -p ":5353" -T udp -P "8.8.8.8:53"
Then access to the local UDP:5353 port is access to the UDP:53 port of the 8.8.8.8.
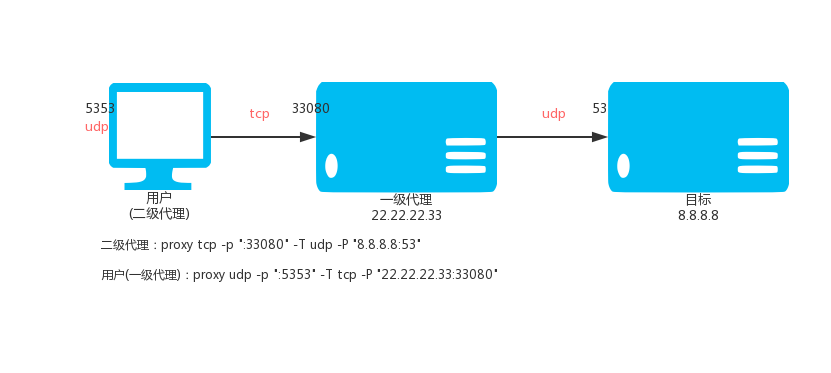
VPS(IP:22.22.22.33) execute:
./proxy tcp -p ":33080" -T udp -P "8.8.8.8:53"
local execution:
./proxy udp -p ":5353" -T tcp -P "22.22.22.33:33080"
Then access to the local UDP:5353 port is access to the UDP:53 port of the 8.8.8.8 through the TCP tunnel.
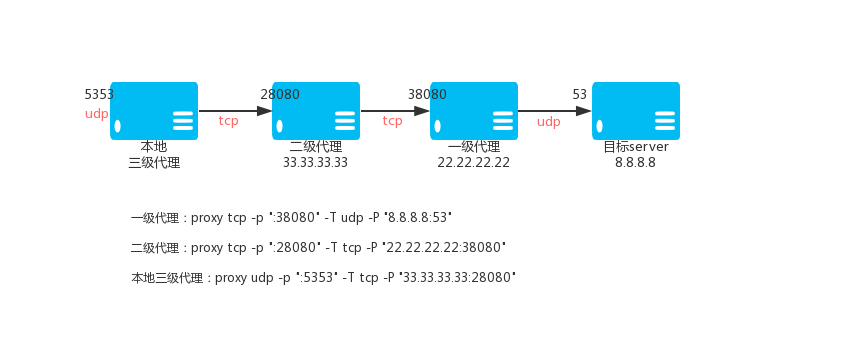
TCP first level proxy VPS_01,IP:22.22.22.22
./proxy tcp -p ":38080" -T udp -P "8.8.8.8:53"
TCP second level proxy VPS_02,IP:33.33.33.33
./proxy tcp -p ":28080" -T tcp -P "22.22.22.22:38080"
TCP third level proxy (local)
./proxy udp -p ":5353" -T tcp -P "33.33.33.33:28080"
Then access to the local 5353 port is access to the 53 port of the 8.8.8.8 through the TCP tunnel.
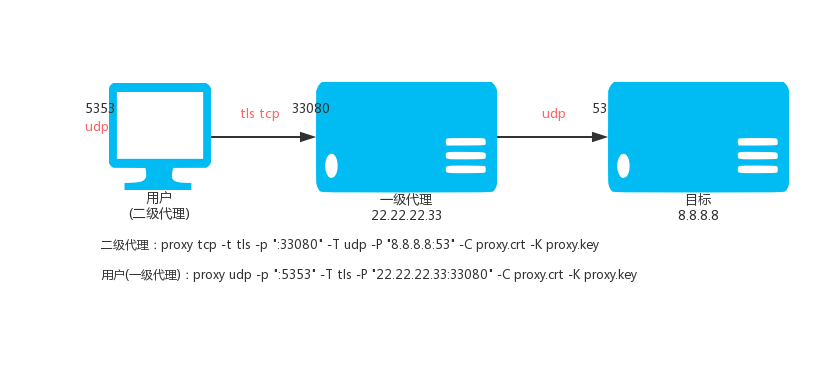
VPS(IP:22.22.22.33) execute:
./proxy tcp --tls -p ":33080" -T udp -P "8.8.8.8:53" -C proxy.crt -K proxy.key
local execution:
./proxy udp -p ":5353" -T tls -P "22.22.22.33:33080" -C proxy.crt -K proxy.key
Then access to the local UDP:5353 port is access to the UDP:53 port of the 8.8.8.8 by the encrypting TCP tunnel.
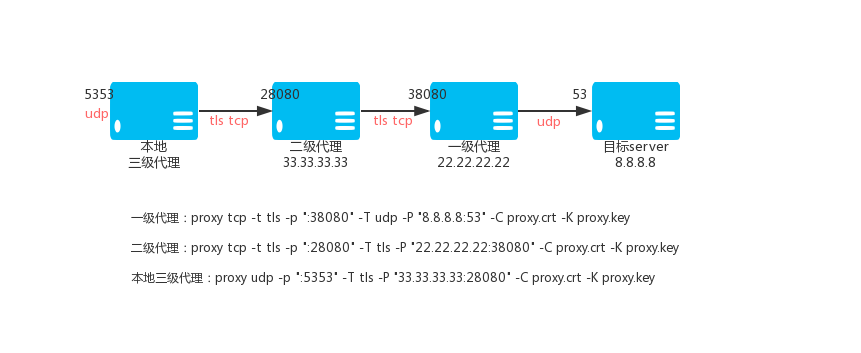
TCP first level proxy VPS_01,IP:22.22.22.22
./proxy tcp --tls -p ":38080" -T udp -P "8.8.8.8:53" -C proxy.crt -K proxy.key
TCP second level proxy VPS_02,IP:33.33.33.33
./proxy tcp --tls -p ":28080" -T tls -P "22.22.22.22:38080" -C proxy.crt -K proxy.key
TCP third level proxy (local)
./proxy udp -p ":5353" -T tls -P "33.33.33.33:28080" -C proxy.crt -K proxy.key
Then access to the local UDP:5353 port is access to the UDP:53 port of the 8.8.8.8 by the encrypting TCP tunnel.
./proxy help udp
Nat forward, is divided into two versions, "multi-link version" and "multiplexed version", generally like web services Which is not a long time to connect the service recommende "multi-link version", if you want to keep long Time connection, "multiplexed version" is recommended.
- Multilink version, the corresponding subcommand is tserver,tclient,tbridge。
- Multiplexed version, the corresponding subcommand is server,client,bridge。
- the parameters and use of Multilink version and multiplexed is exactly the same.
- Multiplexed version of the server, client can open the compressed transmission, the parameter is --c.
- Server, client or both are open compression, either do not open, can not only open one.
The following tutorial uses "Multiplexing Versions" as an example to illustrate how to use it.
Nat forward consists of three parts: client-side, server-side, bridge-side; client and server take the initiative to connect the bridge to bridge.
When the user access the server side, the process is:
- Server and bridge initiative to establish a link;
- Then the bridge notifies the client to connect the bridge, and connects the intranet target port;
- Then bind the client to the bridge and client to the internal network port connection;
- Then the bridge of the client over the connection and server-side connection binding;
- The entire channel is completed;
Background:
- The company computer A provides the 80 port of the web service
- There is one VPS, which public IP is 22.22.22.22
Demand:
You can access the 80 port of the company's computer by access to VPS's 28080 port when you are at home.
Procedure:
-
Execute on VPS
./proxy bridge -p ":33080" -C proxy.crt -K proxy.key
./proxy server -r ":28080@:80" -P "127.0.0.1:33080" -C proxy.crt -K proxy.key -
Execute on the company's computer A
./proxy client -P "22.22.22.22:33080" -C proxy.crt -K proxy.key -
complete
Background:
- My own computer provides the 80 port of nginx service
- There is one VPS, which public IP is 22.22.22.22
Demand:
Fill out the Web callback interface configuration address of WeChat Development Account: http://22.22.22.22/calback.php
Then you can access the calback.php under the 80 port of the computer, and if you need to bind the domain name, you can use your own domain name.
for example: Wx-dev.xxx.com is resolved to 22.22.22.22, and then configure the domain name wx-dev.xxx.com into a specific directory in the nginx of your own computer.
Procedure:
-
Execute on VPS and ensure that the 80 port of VPS is not occupied by other programs.
./proxy bridge -p ":33080" -C proxy.crt -K proxy.key
./proxy server -r ":80@:80" -P "22.22.22.22:33080" -C proxy.crt -K proxy.key -
Execute it on your own computer
./proxy client -P "22.22.22.22:33080" -C proxy.crt -K proxy.key -
compolete
Background:
- The company computer A provides the DNS resolution, the UDP:53 port.
- There is one VPS, which public IP is 22.22.22.22.
Demand:
You can use the company computer A for domain name resolution services by setting up local DNS as 22.22.22.22 at home.
Procedure:
-
Execute on VPS
./proxy bridge -p ":33080" -C proxy.crt -K proxy.key
./proxy server --udp -r ":53@:53" -P "127.0.0.1:33080" -C proxy.crt -K proxy.key -
Execute on the company's computer A
./proxy client -P "22.22.22.22:33080" -C proxy.crt -K proxy.key -
compolete
Background:
- The company computer A provides the 80 port of the web service
- There is one VPS, which public IP is 22.22.22.22
Demand:
For security, it doesn't want to be able to access the company's computer A on VPS. At home, it can access the 80 port of the company's computer A through the encrypted tunnel by accessing the 28080 port of you own computer.
Procedure:
-
Execute on VPS
./proxy bridge -p ":33080" -C proxy.crt -K proxy.key -
Execute on the company's computer A
./proxy client -P "22.22.22.22:33080" -C proxy.crt -K proxy.key -
Execute it on your own computer
./proxy server -r ":28080@:80" -P "22.22.22.22:33080" -C proxy.crt -K proxy.key -
compolete
Tips:
If there are multiple client connected to the same bridge at the same time, you need to specify different key, which can be set by --k parameter. --k must be a unique string on the same bridge.
When server is connected to bridge, if multiple client is connected to the same bridge at the same time, you need to use the --k parameter to select client.
Repeating -r parameters can expose multiple ports: -r format is "local IP: local port @clientHOST:client port".
Background:
- The company computer A provides the web service 80 port and the FTP service 21 port
- There is one VPS, which public IP is 22.22.22.22
Demand:
You can access the 80 port of the company's computer by access to VPS's 28080 port at home.
You can access the 21 port of the company's computer by access to VPS's 29090 port at home.
Procedure:
-
Execute on VPS
./proxy bridge -p ":33080" -C proxy.crt -K proxy.key
./proxy server -r ":28080@:80" -r ":29090@:21" --k test -P "127.0.0.1:33080" -C proxy.crt -K proxy.key -
Execute on the company's computer A
./proxy client --k test -P "22.22.22.22:33080" -C proxy.crt -K proxy.key -
complete
The full format of the -r is:PROTOCOL://LOCAL_IP:LOCAL_PORT@[CLIENT_KEY]CLIENT_LOCAL_HOST:CLIENT_LOCAL_PORT
4.7.1.PROTOCOL is tcp or udp.
for example: -r "udp://:10053@:53" -r "tcp://:10800@:1080" -r ":8080@:80"
If the --udp parameter is specified, PROTOCOL is UDP by default, then -r ":8080@:80" is UDP.
If the --udp parameter is not specified, PROTOCOL is TCP by default, then -r ":8080@:80" is TCP.
4.7.2.CLIENT_KEY by default is 'default'.
for example: -r "udp://:10053@[test1]:53" -r "tcp://:10800@[test2]:1080" -r ":8080@:80"
If the --k parameter is specified, such as --k test, then -r ":8080@:80" CLIENT_KEY is 'test'.
If the --k parameter is not specified,then -r ":8080@:80"CLIENT_KEY is 'default'.
4.7.3.LOCAL_IP is empty which means LOCAL_IP is 0.0.0.0, CLIENT_LOCAL_HOST is empty which means LOCAL_IP is 127.0.0.1.
./proxy help bridge
./proxy help server
./proxy help client
Tips: SOCKS5 proxy, support CONNECT, UDP protocol and don't support BIND and support username password authentication.
./proxy socks -t tcp -p "0.0.0.0:38080"
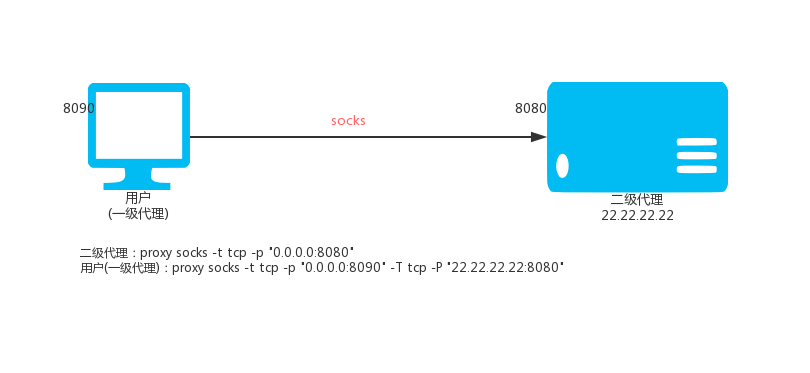
 Using local port 8090, assume that the parent SOCKS5 proxy is
 22.22.22.22:8080
./proxy socks -t tcp -p "0.0.0.0:8090" -T tcp -P "22.22.22.22:8080"
We can also specify the black and white list files of the domain name, one line for one domain name. The matching rule is the most right-hand matching. For example, baidu.com is ..baidu.com, the domain name of the blacklist is directly accessed by the parent proxy, and the domain name of the white list does not access to the parent proxy.
./proxy socks -p "0.0.0.0:8090" -T tcp -P "22.22.22.22:8080" -b blocked.txt -d direct.txt
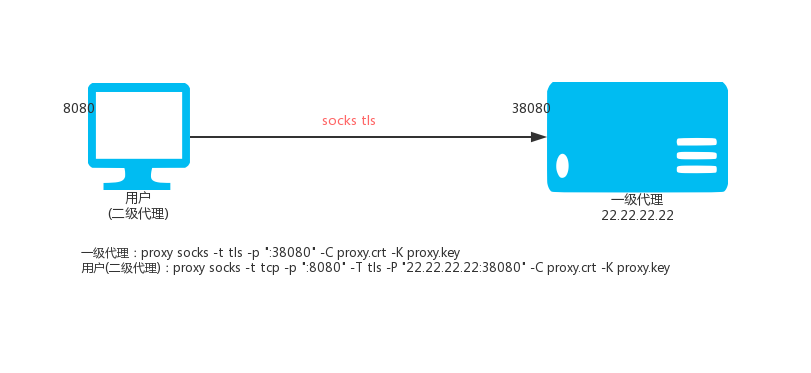
SOCKS5 first level proxy(VPS,IP:22.22.22.22)
./proxy socks -t tls -p ":38080" -C proxy.crt -K proxy.key
SOCKS5 second level proxy(local Linux)
./proxy socks -t tcp -p ":8080" -T tls -P "22.22.22.22:38080" -C proxy.crt -K proxy.key
Then access to the local 8080 port is access to the proxy port 38080 above VPS.
SOCKS5 second level proxy(local windows)
./proxy.exe socks -t tcp -p ":8080" -T tls -P "22.22.22.22:38080" -C proxy.crt -K proxy.key
Then set up your windows system, the proxy that needs to surf the Internet by proxy is Socks5 mode, the address is: 127.0.0.1, the port is: 8080. the program can surf the Internet through the encrypted channel which is running on VPS.
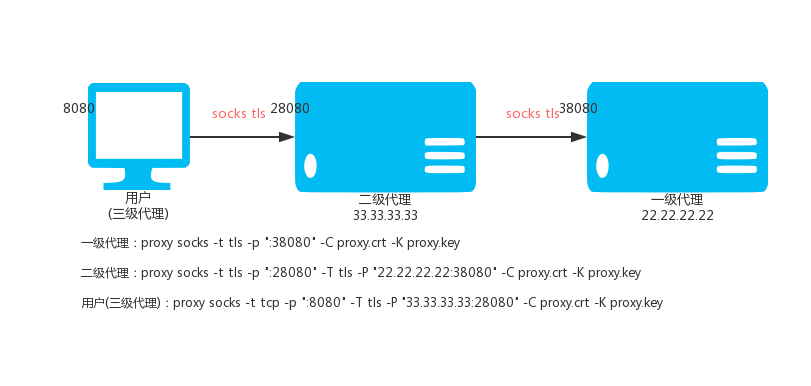
SOCKS5 first level proxy VPS_01,IP:22.22.22.22
./proxy socks -t tls -p ":38080" -C proxy.crt -K proxy.key
SOCKS5 second level proxy VPS_02,IP:33.33.33.33
./proxy socks -t tls -p ":28080" -T tls -P "22.22.22.22:38080" -C proxy.crt -K proxy.key
SOCKS5 third level proxy(local)
./proxy socks -t tcp -p ":8080" -T tls -P "33.33.33.33:28080" -C proxy.crt -K proxy.key
Then access to the local 8080 port is access to the proxy port 38080 above the SOCKS first level proxy.
By default, proxy will intelligently judge whether a domain name can be accessed. If it cannot be accessed, it will go to parent SOCKS proxy. Through --always parameter, all SOCKS proxy traffic can be coercion to the parent SOCKS proxy.
./proxy socks --always -t tls -p ":28080" -T tls -P "22.22.22.22:38080" -C proxy.crt -K proxy.key
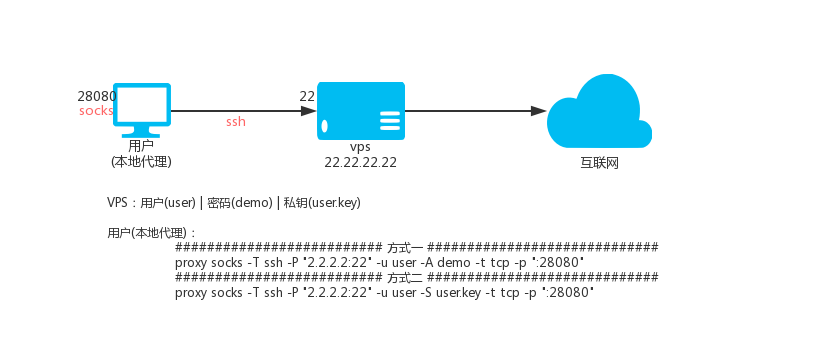
Explanation: the principle of SSH transfer is to take advantage of SSH's forwarding function, which is, after you connect to SSH, you can access the target address by the SSH.
Suppose there is a vps
- IP is 2.2.2.2, SSH port is 22, SSH username is user, SSH password is Demo
- The SSH private key name of the user is user.key
Local SOCKS5 proxy 28080 port, execute:
./proxy socks -T ssh -P "2.2.2.2:22" -u user -A demo -t tcp -p ":28080"
Local SOCKS5 proxy 28080 port, execute:
./proxy socks -T ssh -P "2.2.2.2:22" -u user -S user.key -t tcp -p ":28080"
Then access to the local 28080 port is to access the target address through VPS.
For socks5 proxy protocol we can use username and password authentication, username and password authentication can be specified on the command line.
./proxy socks -t tcp -p ":33080" -a "user1:pass1" -a "user2:pass2"
If you need multiple users, repeat the -a parameters.
You can also be placed in a file, which is a line, a ‘username: password’, and then specified in -F.
./proxy socks -t tcp -p ":33080" -F auth-file.txt
In addition, socks5 proxy also integrates external HTTP API authentication, we can specify a http url interface address through the --auth-url parameter,
Then when the user is connected, the proxy request this url by get way, with the following four parameters, if the return HTTP status code 204, on behalf of the authentication is successful.
In other cases, the authentication fails.
for example:
./proxy socks -t tcp -p ":33080" --auth-url "http://test.com/auth.php"
When the user is connected, the proxy will request this URL ("http://test.com/auth.php") by GET way.
With user, pass, IP, three parameters:
http://test.com/auth.php?user={USER}&pass={PASS}&ip={IP}
user:username
pass:password
ip: user's IP, for example: 192.168.1.200
If there is no -a or -F or --auth-url parameters, it means to turn off the authentication.
The KCP protocol requires a --kcp-key parameter which can set a password to encrypt and decrypt data.
HTTP first level proxy(VPS,IP:22.22.22.22)
./proxy socks -t kcp -p ":38080" --kcp-key mypassword
HTTP two level proxy(local os is Linux)
./proxy socks -t tcp -p ":8080" -T kcp -P "22.22.22.22:38080" --kcp-key mypassword
Then access to the local 8080 port is access to the proxy port 38080 on the VPS, and the data is transmitted through the KCP protocol.
--dns-address and --dns-ttl parameters can be used to specify DNS(--dns-address) when you use proxy to access to a domain.
they also can specify dns result cache time (--dns-ttl) which unit is second. they can avoid the interference of system DNS to proxy. cache can reduce DNS resolution time and increase access speed.
for example:
./proxy socks -p ":33080" --dns-address "8.8.8.8:53" --dns-ttl 300
HTTP(s) proxy can encrypt TCP data by TLS standard encryption and KCP protocol encryption, in addition to supporting custom encryption after TLS and KCP, That is to say, custom encryption and tls|kcp can be combined to use. The internal AES256 encryption is used, and it only needs to define one password by yourself. Encryption is divided into two parts, the one is whether the local (-z) is encrypted and decrypted, the other is whether the parents (-Z) is encrypted and decrypted. Custom encryption requires both ends are proxy. Next, we use two level example and three level example as examples:
two level example
First level VPS (ip:2.2.2.2) execution:
proxy socks -t tcp -z demo_password -p :7777
Local second level execution:
proxy socks -T tcp -P 2.2.2.2:777 -Z demo_password -t tcp -p :8080
through this way, When you visits the website by local proxy 8080, it visits the target website by encryption transmission with the parents proxy.
three level example
First level VPS (ip:2.2.2.2) execution:
proxy socks -t tcp -z demo_password -p :7777
Second level VPS (ip:2.2.2.2) execution:
proxy socks -T tcp -P 2.2.2.2:7777 -Z demo_password -t tcp -z other_password -p :8888
Local third level execution:
proxy socks -T tcp -P 3.3.3.3:8888 -Z other_password -t tcp -p :8080
through this way, When you visits the website by local proxy 8080, it visits the target website by encryption transmission with the parents proxy.
HTTP(s) proxy can encrypt TCP data through TCP standard encryption and KCP protocol encryption, and can also compress data before custom encryption. That is to say, compression and custom encryption and tls|kcp can be used together, compression is divided into two parts, the one is whether the local (-z) is compressed transmission, the other is whether the parents (-Z) is compressed transmission. The compression requires both ends are proxy. Compression also protects the (encryption) data in certain extent. we use two level example and three level example as examples:
two level example
First level VPS (ip:2.2.2.2) execution:
proxy socks -t tcp -m -p :7777
Local second level execution:
proxy socks -T tcp -P 2.2.2.2:777 -M -t tcp -p :8080
through this way, When you visits the website by local proxy 8080, it visits the target website by compressed transmission with the parents proxy.
three level example
First level VPS (ip:2.2.2.2) execution:
proxy socks -t tcp -m -p :7777
Second level VPS (ip:3.3.3.3) execution:
proxy socks -T tcp -P 2.2.2.2:7777 -M -t tcp -m -p :8888
Local third level execution:
proxy socks -T tcp -P 3.3.3.3:8888 -M -t tcp -p :8080
through this way, When you visits the website by local proxy 8080, it visits the target website by compressed transmission with the parents proxy.
./proxy help socks
The proxy protocol conversion use the SPS subcommand (abbreviation of socks+https), SPS itself does not provide the proxy function, just accept the proxy request and then converse protocol and forwarded to the existing HTTP (s) or Socks5 proxy. SPS can use existing HTTP (s) or Socks5 proxy converse to support HTTP (s) and Socks5 HTTP (s) proxy at the same time by one port, and proxy supports forward and reverse proxy (SNI), SOCKS5 proxy which is conversed does not support UDP. in addition to the existing HTTP or Socks5 proxy, which supports TLS, TCP, KCP three modes and chain-style connection. That is more than one SPS node connection can build encryption channel.
Suppose there is a common HTTP (s) proxy: 127.0.0.1:8080. Now we turn it into a common proxy that supports HTTP (s) and Socks5 at the same time. The local port after transformation is 18080.
command:
./proxy sps -S http -T tcp -P 127.0.0.1:8080 -t tcp -p :18080
Suppose that there is a TLS HTTP (s) proxy: 127.0.0.1:8080. Now we turn it into a common proxy that supports HTTP (s) and Socks5 at the same time. The local port after transformation is 18080, TLS needs certificate file.
command:
./proxy sps -S http -T tls -P 127.0.0.1:8080 -t tcp -p :18080 -C proxy.crt -K proxy.key
Suppose there is a KCP HTTP (s) proxy (password: demo123): 127.0.0.1:8080. Now we turn it into a common proxy that supports HTTP (s) and Socks5 at the same time. The local port after transformation is 18080.
command:
./proxy sps -S http -T kcp -P 127.0.0.1:8080 -t tcp -p :18080 --kcp-key demo123
Suppose there is a common Socks5 proxy: 127.0.0.1:8080, now we turn it into a common proxy that supports HTTP (s) and Socks5 at the same time, and the local port after transformation is 18080.
command:
./proxy sps -S socks -T tcp -P 127.0.0.1:8080 -t tcp -p :18080
Suppose there is a TLS Socks5 proxy: 127.0.0.1:8080. Now we turn it into a common proxy that support HTTP (s) and Socks5 at the same time. The local port after transformation is 18080, TLS needs certificate file.
command:
./proxy sps -S socks -T tls -P 127.0.0.1:8080 -t tcp -p :18080 -C proxy.crt -K proxy.key
Suppose there is a KCP Socks5 proxy (password: demo123): 127.0.0.1:8080, now we turn it into a common proxy that support HTTP (s) and Socks5 at the same time, and the local port after transformation is 18080.
command:
./proxy sps -S socks -T kcp -P 127.0.0.1:8080 -t tcp -p :18080 --kcp-key demo123
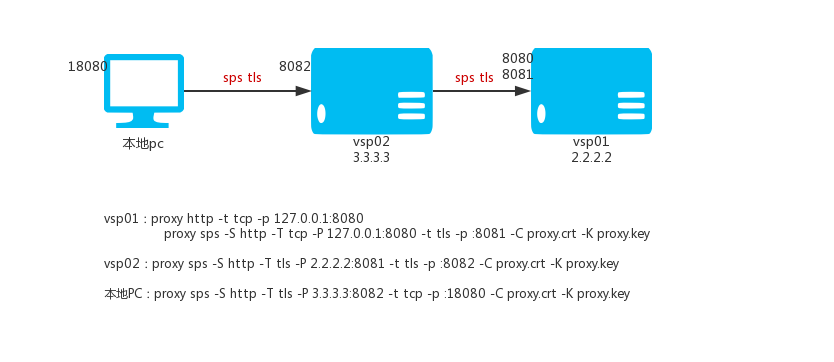
It is mentioned above that multiple SPS nodes can be connected to build encrypted channels, assuming you have the following VPS and a PC.
vps01:2.2.2.2
vps02:3.3.3.3
Now we want to use PC and vps01 and vps02 to build an encrypted channel. In this example, TLS is used. KCP also supports encryption in addition to TLS. and accessing to local 18080 port on PC is accessing to the local 8080 ports of vps01.
First, on vps01 (2.2.2.2), we run a HTTP (s) proxy that only can be accessed locally,excute:
./proxy -t tcp -p 127.0.0.1:8080
Then run a SPS node on vps01 (2.2.2.2),excute:
./proxy -S http -T tcp -P 127.0.0.1:8080 -t tls -p :8081 -C proxy.crt -K proxy.key
Then run a SPS node on vps02 (3.3.3.3),excute:
./proxy -S http -T tls -P 2.2.2.2:8081 -t tls -p :8082 -C proxy.crt -K proxy.key
Then run a SPS node on the PC,excute:
./proxy -S http -T tls -P 3.3.3.3:8082 -t tcp -p :18080 -C proxy.crt -K proxy.key
finish。
In general, listening one port is enough, but if you need to monitor 80 and 443 ports at the same time as a reverse proxy, the -p parameter can support it.
The format is:-p 0.0.0.0:80,0.0.0.0:443, Multiple bindings are separated by a comma.
SPS supports HTTP(s)\socks5 proxy authentication, which can concatenate authentication, there are four important information:
1:Users send authentication informationuser-auth。
2:Local authentication information set uplocal-auth。
3:Set the authentication information accessing to the father proxyparent-auth。
4:The final authentication information sent to the father proxyauth-info-to-parent。
The relationship between them is as follows:
| user-auth | local-auth | parent-auth | auth-info-to-paren |
|---|---|---|---|
| yes/no | yes | yes | come from parent-auth |
| yes/no | no | yes | come from parent-auth |
| yes/no | yes | no | no |
| no | no | no | no |
| yes | no | no | come from user-auth |
For SPS proxy we can have username and password to authenticate, and the authentication username and password can be specified on the command line
./proxy sps -S http -T tcp -P 127.0.0.1:8080 -t tcp -p ":33080" -a "user1:pass1" -a "user2:pass2"
if there are multiple users, repeat the -a parameters.
It can also be placed in a file, which is a line to a username: password, and then specified in -F parameter.
./proxy sps -S http -T tcp -P 127.0.0.1:8080 -t tcp -p ":33080" -F auth-file.txt
If the father proxy is authenticated, the lower level can set the authentication information through the -A parameters, such as:
father proxy:./proxy sps -S http -T tcp -P 127.0.0.1:8080 -t tcp -p ":33080" -a "user1:pass1" -a "user2:pass2"
local proxy:./proxy sps -S http -T tcp -P 127.0.0.1:8080 -A "user1:pass1" -t tcp -p ":33080"
In addition, SPS proxy, local authentication is integrated with external HTTP API authentication, and we can specify a HTTP URL interface address through the --auth-url parameter,
Then, when there is a user connection, proxy will request this URL by GET way, with the following four parameters, and if the HTTP state code 204 is returned, the authentication is successful.
Other cases consider authentication failure.
for example:
./proxy sps -S http -T tcp -P 127.0.0.1:8080 -t tcp -p ":33080" --auth-url "http://test.com/auth.php"
When the user is connected, proxy will request this URL by GET way("http://test.com/auth.php"),
Four parameters with user, pass, IP, and target:
http://test.com/auth.php?user={USER}&pass={PASS}&ip={IP}&target={TARGET}
user:username
pass:password
ip:user's ip,for example:192.168.1.200
target: if the client is the HTTP (s) proxy request, this represents the complete URL of the request, and the other cases are empty.
If there is no -a or -F or --auth-url parameters, local authentication is closed.
If there is no -A parameter, the connection to the father proxy does not use authentication.
HTTP(s) proxy can encrypt TCP data by TLS standard encryption and KCP protocol encryption, in addition to supporting custom encryption after TLS and KCP, That is to say, custom encryption and tls|kcp can be combined to use. The internal AES256 encryption is used, and it only needs to define one password by yourself. Encryption is divided into two parts, the one is whether the local (-z) is encrypted and decrypted, the other is whether the parents (-Z) is encrypted and decrypted.
Custom encryption requires both ends are proxy. Next, we use two level example and three level example as examples:
Suppose there is already a HTTP (s) proxy:6.6.6.6:6666
two level example
First level VPS (ip:2.2.2.2) execution:
proxy sps -S http -T tcp -P 6.6.6.6:6666 -t tcp -z demo_password -p :7777
Local second level execution:
proxy sps -T tcp -P 2.2.2.2:777 -Z demo_password -t tcp -p :8080
through this way, When you visits the website by local proxy 8080, it visits the target website by encryption transmission with the parents proxy.
three level example
First level VPS (ip:2.2.2.2) execution:
proxy sps -S http -T tcp -P 6.6.6.6:6666 -t tcp -z demo_password -p :7777
Second level VPS (ip:2.2.2.2) execution:
proxy sps -T tcp -P 2.2.2.2:7777 -Z demo_password -t tcp -z other_password -p :8888
Local third level execution:
proxy sps -T tcp -P 3.3.3.3:8888 -Z other_password -t tcp -p :8080
through this way, When you visits the website by local proxy 8080, it visits the target website by encryption transmission with the parents proxy.
HTTP(s) proxy can encrypt TCP data through TCP standard encryption and KCP protocol encryption, and can also compress data before custom encryption. That is to say, compression and custom encryption and tls|kcp can be used together, compression is divided into two parts, the one is whether the local (-z) is compressed transmission, the other is whether the parents (-Z) is compressed transmission. The compression requires both ends are proxy. Compression also protects the (encryption) data in certain extent. we use two level example and three level example as examples:
two level example
First level VPS (ip:2.2.2.2) execution:
proxy sps -t tcp -m -p :7777
Local second level execution:
proxy sps -T tcp -P 2.2.2.2:777 -M -t tcp -p :8080
through this way, When you visits the website by local proxy 8080, it visits the target website by compressed transmission with the parents proxy.
three level example
First level VPS (ip:2.2.2.2) execution:
proxy sps -t tcp -m -p :7777
Second level VPS (ip:3.3.3.3) execution::
proxy sps -T tcp -P 2.2.2.2:7777 -M -t tcp -m -p :8888
Local third level execution:
proxy sps -T tcp -P 3.3.3.3:8888 -M -t tcp -p :8080
through this way, When you visits the website by local proxy 8080, it visits the target website by compressed transmission with the parents proxy.
./proxy help sps
Many functions of the proxy support the KCP protocol, and all the functions that can use the KCP protocol support the configuration parameters introduced here.
So here is a unified introduction to the KCP configuration parameters.
The number of KCP configuration parameters is 17, you don't have to set up them. they all have the default value, if for the best effect,
You need to configure the parameters according to your own network conditions. Due to the complexity of KCP configuration, a certain network basic knowledge is required,
If you want to get a more detailed configuration and explanation of the KCP parameters, search for yourself. The command line name for each parameter, as well as the default and simple functions, are described as follows:
--kcp-key="secrect"        pre-shared secret between client and server
--kcp-method="aes"         encrypt/decrypt method, can be: aes, aes-128, aes-192, salsa20, blowfish,
                           twofish, cast5, 3des, tea, xtea, xor, sm4, none
--kcp-mode="secrect"       profiles: fast3, fast2, fast, normal, manual
--kcp-mtu=1350             set maximum transmission unit for UDP packets
--kcp-sndwnd=1024          set send window size(num of packets)
--kcp-rcvwnd=1024          set receive window size(num of packets)
--kcp-ds=10                set reed-solomon erasure coding - datashard
--kcp-ps=3                 set reed-solomon erasure coding - parityshard
--kcp-dscp=0               set DSCP(6bit)
--kcp-nocomp               disable compression
--kcp-acknodelay           be carefull! flush ack immediately when a packet is received
--kcp-nodelay=0            be carefull!
--kcp-interval=50          be carefull!
--kcp-resend=0             be carefull!
--kcp-nc=0                 be carefull! no congestion
--kcp-sockbuf=4194304      be carefull!
--kcp-keepalive=10         be carefull!
- Welcome joining group feedback...
Recommend go1.8.5, which does not guarantee that version >=1.9 can be used.
go get github.com/snail007/goproxy
use command cd to enter your go SRC directory
then cd to enter github.com/snail007/goproxy.
Direct compilation:go build -o proxy
execution: go run *.go
utils is a toolkit, and service is a specific service class.
Proxy is licensed under GPLv3 license.
proxy QQ group:189618940
if proxy help you a lot,you can support us by:


