MIDI.to.Keyframe.-.Process.-.Creating.Keyframes.V2.Shorter.Zoom.webm
This is a free Blender addon to import MIDI files and generate animation keyframes. It assigns the keyframes to objects you assign as piano keys.
- Download the plugin zip from the releases page or Blender extension marketplace
- Open Blender
- Go to Edit > Preferences and go to the Addons tab on left.
- Click install button.
- Select the zip you downloaded.
- You can confirm it's installed by searching for "MIDI to Keyframes" and seeing if it's checked off
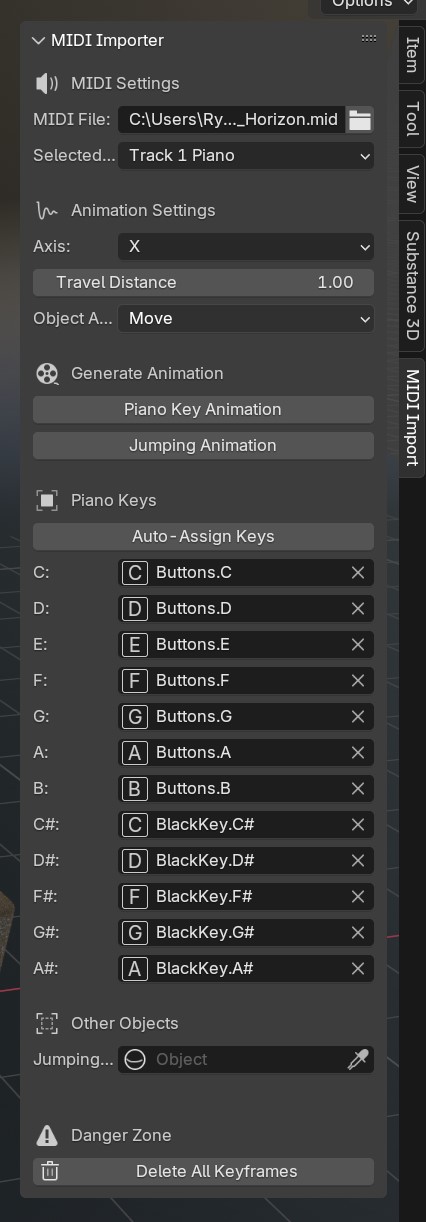
- Open up the side panel labeled "MIDI Importer", it's available in the 3D viewport in the n-panel (the right side panel that's usually collapsed).
- Select a MIDI file you'd like to import.
- Assign 3D objects to piano keys.
- Click the button labeled "Generate Keyframes"
Not happy with the animation? You can undo the keyframes (
CTRL/CMD + Z). Can't undo? Try the "Delete All Keyframes" button, it will delete all keyframes on any selected note object.
The plugin can automatically assign piano keys if you create a collection with objects with the note letter appended to the end.
For example, you'd name your objects something like:
ObjectName.Cmaps to theCpiano keyyourobject.F#maps to theF#piano key
Then you can select the collection and press the "Auto-Assign Keys" button.
I'd recommend downloading Audacity to visualize the MIDI tracks and see what the note charts look like before you import them into Blender.
When creating the animation keyframes, we use the current scene's frame rate to calculate the music time. If you change the frame rate after generating keyframes, you should re-generate keyframes to ensure the timing is correct.
I did a full breakdown on my blog here that covers the creation of the plugin and tips and tricks for working with MIDI in Python.
- Clone the repo:
git clone - Zip up the folder.
- Install in Blender.
- Open the plugin code inside your Blender plugin folder.
- Edit, Save, Repeat.
- Bump version in
__init__.py - Bump version in
blender_manifest.toml blender --command extension build --output-dir dist- Upload the new
.zipfile generated inside/distfolder to Blender addon marketplace and GitHub Releases page.
On Windows? You can add
blenderto your command line by going to Start annd searching for "Edit Environment Variables for your account". Find the Variable "PATH" and edit it. Add the full path to where yourblender.exeis located (e.g.C:/Program Files/Blender/4.2/).
We basically have Python PIP "wheel" files that contain dependencies we need for this addon. The manifest installs them for us. Running the build command just zips up the folder with the version name attached - nothing fancy.
If you want to update the dependencies, run these commands and then update the blender_manifest.toml with any new .whl filenames:
pip download mido --dest ./wheels --only-binary=:all: --python-version=3.11 --platform=macosx_11_0_arm64
pip download mido --dest ./wheels --only-binary=:all: --python-version=3.11 --platform=manylinux_2_28_x86_64
pip download mido --dest ./wheels --only-binary=:all: --python-version=3.11 --platform=win_amd64
Read more about the extension setup here and build process here.
