SynAnno is a tool designed for interactive guided proofreading and correction of synaptic annotations from electron microscopy (EM) volumes.
A simplified version of the app, starting directly in the Error Categorization view, is available here.
For the full functionality and configuration options of SynAnno, try the complete version here.
The current version of the tool features the H01 dataset. Harvard's Lichtman laboratory and Google's Connectomics team released the H01 dataset, a 1.4-petabyte view of human brain tissue via nanoscale EM. It covers a volume of ~1mm³, featuring tens of thousands of neurons, millions of neuron fragments, 183 million annotated synapses, and 100 proofread cells.
We classify synapses as pre-synaptic or post-synaptic. A pre-synaptic neuron sends neurotransmitter signals across the synaptic cleft to the post-synaptic neuron, which receives these signals and processes the information. While the segmentation masks highlight the synaptic clefts between neurons, the pre-/post-synaptic markers are coordinates placed into the associated neurons, identifying the specific sender and receiver. Identifying these key elements is crucial for creating accurate structural and functional wiring diagrams. SynAnno assists in proofreading, correcting, and identifying these segmentation masks and synaptic markers.
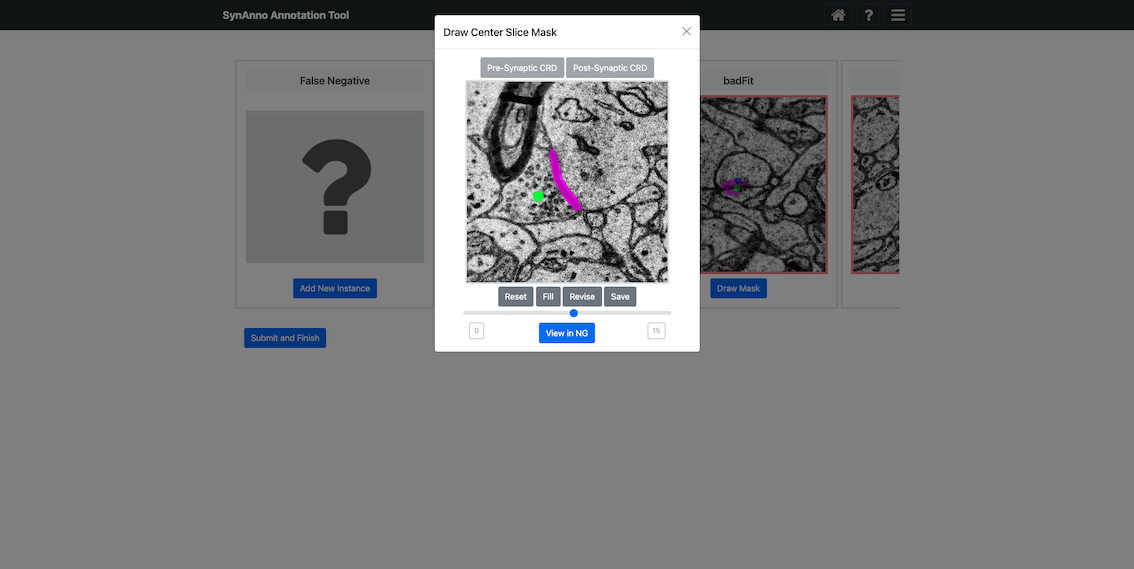
SynAnno's mask layout adheres to the H01 dataset standards, using a monochrome segmentation mask to highlight the synaptic cleft. In the proofreading view, pre-synaptic coordinate markers are indicated by a green dot, and post-synaptic coordinates are indicated by a blue dot. These markers are presented in bright colors on their specific slice and in muted shades on related slices for easy reference. In the drawing mode, users have the flexibility to place pre-/post-synaptic ID markers on any slices independently, making it possible to accommodate synapses with varying orientations in the Neuroglancer view. Users can redraw mismatches by setting an adjustable number of spline points. The corrected segmentation mask can be downloaded directly, while the pre-/post-synaptic markers are stored in a pandas DataFrame along with the rest of the dataset and instance metadata, available for download as a JSON file.
SharkViewer is a lightweight 3D neuron skeleton renderer integrated into SynAnno to help users maintain spatial awareness. SynAnno uses SharkViewer to display the neuron structure and its compartments, overlaid with synapse positions and proofreading progress. The viewer supports zooming, rotating, and highlighting compartments, providing an intuitive overview of the neuron's topology and review status.
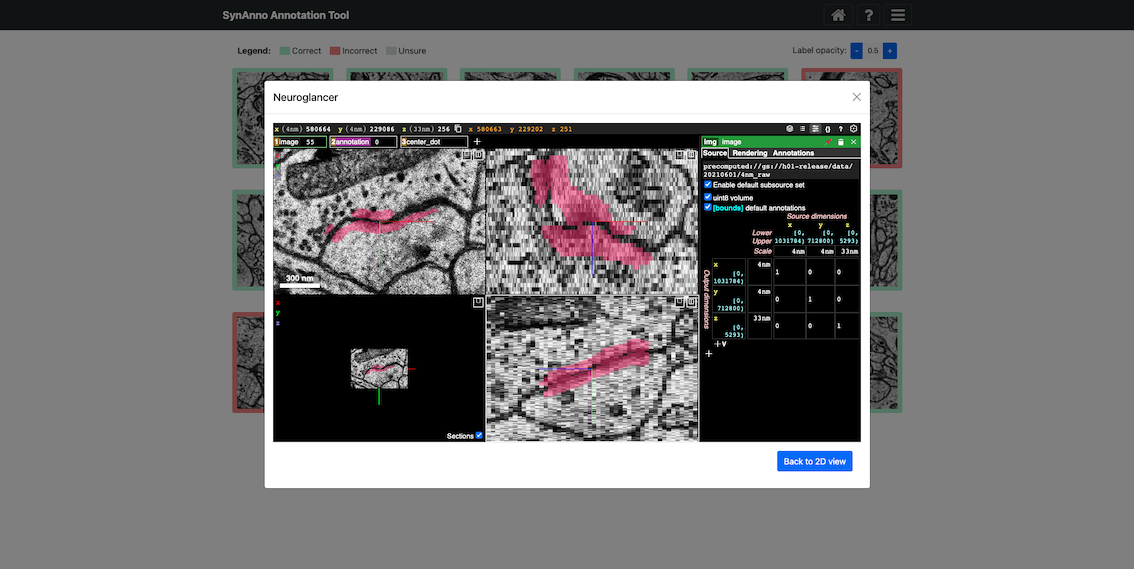
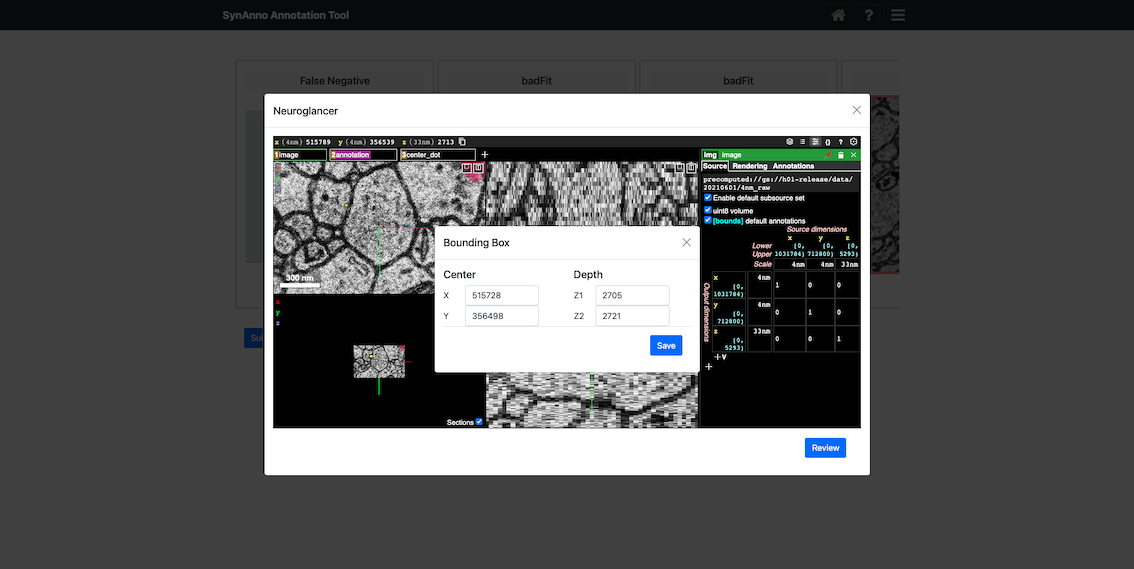
SynAnno integrates Neuroglancer directly into its interface. Neuroglancer is a powerful tool for 3D visualization of large-scale neuroimaging data. This integration allows users to effortlessly transition to a 3D view from any instance in the proofreading or drawing views. When an instance is selected, the embedded Neuroglancer opens at the exact location, providing an enhanced view of that specific instance. This functionality is particularly helpful during proofreading, enabling users to closely examine complex cases and make more informed decisions. In the drawing view and after reviewing a compartment in the Error Detection view, users can use Neuroglancer to search for and add false negatives. They can navigate through the dataset with ease, mark false negatives with a single click, and then return to SynAnno to draw segmentation masks, set pre-/post-synaptic coordinate markers, or more accurately assess and correct erroneous cases by editing existing masks and markers.
Leveraging CloudVolume, SynAnno efficiently handles vast datasets, such as the H01 1.4-petabyte volume, by employing on-demand, page-wise loading of instance-specific subvolumes. Users can seamlessly access synapses associated with specific pre- and/or post-synaptic markers or within designated subvolumes, allowing for the referencing of an unlimited number of neurons. SynAnno only retains metadata for each page and image data for instances marked as erroneous, optimizing memory usage. This targeted data retention enables quick reloading of problematic instances for further analysis and correction in the categorization and drawing views.
SynAnno uses NetworkX and Navis to manage and analyze neuron skeletons. After downloading skeletons from CloudVolume, SynAnno builds a graph-based representation using NetworkX to enable deterministic depth-first traversal and biologically meaningful compartmentalization. Navis provides additional utilities for skeleton manipulation, pruning, and structural integrity checks. These libraries underpin the neuron-centric proofreading workflow by enabling traversal, compartment mapping, and synapse-skeleton association.
The Materialization Table functions as a database that links annotations to segmentation IDs within large-scale neuroimaging datasets. It regularly updates based on the bound spatial points of the annotations and the underlying segment IDs, creating a systematic connection between annotations and IDs. This enables efficient querying for specific annotations or IDs, providing essential information for tracking connectivity in the datasets.
In SynAnno, the Materialization Table is simply a reference for determining which instances to load. SynAnno queries the table with the provided pre-/post-synaptic markers or subvolume coordinates and loads the relevant instances based on the retrieved information. This approach streamlines the loading process, making it efficient and straightforward to access the required data.
-
Neuron-Centric Proofreading
- Structured traversal of neurons using a depth-first path, rooted at the soma or central node.
- Proofreading of all synapses associated with a selected neuron, one compartment at a time.
- Interactive 3D skeleton viewer to maintain spatial orientation and track proofreading progress.
-
Error Detection and Categorization
- Review automatically predicted synapse masks in a scrollable tile grid.
- Label instances as correct, incorrect, or unsure.
- Assign detailed error types (e.g., merged mask, missing marker, wrong direction).
-
Error Correction and Annotation
- Manually redraw segmentation masks using spline-based interpolation.
- Auto-complete masks using a 3D U-Net, optionally guided by manual inputs.
- Place or revise pre- and post-synaptic markers.
- Add previously missed false negatives directly through Neuroglancer and annotate them.
-
Integrated Visualization and Context Switching
- Synapse progress and labels are mirrored in a 3D skeleton mini-map using SharkViewer.
- Embedded Neuroglancer views launch at instance-specific coordinates.
-
Flexible Data Access and Management
- On-demand, page-wise loading via CloudVolume for efficient memory usage.
- Compatible with Neuroglancer’s precomputed format.
- Support for neuron-centric or volume-centric selection and review.
- Seamless transition between proofreading and revision workflows using a shared metadata JSON.
-
Export and Collaboration
- Export segmentation masks and pre/post marker metadata.
- Download JSON summaries of proofreading sessions for later restoration.
Note: If you get stuck, you can always click the home button in the top right corner to return to the landing page, which resets the backend state. Alternatively, you can go directly to http://127.0.0.1:5000/reset.
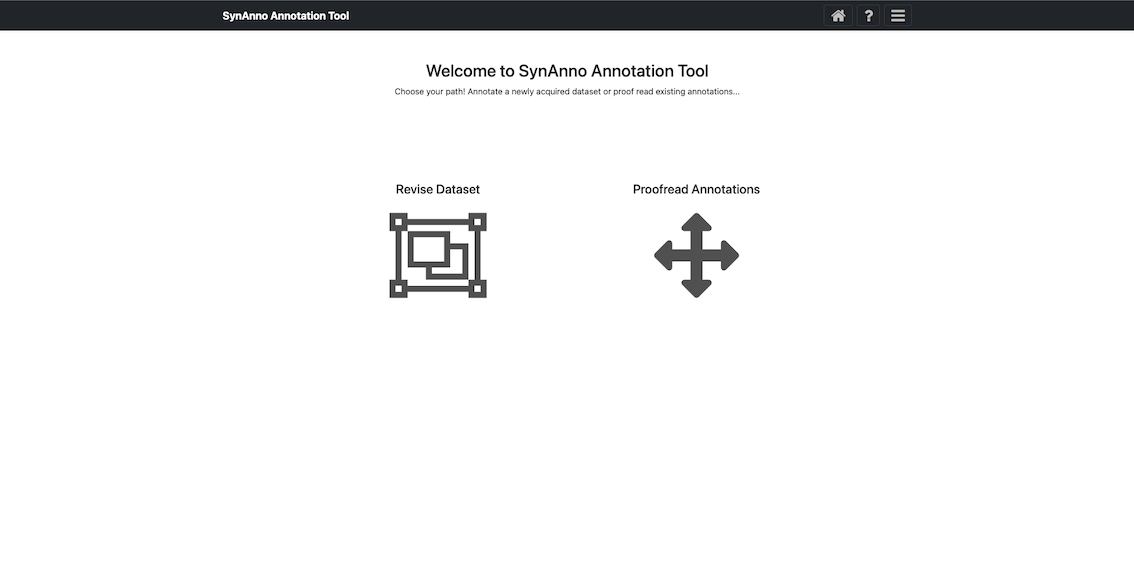
On the landing page you can choose between two workflows: "Error Correction" and "Error Detection". The former allows you to redraw segmentation masks, assign pre-/post-synaptic markers, and add missed false negatives. The latter allows you to review existing segmentations and pre-/post-synaptic markers, mark incorrect instances, and assign error descriptions to those instances. After categorizing all erroneous instances in the "Error Detection" workflow, you can automatically proceed with the "Error Correction" workflow.
Each page has three buttons: "Home", "Question Mark", and "Menu". The first returns you to the landing page. The second provides an explanation of the current view and its functionality. The third provides general information and contact details.
This view is identical for both workflows. You'll be prompted to provide a source bucket and a target bucket (both in Neuroglancer's precomputed format), a URL to a materialization table, optionally a bucket secrets file (defaults to ~/.cloudvolume/secrets), and optionally a JSON file containing instance metadata. The JSON file can be used to save and restore sessions or to start an "Error Correction" workflow using information from a previous "Error Detection" session. If you want to follow the "Neuron-Centric" proofreading workflow, you must also provide a neuropil segmentation bucket in Neuroglancer's precomputed format.
Opening the "Volume Parameters" tab, you will have two different options for the manner in which to select your instances, "View Centric" and "Neuron Centric".
If you choose the 'Neuron Centric' approach with all required parameters filled in, you will see a button prompting you to "Choose a Neuron".
Clicking this button will open up a Neuroglancer view with your source, target, and neuropil layers displayed. Hover your mouse over the desired neuron and press the n key to save your choice. After Neuroglancer window is closed, the app will remember which neuron you selected.
If you choose the "Volume-Centric" approach, you'll need to specify the coordinate layout of a subvolume that adheres to the referenced precomputed datasets, as well as the source and target volume resolutions (in nanometers). If you do not specify coordinates, all instances from the metadata table will be loaded page-wise.
After providing the required information, click 'Submit' to prepare the data for the first page or revision. Then, click "Start Data Proofread"/"Start Drawing" to begin proofreading or revision.
Once you've selected a neuron and submitted the form using the "Neuron-Centric" approach, SynAnno automatically fetches the neuron's skeleton and maps all associated synapse instances onto it.
In this view:
- The neuron skeleton is visualized with color-coded compartments derived from a depth-first traversal rooted at the soma or central node.
- Synapse instances are displayed as spheres positioned along the skeleton.
- A legend is displayed alongside the viewer, listing each neuron compartment and allowing direct navigation by clicking on a section.
- Workflow: Proofreading
- URL: http://127.0.0.1:5000/annotation
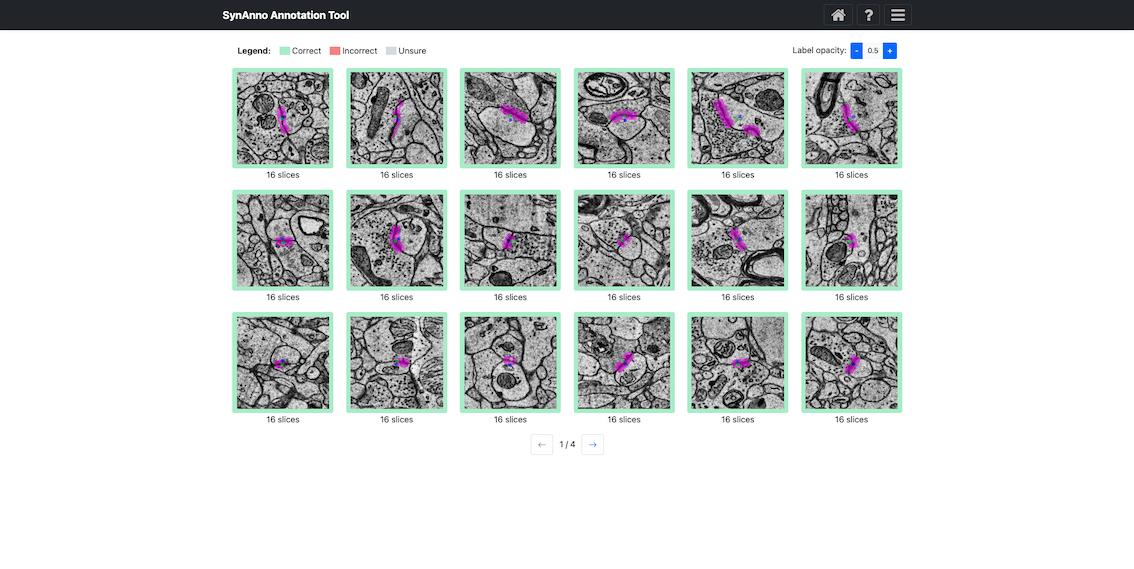
Clicking Start Data Proofread directs you to a grid view of instances. Instance status is indicated by color: correct (green), incorrect (red), unsure (yellow). Clicking on an instance changes its status: once for incorrect, twice for unsure, three times for correct.
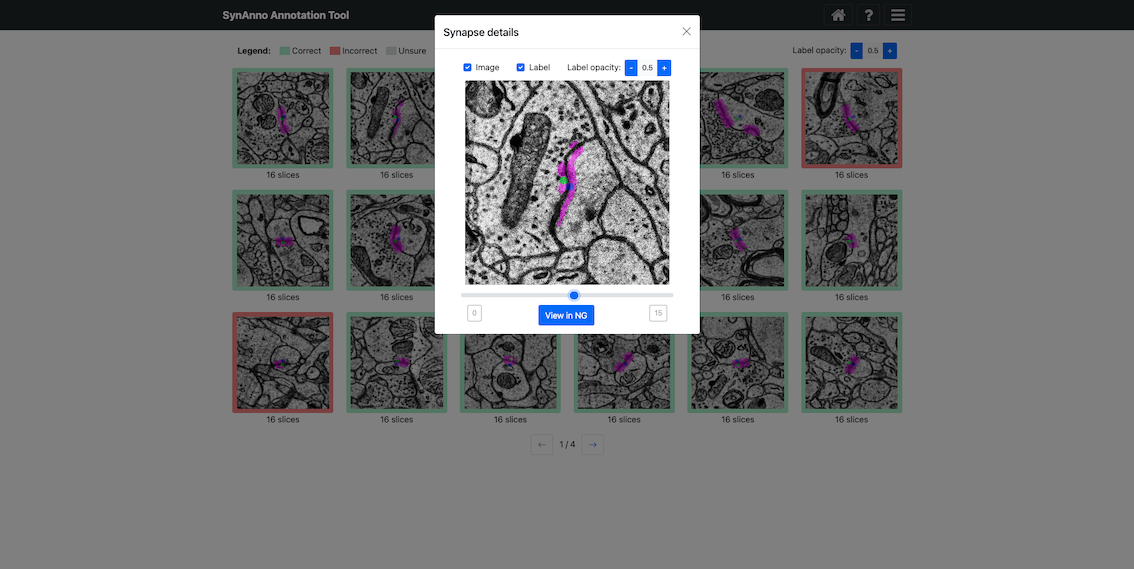
To inspect an instance's mask, right-click the instance to enlarge the patch and navigate through slices.
Click View in NG to view the instance in Neuroglancer.
At the end of each neuron compartment review in the Error Detection view, SynAnno prompts you to check for potential false negatives—synapses that were missed by the automated segmentation.
Clicking this button will:
- Open a Neuroglancer view centered on the currently reviewed neuron compartment.
- Allow you to navigate through the EM volume and inspect areas along the neurite where synapses might be missing.
- To mark a candidate false negative, place your cursor at the suspected location and press the
ckey. A yellow marker will appear. - Upon closing Neuroglancer, a review dialog will open where you can confirm or adjust the bounding box around the selected region.
Once confirmed:
- The new instance will be cropped and added to the list of synapse tiles.
- It will automatically be labeled as a false negative and routed to the Error Correction view for segmentation and marker annotation.
This structured addition of false negatives ensures complete compartment-level coverage and supports the recovery of missing synaptic annotations with minimal disruption to the proofreading workflow.
After evaluating the segmentation masks, click -> to load and evaluate the page. When done, click Error Processing to proceed to the Error Categorization view.
- Workflow: Proofreading
- URL: http://127.0.0.1:5000/categorize
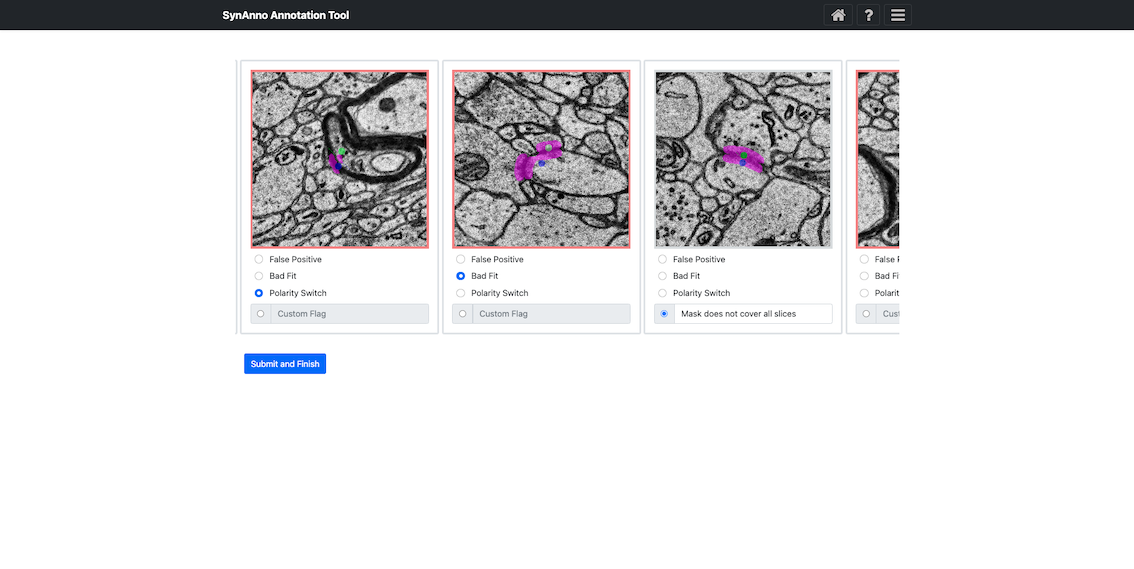
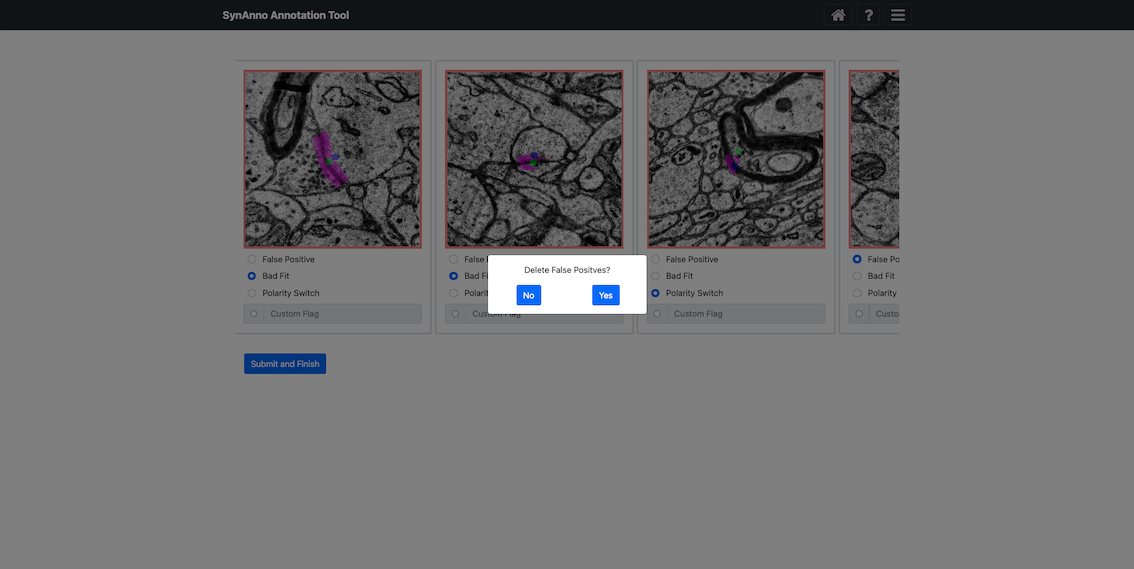
Clicking Error Processing brings you to the error categorization view. Here, you specify errors for instances marked as incorrect or unsure. Scroll downward to see all cards. Right-click to enlarge the patch, navigate through slices, or open Neuroglancer. When done, click Submit and Finish. Additionally, users can now edit or revise instance labels directly within this view.
If you marked instances as false positives, you'll be asked if they should be discarded.
- Workflow: Proofreading
- URL: http://127.0.0.1:5000/export_annotate
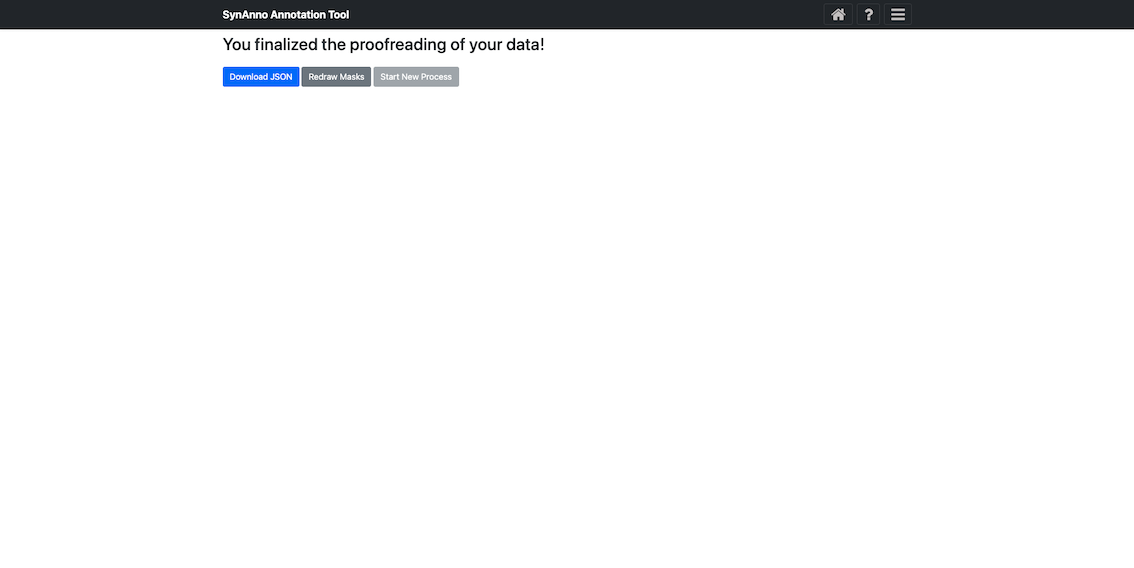
After clicking Submit and finish, you can download the JSON file containing instance metadata by clicking Download JSON, redraw masks with the Error Correction workflow by clicking Redraw Masks, or start a new process by clicking Start New Process.
- Revision Workflow
- URL: http://127.0.0.1:5000/draw
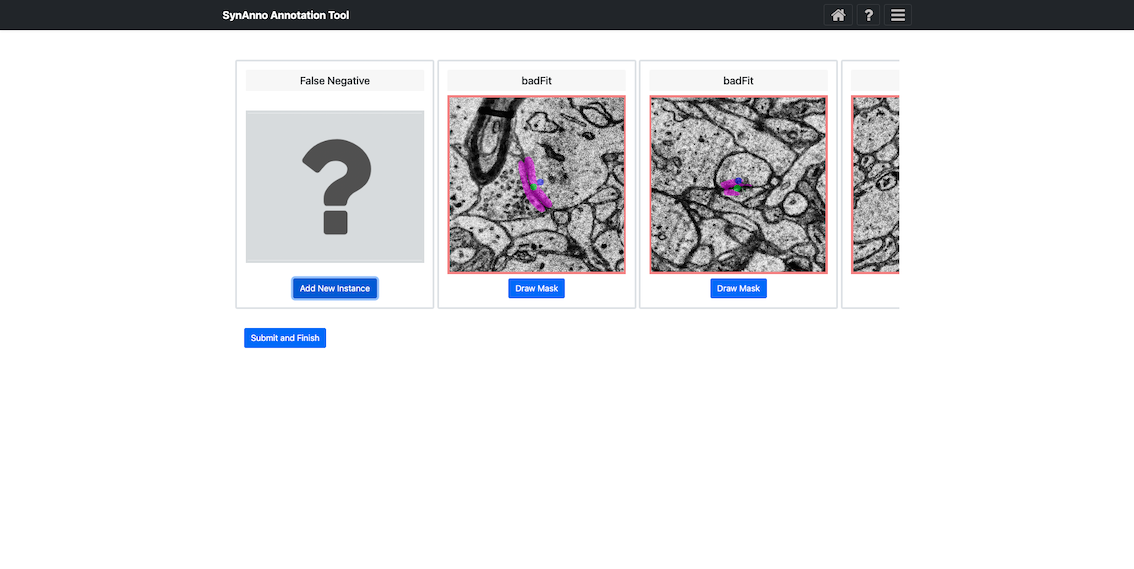
The Error Correction view is where users refine synaptic annotations by correcting segmentation masks, adjusting pre-/post-synaptic markers, and adding missed false negatives.
You can access this view in two ways:
- By clicking
Start Drawingfrom the Open Data view after choosing the Error Correction workflow on the landing page. - By selecting
Redraw Masksafter finishing the Error Categorization view in the Proofreading Workflow.
If you arrive from the Proofreading Workflow, you’ll see only the instances marked as incorrect or unsure during review and categorization. If you start from the Revision Workflow and load a JSON file, SynAnno will load all relevant instances either within the specified sub-volume or associated with the referenced neuron. If no JSON file is provided, SynAnno assumes all existing instances are correct, and only new false negatives can be added.
Selecting a any instance and clicking Draw Mask opens a dedicated mask editing view:
- Scroll through slices using the mouse wheel.
- Draw a segmentation mask on any slice using spline interpolation with intuitive control points.
- Click
Fillto generate the mask, or useReviseto erase and redraw portions of it. - Click
Saveto store your mask for that slice.
You can edit as many slices as necessary to cover the full 3D extent of the synapse.
To set synaptic polarity:
- Select a slice, click either
Pre-Synaptic CRDorPost-Synaptic CRD, then click the desired location to place the marker. - Markers can be placed on arbitrary slices and adjusted as needed.
If additional context is needed, click View in NG to open the current instance in Neuroglancer.
Once the window is closed, the most recently edited slice and its custom mask will appear in the instance overview.
To annotate synapses that were missed by the model:
- Click the
Add New Instancebutton to open a Neuroglancer view centered on the currently active neuron compartment. - Navigate to the suspected synapse location and press the
ckey to place a yellow marker. - Upon exiting Neuroglancer, a review module will appear where you can adjust the bounding box and slice range.
- Click
Saveto confirm and crop the new instance.
The instance will automatically be labeled as a false negative and added to your list of editable tiles for segmentation and marker placement.
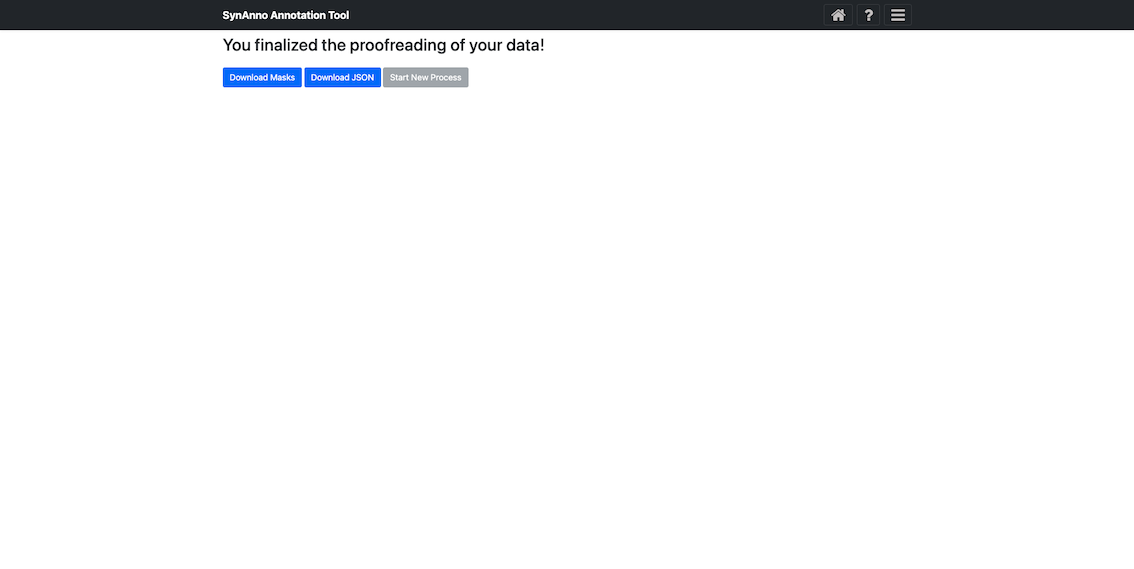
After correcting all segmentation masks and assigning pre- and post-synaptic coordinate markers, click the Submit and Finish button to proceed to the final Export Masks view.
In this view, you can download the JSON file containing the instances' metadata by clicking Download JSON, or download the segmentation masks as a numpy array or image by clicking Save Masks. The instance ID, bounding box, and slice number are encoded in the file names. If you want to start a new process, click Start New Process to return to the landing page.
Download SynAnno and unzip it into a folder of your choice. For the following we assume you've unzipped the folder under /home/user/SynAnno. You can either run SynAnno in a Docker container or set up a local environment.
Repository includes a Dockerfile that enables you to build and run the application in a Docker container to isolate it from your local setup. It ensures a consistent environment across different machines, simplifying deployment and avoiding potential configuration issues.
-
Install Docker: If you haven't already, install Docker on your machine.
-
Navigate to the project folder: Open a terminal and navigate to the folder containing the Dockerfile.
cd /home/user/SynAnno -
Build the Docker image: Build the Docker image using the provided Dockerfile.
docker build -t synanno/uwsgi -f Dockerfile_uwsgi . -
Run the Docker container: Run the Docker container using the image you just built.
docker run -d --name synanno -p 80:80 -p 9015:9015 synanno/uwsgi
-
Access the application: Open a web browser and go to
http://localhostto access the application running in the Docker container. -
Stop the Docker container: When you're done, you can stop the Docker container by pressing
Ctrl + Cin the terminal where the container is running or by running the following command:docker stop synanno
To set up SynAnno on your local machine, start by creating a fresh environment and installing the required packages using uv. The guide below provides an optimal setup using uv on macOS to manage a specific Python version and isolated environment.
Why Use uv?
- Isolation: Prevent dependency conflicts with isolated virtual environments.
- Reproducibility: Ensure consistent dependency versions.
- Performance:
uvoffers significantly faster dependency resolution and installation. - Simplified Python Version Management:
uvcan manage Python versions without requiringpyenv.
-
Install
uvusingpip:python -m pip install uv
If you installed uv but the command is not recognized, it may not be in your PATH.
-
Check if uv is installed:
python -m uv --version
If this works, uv is installed but not in your PATH. You'll need to add it manually. Alternative you can install uv using the official installer:
curl -LsSf https://astral.sh/uv/install.sh | sh
-
-
Ensure the correct Python Version is Installed:
- If you already use
pyenv, this is probably not the time to switch your Python version management tool.
pyenv install $(cat .python-version)
pyenv local $(cat .python-version)
- If you don't use
pyenv, you can install the required Python version usinguv:
uv python install $(cat .python-version) - If you already use
-
Navigate to your project folder:
cd /<path-to-repo>/SynAnno
-
Create and Activate the Virtual Environment with:
uv venv .venv --python $(cat .python-version)
source .venv/bin/activate
-
Install Dependencies:
uv pip install -e ."[seg,dev]"
SynAnno can be configured via environment variables or the .env file.
APP_IP=0.0.0.0
APP_PORT=5000From with in the repository (e.g. /home/user/SynAnno) start SynAnno using the following command:
python run.py
# the app is accessible at http://127.0.0.1/5000/To obtain some sample data from the H01 dataset to use in a SynAnno materialization table, run the following on the command line:
gsutil cp gs://h01-release/data/20210729/c3/synapses/exported/\* [PATH_TO_FOLDER]where [PATH_TO_FOLDER] is a directory on your machine to store raw data from H01.
Then, from your project folder run:
python ./backend/materialization_generation.py [PATH_TO_FOLDER] --output_csv_path [PATH_TO_STORE_MATERIALIZATION TABLE]where [PATH_TO_FOLDER] is as before and [PATH_TO_STORE_MATERIALIZATION TABLE] is where you wish to store your materialization of the raw H01 data.
The file stored at [PATH_TO_STORE_MATERIALIZATION TABLE] is a valid materialization table to use with SynAnno. For an example run through of the app, use the following URLs on SynAnno's 'Open Data' view:
- source: gs://h01-release/data/20210601/4nm_raw
- target: gs://h01-release/data/20210729/c3/synapses/whole_ei_onlyvol
- neuropil: gs://h01-release/data/20210729/c3/synapses/whole_ei_onlyvol
- materialization: [PATH_TO_STORE_MATERIALIZATION TABLE]
Pre-submission, we ask you to only create issues for bugs, feature requests, or questions about the code. After submission, we strongly encourage any kind of contribution, including bug fixes, additional features, and documentation improvements. If you're unsure about whether a contribution is appropriate, feel free to open an issue and ask.
For members of the VSC, please set up pre-commit hooks to ensure that your code adheres to our coding style. This will prevent you from committing code that doesn't follow our style guidelines and subsequent failing PRs. To set up pre-commit hooks, run the following command in the root of the SynAnno repository.
pre-commit installYou can manually run pre-commit on all the files in your repository by running:
pre-commit run --all-filesNow, whenever you try to commit changes to your repository, pre-commit will automatically run all hooks. If any problems are found, the commit will be prevented until you fix them.
