godfs provides out-of-the-box usage and friendly support for docker,
You can pull the image on docker hub: https://hub.docker.com/r/hehety/godfs/
- Fast, lightweight, stable, out-of-the-box, friendly api.
- Easy to expand, Stable to RUN.
- Low resource overhead.
- Native client api and java client api(not started).
- API for http upload and download.
- Support file breakpoint download.
- Support basic verification by http download.
- Clear logs help troubleshoot errors.
- Support different platforms: Linux, Windows, Mac
- Better support docker.
- File fragmentation storage.
- Perfect data migration solution.
- Support readonly node.
- File synchronization in same group.
Please install golang1.8+ first!
Take CentOS 7 as example.
yum install golang -y
git clone https://github.com/hetianyi/godfs.git
cd godfs
./make.sh
# on windows you just need to click 'make.cmd'
After the build is successful, three files will be generated under the ./bin directory:
./bin/client
./bin/storage
./bin/tracker
Install godfs binary files to /usr/local/godfs:
./install.sh /usr/local/godfsYou can start tracker server by:
/usr/local/godfs/bin/tracker [-c /your/tracker/config/path]and start storage node by:
/usr/local/godfs/bin/storage [-c /your/storage/config/path]then you can using command client directly in command line to upload and download file.
Of course, you must first set up the tracker server.
# set up tracker servers for client
client --set "trackers=host1:port1[,host2:port2]"
For example:
# upload a file
client -u /you/upload/file
You can upload file by:
client -u /f/project.rarIf you want to upload file to specified group, you can add parameter -g <groupID> in command line.
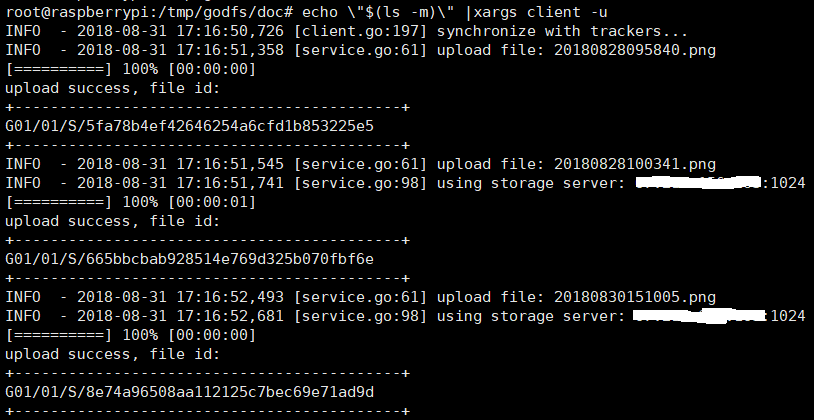
also, it's cool that you can upload all files in a directory by:
echo \"$(ls -m /f/foo)\" |xargs client -uif you don't has a godfs client, you can use curl to upload files by:
curl -F "file=@/your/file" "http://your.host:http_port/upload"if upload success, server will return a json string like this:
{
    "status":"success",
    "formData":{
        "data":[
            "G01/01/M/826d552525bceec5b8e9709efaf481ec"
        ],
        "name":[
            "mike"
        ]
    },
    "fileInfo":[
        {
            "index":0,
            "fileName":"mysql-cluster-community-7.6.7-1.sles12.x86_64.rpm-bundle.tar",
            "path":"G01/01/M/826d552525bceec5b8e9709efaf481ec"
        }
    ]
}
The
formDatacontains all parameters of your posted form, the file will be replaced by a remote path. If you want to upload file to specified group, you can add parameter?group=<groupID>to the request path.
# download a file as 123.zip
client -d G01/10/M/2c9da7ea280c020db7f4879f8180dfd6 -n 123.zipcd godfs/docker
docker build -t godfs .It is highly recommended to use docker to run godfs. You can pull the docker image from docker hub:
docker pull hehety/godfsstart tracker using docker:
docker run -d -p 1022:1022 --name tracker --restart always -v /godfs/data:/godfs/data --privileged -e log_level="info" hehety/godfs:latest trackerstart storage using docker:
docker run -d -p 1024:1024 -p 80:8001 --name storage -v /godfs/data:/godfs/data --privileged -e trackers=192.168.1.172:1022 -e bind_address=192.168.1.187 -e port=1024  -e instance_id="01" hehety/godfs storage
# you'd better add docker command '-e port=1024' on single machine.
we're here using directory /godfs/data to persist data, you can use -e in docker command line to override default configuration.
client usage:
-u string
    the file to be upload, if you want upload many file once, quote file paths using """ and split with ","
    example:
    client -u "/home/foo/bar1.tar.gz, /home/foo/bar1.tar.gz"
-d string
    the file to be download
-l string
    custom logging level: trace, debug, info, warning, error, and fatal
-n string
    custom download file name
--set string
    set client config, for example:
    client --set "tracker=127.0.0.1:1022"
client --set "log_level=info"| Name | Value |
|---|---|
| OS | CentOS7 |
| RAM | 1GB |
| CPU core | 1 |
| DISK | 60GB SSD |
Generate 500w simple files, the file content is just a number from 1 to 5000000. and they were uploaded in 5 different threads by curl command(http upload).
The test took 41.26 hours with not a single error which means 33.7 files uploaded per second.
The CPU usage of the host in the test was kept at 60%-70%, and the memory consumed by the tracker and storage were both less than 30M.
The test and one tracker server, one storage server are on the same machine. This test shows that godfs has no problem in handling large concurrent (for file system) uploads and database writes, and the system performs very stable.
Test tool is available in release page. and I will do more test in the future.


